UV/图像编辑器
章节大纲
-
Blender’s UV/Image Editor window serves a number of related purposes:
::混合器的UV/图像编辑器窗口有多个相关目的:-
It is a place to view rendered images, and save them to files.
::它们可以显示染图像,并将其保存到文件中. -
It is a place to view and edit images being used as textures.
::它是一个视图和编辑图像的位置, -
It is a place to perform
UV mapping
of meshes to texture images.
::这是一个将网格进行紫外线映射到图像纹理的场所.
In the window header, you will see “View” and “Image” menus, followed by a menu for choosing which image to view. The rest of the window header varies depending on your choice from this last menu.
::在窗口头部,您将看到"查看"和"图像"菜单,然后选择要查看的图像.窗口头部的其余部分取决于您在最后一个菜单中的选择.Viewing Render Results
::查看染结果
Here is what the variable part of the window header looks like when you choose the special “Render Result” entry in the image-selection menu. The next menu, showing the word “View”, serves no useful purpose in this case (it is only applicable to editable images, not the render result). Next to that is a Slot menu, allowing you to select from any of 8 numbered slots. Each slot can hold a separate Render Result image. This is handy for trying out different render settings (e.g. quality etc), and quickly flip between them for comparison. You can also use the keyboard shortcuts 1KEY .. 8KEY to switch slots. When you perform a render, the generated image is put into the slot you are currently viewing in the UV/Image Editor.
::在图像选择菜单中选择特殊的"Render Result"项时,窗口头部的可变部分是这样的.下一个菜单显示"View"这个词在这种情况下没有任何有用的用途 (它只适用于可编辑的图像,而不是染结果).旁边是一个Slot菜单,允许您从任何8个编号的槽中进行选择.每个槽可以保存一个单独的染结果图像.这对于尝试不同的染设置 (例如质量等) 很方便,并快速翻转它们进行比较.您还可以使用键盘快捷键1KEY .. 8KEY切换槽.当您执行染时,生成的图像将被放入您正在UV/图像编辑器中查看的槽中.The next two menus, showing “RenderLayer” and “Combined” in the above screenshot, allow you to view different render layers and render passes, if you have more than one of these configured in the render settings, as well as the final compositor result.
::接下来的两个菜单,在上图显示的RenderLayer和Combined,允许您查看不同的染层和染通道,如果您在染设置中配置了多个染层,以及最终的作曲器结果.The rightmost group of four icons make a further breakdown of the image into RGB channels with/without alpha transparency layer, alpha on its own, and Z (depth) buffer on its own. Alpha transparency only matters if you are rendering a transparent background in place of the sky, as discussed later .
::最右边的四个图标组将图像进一步分解为具有/没有α透明层的RGB频道,单独的α,单独的Z (深度) 缓冲.如下所述,如果您正在染透明背景而不是天空,则α透明度才重要.
What you see is what you save. When saving an image to a file, the saved image will correspond—choice of slot, layer and pass—to what you are currently viewing on-screen.
::您所看到的就是您所保存的. 当将图像保存到文件中时, 保存的图像将与您正在屏幕上查看的内容相匹配.Viewing/Editing Texture Images
::查看/编辑纹理图像
Here is what the variable part of the window header looks like when you select some other image, or create a new one. Now the editing-context menu
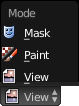 becomes useful: selecting the “Paint” item lets you paint on the image.
::当您选择其他图像或创建新图像时,窗口头部的可变部分是这样的.现在编辑上下文菜单变得有用:选择"绘画"项可以让您在图像上绘制.Note the rightmost group of icons in the header has shrunk slightly: there is no more Z-buffer option, though the alpha-related options still exist.
::注意,标题中的最右边的图标组略微缩小了:没有更多的Z缓冲区选项,尽管与alpha相关的选项仍然存在.UV Mapping
::超紫外线映射
Here is what the variable part of the window header looks like when you select a texture image, and go into Edit mode on a mesh in the 3D View window.
::在3D视图窗口中, 在网格上进入编辑模式.
-
It is a place to view rendered images, and save them to files.