锐化和模糊
章节大纲
-
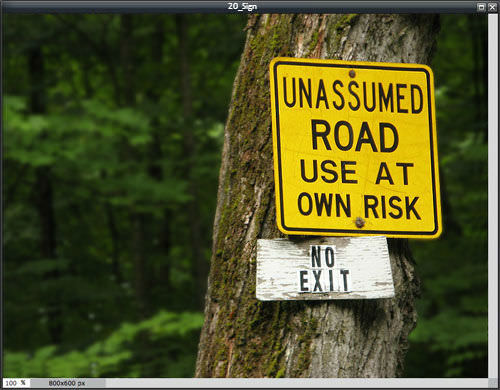
In this lesson, you'll use the image, "20_Sign.jpg." Before continuing, click on the Resources tab and download the image.
::在此课中, 您将使用图像“ 20_ Sign. jpg ” 。 在继续之前, 请点击资源标签并下载图像 。
The Sharpen and Blur tools do exactly what you’d expect, sharpen and blur specific areas of an image.
::Sharpen 和 Blur 工具完全照你预期的做, 磨亮和模糊图像的具体区域。Open the image “20_Sign.jpg” in Pixlr Editor. The lettering and edge of the signs are a little blurry and the forest in the background is fairly clear. You’re going to make the sign sharper and the forest blurred. This will give an appearance depth, with the sign popping out against the blurred background.
::在 Pixlr 编辑器中打开图像“ 20_ Sign.jpg ” 。 符号的字母和边缘有点模糊,背景中的森林也相当清楚。 你会把符号更锐利,森林更模糊。 这将给人一个外观深度, 标志在模糊的背景中弹出。
Click on the Sharpen tool in the Tools panel.
::点击工具面板中的 Sharpen 工具 。
The edges of each sign should be sharp. If you use a feathered edge brush, you'd need to rub outside of the sign edges to apply the effect. This would also apply it to some of the background. This time, you'll use a sharp edge brush.
::每个标志的边缘都应该是尖的。 如果您使用羽毛边缘的刷子, 您需要擦出符号边缘以应用效果。 这也会应用到某些背景。 这次, 您将使用尖锐的边刷子 。-
Set
the brush size to 30
with sharp edges.
::将刷子的大小设为30, 有尖锐的边缘。 -
Rub the
Sharpen
t
ool inside the edges of each sign.
::在每个标志的边缘 擦擦Sharpen工具。 -
Reset
the brush size to 100 with feathered edges,
and rub across the middle areas of each sign. This sharpens both signs.
::将刷子的大小重置为100, 带羽毛边, 并擦过每个标志的中间区域。 这能磨断两个标记 。
Click on the Blur tool in t he Tools panel.
::单击“工具”面板中的模糊工具。
Like the edges of the signs you just edited, you want a distinct edge where the forest in the background meets the tree and sign in the foreground.
::就像你刚刚编辑的标志的边缘, 你想要一个明显的边缘, 在背景中的森林与树相匹配, 在前景中签名。-
Set the brush size to 200 with a sharp edge.
::将刷子的大小设为200, 并有尖锐的边缘 。 -
Rub the tool several times across the forest to the left of the tree, making sure not to touch the tree.
::将工具擦过森林几次到树左侧, 确保不要碰树。 -
Reset the brush to 100, and rub the tool across the forest to the right of the tree, making sure not to touch the signs or tree.
::将刷子重置为100, 将工具擦过森林到树右侧, 确保不要触碰标志或树 。
In the finished image, the signs stand out sharply while the forest is blurred giving a feeling of depth.
::在最后的图像中,标志明显突出,而森林则模糊不清,给人一种深度的感觉。
Save and share the Sharpen- and Blur -adjusted image with your teacher, and be prepared to discuss how it shows what you’ve learned.
::与老师分享Sharpen和Blurr调整后的图像, 并准备讨论该图像如何显示你学到的东西。
RECORD YOUR FINDINGS
::记录你的调查结果-
What does the
Sharpen
tool do? The
Blur
tool?
::Sharpen工具是做什么的? -
How is the feathered edge brush different from the sharp edge brush?
::羽毛边刷和锋利边刷有什么不同? -
Why would you want a feathered edge brush for some edits and a sharp edged brush for other edits?
::你为什么想要一个羽毛边刷子 来做一些编辑 和尖锐边刷子 来做其他编辑?
-
Set
the brush size to 30
with sharp edges.