4.3 克隆立体印章
Section outline
-
In this lesson, you'll reuse the image, "14_Selfie.jpg." If you don't have it saved in its unedited version from the previous lesson, you can download it again as "14_Selfie2.jpg." You'll also use the image, "15_Friends2.jpg." Before continuing, click on the Resources tab and download these images.
::在此课中, 您将重新使用图像“ 14_ selfie. jpg ” 。 如果您没有在未编辑的版本中保存上一个课, 您可以再次下载“ 14_ selfie2. jpg ” 。 您还将使用图像“ 15_ Friendds2. jpg ” 。 在继续之前, 请点击资源标签并下载这些图像 。
If there is a change of coloring or some distraction too close to a spot, the Spot Heal tool won’t work. Another tool, the Clone Stamp tool, can do what the Spot Heal tool does... and more.
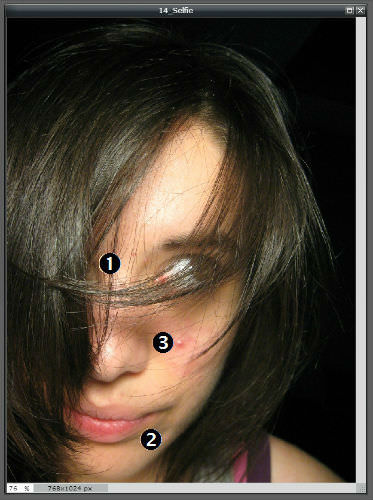
::如果色彩变化或某些分心过于接近某一点,那么“点心治疗”工具就行不通。 另一种工具 — — 克隆人施坦普工具 — — 可以做“点心治疗”工具所做的更多事情。Again, you’ll remove the three spots of acne from young woman's face. When you tried for fix spot 3 using the Spot Heal tool, you found that the hair next to the spot interfered with the tool using the surrounding area to blend on the spot. The Clone Stamp tool works differently. It copies from one area of the image and “clones” that area to the part you want to fix.
::再次,你会从年轻女性的脸上去除三点。 当你试图使用点心治疗工具来修补第3点时,你发现该点旁边的头发干扰了使用周围区域混合的工具。 克隆施坦普工具工作方式不同。 它从图像的一个区域复制图像的“ 区域” 到您想要修补的部分的“ 区域 ” 。Open the unedited image “14_Selfie.jpg” or "14_Selfie2.jpg" in Pixlr Editor. First, you’ll fix spot 1 to get to know how the Clone Stamp tool works.
::打开 Pixlr 编辑器中的未经编辑的图像“ 14_ selfie. jpg ” 或“ 14_ selfie2. jpg ” 。 首先, 您将修补第1点, 以便了解 Clone Stamp 工具是如何工作的 。
Click on the Clone Stamp tool in the Tools Palette.
::点击“ 工具调色板” 中的克隆印章工具 。
Select a brush size. 15 with feathered edges is good for this fix. The feathered edges help to blend with the existing image.
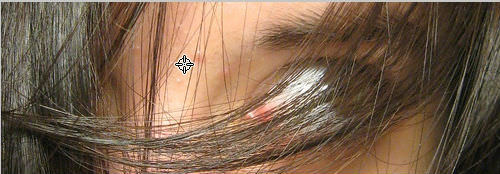
::选择刷子大小 。 15 带羽毛边缘的15 有助于此修正。 羽毛边缘有助于与现有图像混合 。Since the Clone Stamp tool clones from one area to another, you need to set the clone-from point. Find an area with similar coloring and brightness near the spot to fix, hold down the Control key (WIN) or Command [Apple] key (MAC), and click to set the clone-from point.
::自克隆树枝工具从一个区域复制到另一个区域后,您需要从一个点设置克隆。在点附近找到一个颜色和亮度相似的区域来修正、按住控制键(WIN)或命令[Apple]键(MAC),并单击来设置克隆。
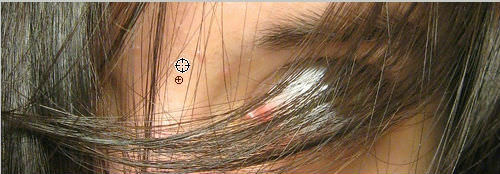
Then, move the cursor over the spot to fix, and click (or rub) the spot. You’ll see the clone-from point and clone-to point. The Clone Stamp tool is copying the clone-from area and applying that to the clone-to point.
::然后,将光标移到原点上进行修正,然后单击(或擦拭)原点。你会看到从点到点的克隆。 克隆Stamp 工具正在复制从区域复制的克隆, 并将它应用到克隆到点 。
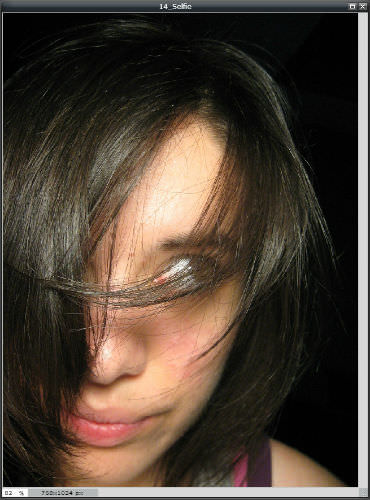
Now, try fixing spots 2 and 3. Coloring and brightness is important for a natural look. You may need to undo (History window) and try a couple of clone-from points before you’re happy with the results. Experiment with different brush sizes. You may also want to experiment with the Clone Stamp tool's opacity setting. 100% opacity completely covers the clone-to area with the clone-from area. Lowering the opacity blends the clone-to area with the clone-from area by making the clone-from area's content somewhat transparent (depending on the opacity percentage). Cloning at 50-65% opacity can work well if the clone-from area is a little too light or dark. For a little more practice, fix the pimple just above the lips.
::现在,尝试固定点2和3。 颜色和亮度对于自然外观很重要。 您可能需要撤销( 历史窗口) , 并在您对结果满意之前尝试几处从点开始的克隆。 尝试不同的刷子大小 。 您也可以尝试使用克隆Stamp 工具的不透明设置。 100%的不透明性完全覆盖了克隆到从区域到克隆的区域。 降低不透明将克隆到区域与从区域从克隆混杂在一起, 使克隆从区域的内容变得比较透明( 取决于不透明的百分比 ) 。 50%到65%的克隆不透明性如果来自区域的克隆太亮或太暗, 可以很好地工作。 稍多一点练习, 修正嘴唇上的小点。The final results should look something like this.
::最终结果应该看起来是这样的。
Save this Clone Stamp -adjusted image for later.
::将此克隆调整后的图像保存到日后 。
Now, here’s a REAL Clone Stamp tool challenge for you!
::现在,这是你面临的一个真正的克隆史坦普工具挑战!Open the image “15_Friends2.jpg” in Pixlr Editor. Your mission is to remove the blue blur from the girl on the left.
::在 Pixlr 编辑器中打开图像“ 15_ Friends2.jpg ” 。 您的任务是清除左边女孩的蓝色模糊 。
You may need to set clone-from points many times for the hair and background, change brush sizes for larger areas and details, change opacity %, and even clone some hair from the girl on the right to the one on the left.
::您可能需要为毛发和背景设定多次的克隆点, 更改大区域和细节的刷子大小, 改变不透明%, 甚至克隆一些女孩从右到左的头发 。See how close you can get to this version.
::看你能有多接近这个版本
Save this Clone Stamp -adjusted image. Share both Clone Stamp -adjusted images with your teacher, and be prepared to discuss how they show what you’ve learned.
::保存此克隆人 Stamp 调整后的图像。 与您的老师共享两个克隆人 Stamp 调整后的图像, 并准备讨论它们如何显示您学到的东西 。RECORD YOUR FINDINGS
::记录你的调查结果-
How does the Clone Stamp tool work?
::克隆邮票工具如何运作? -
How is the
Clone Stamp
tool different from the
Spot Heal
tool?
::Clone Stamp 工具与 Spot Heal 工具有何不同? -
How do different brush sizes, clone-from set points, and opacity % help you blend from one area of an image to another?
::不同的刷子大小、 从设定点的克隆和不透明% 如何帮助您从图像的一个区域混入到另一个区域?
-
How does the Clone Stamp tool work?