4.5 海绵
Section outline
-
In this lesson, you'll use the images, "17_BabyCheeks.jpg" and "18_Red.jpg." Before continuing, click on the Resources tab and download these images.
::在此课中, 您将使用图像, “ 17_ babyCheeks. jpg ” 和 “ 18_ Red. jpg ” 。 在继续之前, 请点击资源标签并下载这些图像 。
The Sponge tool is used to saturate (increase) or desaturate (decrease) the intensity of color in specific areas of an image.
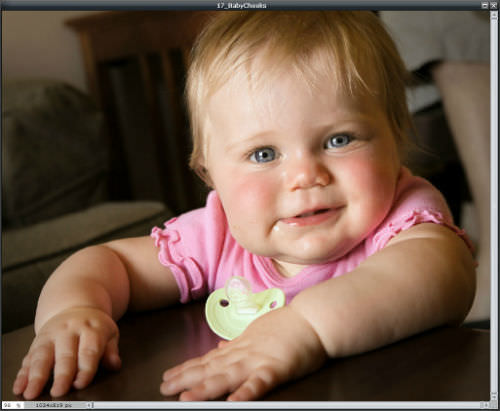
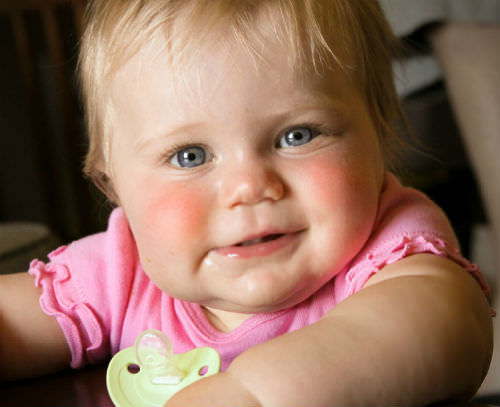
::海绵工具用于图像特定区域颜色强度的饱和(增加)或饱和(减少)。Open the image “17_BabyCheeks.jpg” in Pixlr Editor. In this image, the baby's rosey cheeks, yellow pacifier, and pink top are too pale and need more color. The rest of the image is fine, so you'll only edit those areas.
::打开 Pixlr 编辑器中的图像“ 17_ babyCheeks.jpg ” 。 在此图像中, 婴儿的玫瑰脸颊、 黄色奶嘴和粉色顶部太苍白, 需要更多颜色。 其余的图像都很好, 所以您只能编辑这些区域 。
Click on the Sponge tool in the Tools panel.
::点击工具面板中的海绵工具 。-
Set the brush size to 100 with feathered edges for the cheek on the right and 150 with feathered edges for the cheek on the left, the pacifier, and the top.
::将刷子大小设定为100个,右面部有羽毛边缘,右面部150个,左面部有羽毛边缘,奶嘴和顶部有羽毛边缘。 -
Choose
Saturate
from the
Mode
drop-down menu, and set the
Strength
to around 8.
::从模式下拉菜单中选择饱和度, 并将强度设置为 8 左右 。 -
Click and rub the Sponge tool over one of the areas that need more saturation.
::单击海绵工具,在需要更多饱和度的区域之一上擦擦。 -
You will have to repeat use of the tool on the other areas until the image looks the the way you want.
::您必须在其它区域重复使用该工具,直到图像看起来如您所希望的那样。 -
If you set the strength too high or use the tool too much, the results won’t look natural.
::如果将强度定得太高或使用太强, 结果就显得不自然。 -
If you don’t like some or all of what you’ve done, you can use the
History
panel to undo, so it’s better to work in many short applications rather than one long application.
::如果你不喜欢自己所做的一些或所有事情, 你可以利用历史面板来撤销, 所以在很多短的应用程序中工作更好, 而不是一个长的应用程序 。
The finished face should look like this.
::完蛋的表情应该像这个样子Save your Saturate -edited image for later.
::将您的饱和编辑图像保存到日后 。
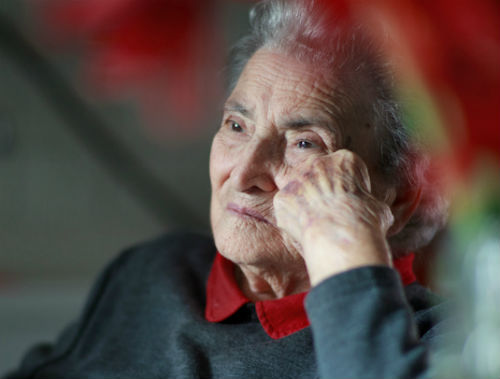
Now, open the image 18_Red.jpg” in Pixlr Editor. In this image, the red of the shirt collar and red, blurred areas are too intense. You'll need to desaturate them.
::现在, 打开 Pixlr 编辑器中的图像 18_Red.jpg 。 在这个图像中, 衬衫领的红色和红色的模糊区域太强烈。 您需要去饱和它们 。
Again, choose the Sponge tool.
::再次选择海绵工具。-
Set the brush size to around 50 with feathered edges for the red collar right and then around 200 with feathered edges for the red, blurred red areas.
::将刷子的大小设定在50左右,红领右侧有羽毛边,红、模糊的红区域则在200左右,红、模糊的红区域则有羽毛边。 -
Choose
Desaturate
from the
Mode
drop-down menu, and set the
Strength
between 15-25.
::从模式下拉菜单中选择去饱和度, 并将强度设定在 15- 25 之间 。 -
Click/rub first on the collar with the smaller brush and then on the red blurs with the larger brush.
::先用小刷子在领子上单击/灌木,然后用大刷子在红模糊上单击/灌木。
When you are finished, the image should look like this.
::当完成时, 图像应该像这个样子 。Save the Desaturate -adjusted image.
::保存不饱和调整后的图像。Share both Sponge -adjusted images (Saturate and Desaturate) with your teacher, and be prepared to discuss how they show what you’ve learned.
::与老师分享海绵调整后的图像(饱和和和减饱), 并准备讨论它们如何显示你学到的东西。
RECORD YOUR FINDINGS
::记录你的调查结果-
What is the difference between
Saturate
and
Desaturate
?
::饱和和与去饱和之间有什么区别? -
What does the tool's
Mode
drop-down menu do?
::该工具的“ 模式下拉菜单” 做什么 ? -
How is the
Sponge
tool different from the
Adjustment
menu's
Hue & Saturation
?
::海绵工具与调整菜单的色调和饱和度有何不同?
-
Set the brush size to 100 with feathered edges for the cheek on the right and 150 with feathered edges for the cheek on the left, the pacifier, and the top.