4.6 烧灼和躲避
章节大纲
-
In this lesson, you'll use the image, "19_ManLeaning.jpg." Before continuing, click on the Resources tab and download the image.
::在此课中, 您将使用图像“ 19_ ManLeaning. jpg ” 。 在继续之前, 请点击资源标签并下载图像 。
The terms "burn" and "dodge" come from developing pictures from film cameras. Burn darkens the image and dodge lightens the image. In digital image editing, the Burn and Dodge tools darken and lighten specific areas of an image.
::“ 烧灼和躲避来自从电影摄像头中制作图片。 烧暗图像并避开图像。 在数字图像编辑中, Burn 和 Dodge 工具暗淡了图像的具体区域, 并照亮了图像的具体区域 。Open the image “19_ManLeaning.jpg” in Pixlr Editor. Some areas of the image are too bright (highlights) - sunny side of the face, hair, arm above the elbow, and closest hand. Other areas are too dark (shadows) - shadowed side of the face and chin.
::在 Pixlr 编辑器中打开图像“ 19_ ManLaining. jpg ” 。 图像的有些区域太亮( 亮光) : 脸部的阳光、 头发、 手肘上的手臂和手最接近的一面。 其它区域太暗( 阴影) —— 脸部和下巴的阴影 。
Start by darkening the highlights. Click on the Burn t ool in the Tools p anel.
::单击工具面板中的 Burn 工具 。- Since the areas that are too bright are highlights, select Highlights from the Range drop-down menu.
::由于亮度太高的区域是亮点, 请从“ 区域下拉” 菜单中选择亮点 。
- Use the brush size slider at the bottom of the brush size selection window to set the brush size to around 50 with feathered edges.
::使用在刷子大小选择窗口底部的刷子大小滑动器,将刷子大小设置在50个左右,加上羽毛边缘。
- The Burn tool is very powerful, and can easily have too much effect, so set the Exposure between 7-10. If you want to see what happens with higher settings, try them. You can always use the History panel to undo any undesired changes.
::刻录工具非常强大, 并且很容易产生太多效果, 所以将曝光时间设置在 7- 10 之间 。 如果您想要看到更高设置发生什么, 请尝试它们 。 您总是可以使用历史面板来取消任何不想要的更改 。
- Click and rub the Burn tool on the areas that are too bright - sunny side of the face, hair, arm above the elbow, and closest hand .
::点击并擦擦烧伤工具在太亮的地区 - 阳光的面部, 头发,手臂在肘部以上, 和最接近的手。
Now, you’ll lighten some shadows. Click on the Dodge tool in the Tools panel.
::点击工具面板中的道奇工具 。- Select Shadows from the Range drop-down menu.
::从“区域下拉”菜单中选择阴影。
- Set the brush size to around 50 with feathered edges.
::将刷子大小设为50个左右,有羽毛边缘。
- Set the Exposure between 7-10.
::设定在 7 -10 之间照射 。
- Click and rub the Dodge tool on the dark, shadowed side of the face and chin . This will lighten and soften these areas.
::点击并擦擦道奇工具在黑暗中, 面部和下巴的影子。 这将减轻和软化这些区域 。
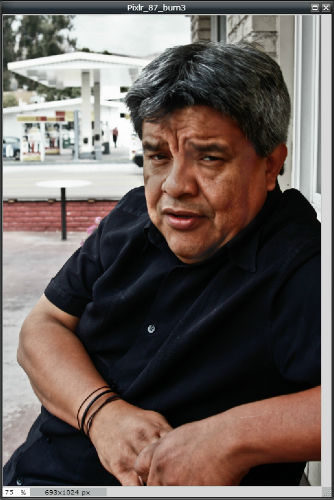
The edited image should look close to this.
::经过编辑的图像应该与此相近 。
Save and share the Burn- and Dodge -adjusted image with your teacher, and be prepared to discuss how it shows what you’ve learned.
::并准备讨论如何展示你学到的东西。
RECORD YOUR FINDINGS
::记录你的调查结果- What does the Burn tool do? The Dodge tool?
::烧烤工具是做什么的?
- How are these tools different from using adjustments like Brightness & Contrast , Levels , or Curves ?
::这些工具与使用布亮度和对比度、级别或曲线等调整有何不同?
- Since the areas that are too bright are highlights, select Highlights from the Range drop-down menu.