2.3 用于翻译的几何软件-interactive
章节大纲
-
Translation with Grid
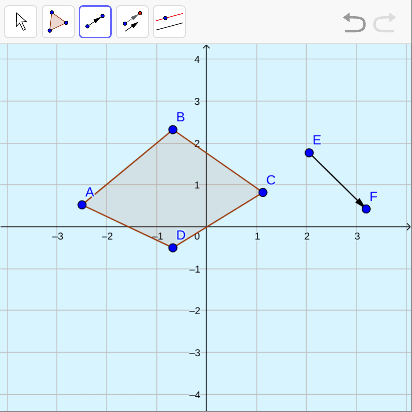
::用网格翻译Recall that a translation is one example of a rigid transformation . A translation moves each point in a shape a specified distance in a specified direction as defined by a vector. Below, the has been translated along vector to create new parallelogram (the image).
::回顾翻译是僵硬变换的一个例子。 翻译将每个点以一个形状以指定距离在矢量定义的指定方向移动。 以下, ABCD 已被按照矢量 v 翻译, 以创建新的平行图 AB_C_D}( 图像) 。
Translation Without a Grid
::无网格翻译When you are working on a grid (or graph paper), performing translations is relatively easy. In the parallelogram translation , you can see that the vector moves each point one unit up and three units to the right. To perform the translation, just move each point that defines the parallelogram one unit up and three units to the right. W hat if the grid is not there? Then, it is not as easy to describe the translation because there are no grid lines as a guide.
::当您在网格(或图形纸)上工作时,翻译相对容易。在平行图解翻译中,您可以看到矢量将每个点一单位向上移动,然后将三个单位向右移动。要进行翻译,请将每个点向上移动,然后将每个点向右移动,将平行图图一单位向上移动,然后将三个单位向右移动。如果网格不在那里,则会怎样?然后,由于没有网格线作为指南,将翻译描述起来并不容易,因为没有网格线作为指南。To perform a translation without a grid , you need to:
::要进行没有网格的翻译, 您需要 :-
Find lines
parallel
to the vector through each of the points that define the shape.
::通过定义形状的每个点查找与矢量平行的线条。 -
Move the length of the vector along each of those lines.
::沿着这些线条移动矢量的长度。
Doing this by hand requires careful construction of parallel lines and copying of line segments. Geometry software simplifies this process, because it commonly has a "translate” tool.
::要亲手完成这项工作,需要仔细建造平行线条和复制线段。几何软件简化了这一过程,因为它通常有一个“翻译”工具。
Translation using Geometry Software
::使用几何软件翻译The interactive below is an example of geometry software that is free to download. The process is detailed step-by-step with pictures just below the interactive.
::下面的交互式是可自由下载的几何软件的一个实例。该过程是详细的一步一步的,图片就在互动下方。In summary, you will:
::总之,你将:-
Create a
polygon
with the shape tool (button with a picture of a triangle)
::用形状工具创建多边形( 带有三角形图片的按钮) -
Create a vector with the vector tool (button with an arrow between two points)
::使用矢量工具创建矢量( 以箭头在两点之间键盘) -
Translate the polygon with the translate tool (button with two parallel arrows)
::用翻译工具翻译多边形( 用两个平行箭头按钮)
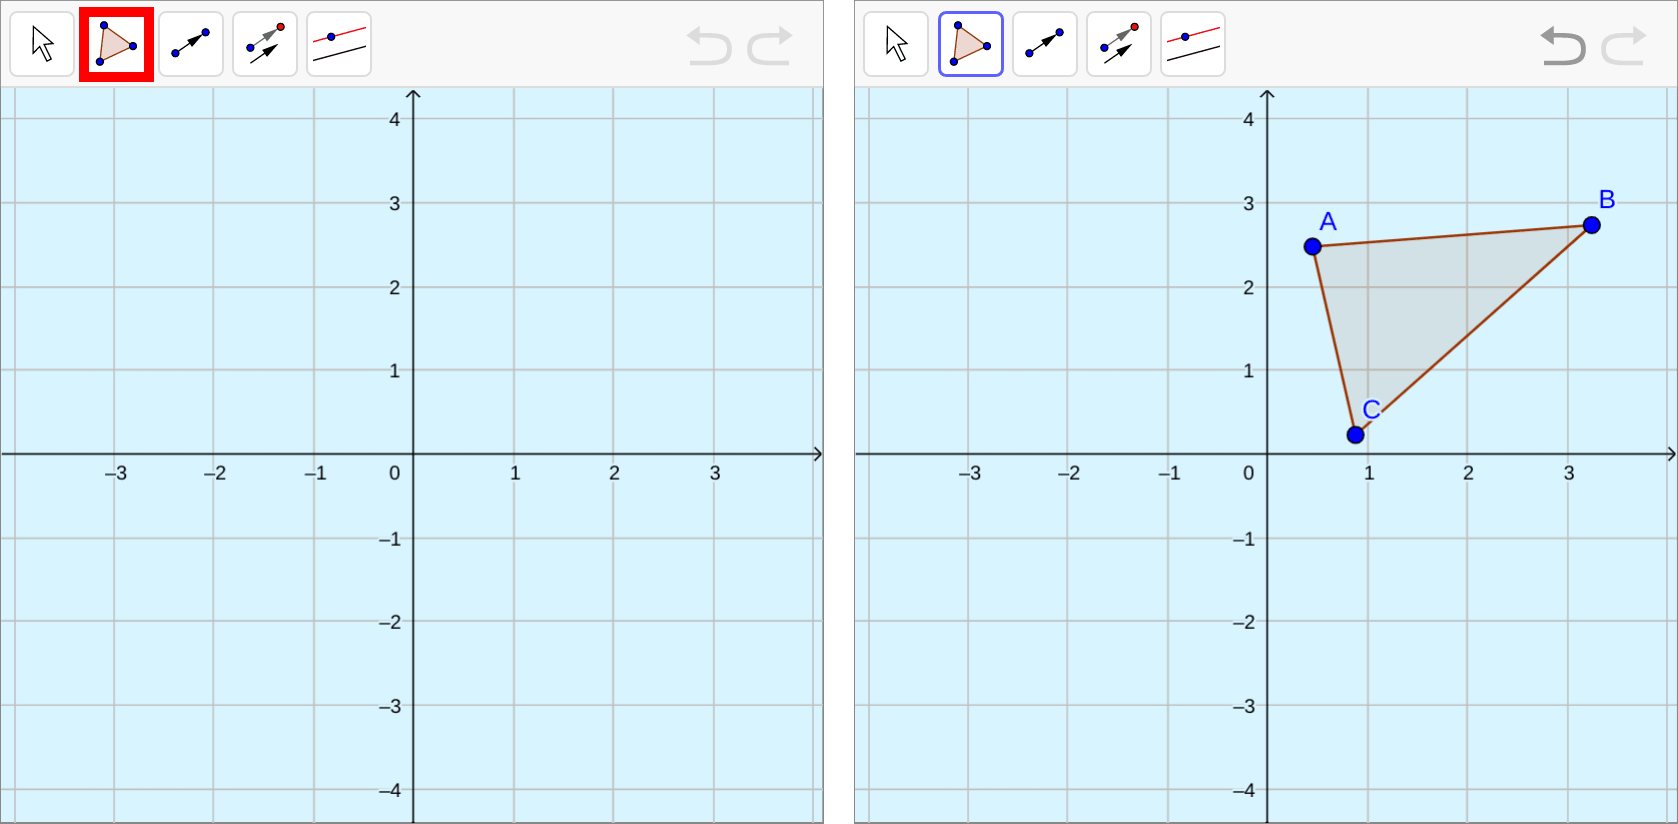
First, select the "polygon" tool. C reate a polygon to translate by clicking on the canvas where you want each vertex to be, click the first point again to complete the shape .
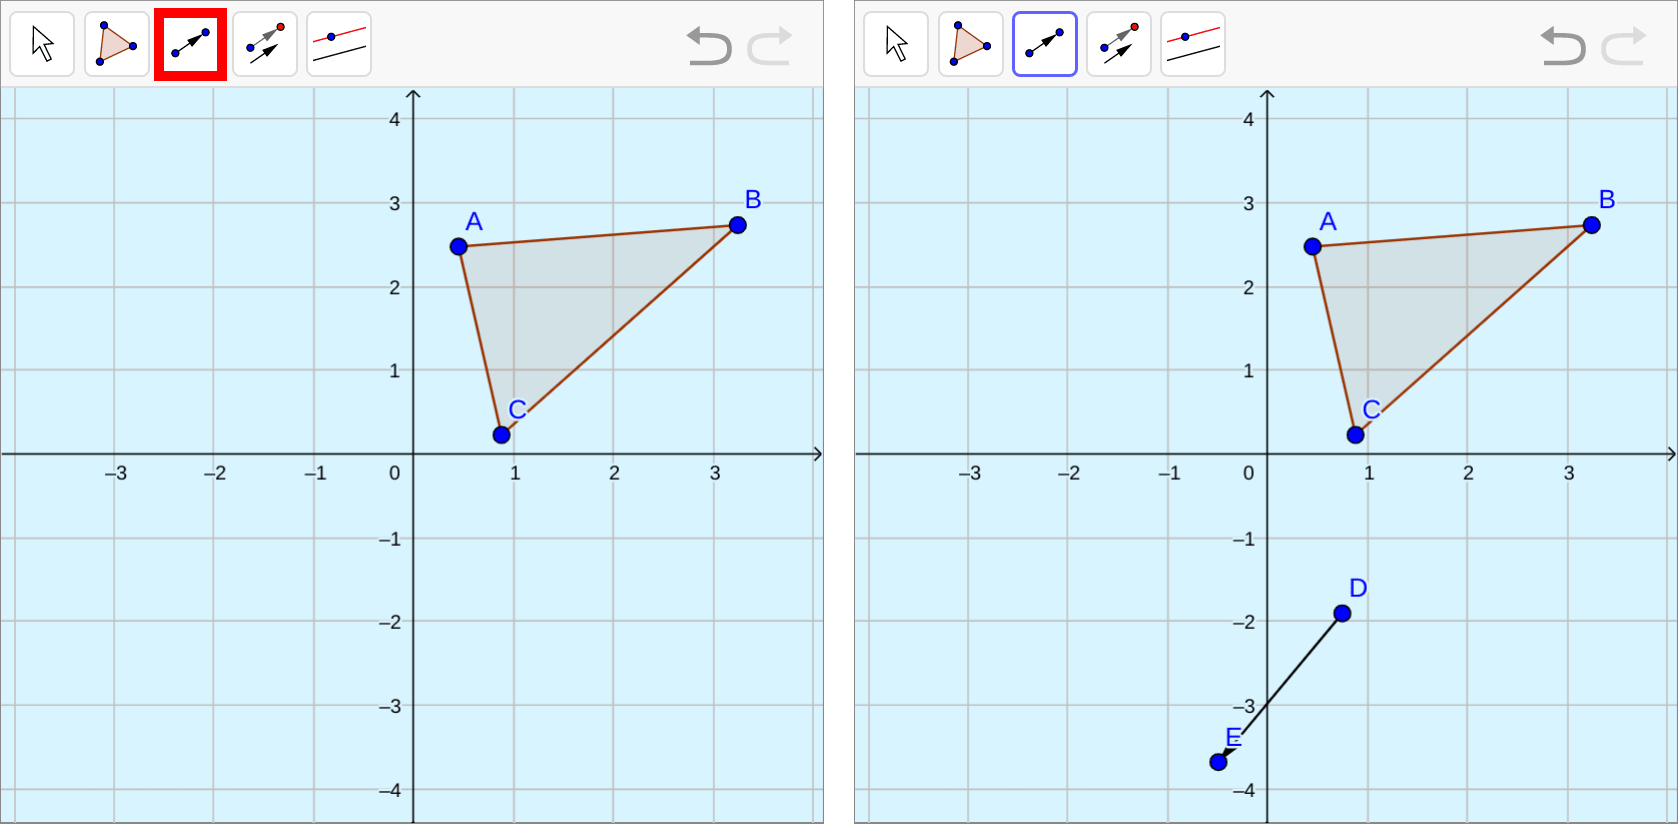
::首先,选择“ polygon” 工具。 在您想要每个顶点的位置单击画布, 创建一个要翻译的多边形, 然后单击第一个点来完成形状 。Next, create the vector that will define your translation. Choose the "vector" tool from the menu and click two places on the canvas to create the vector.
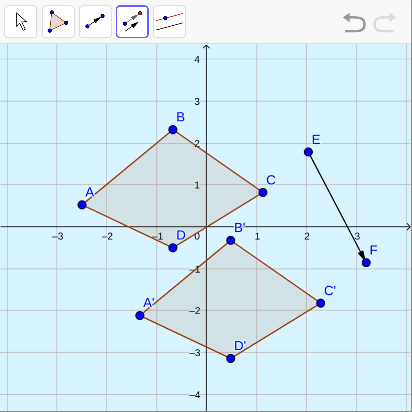
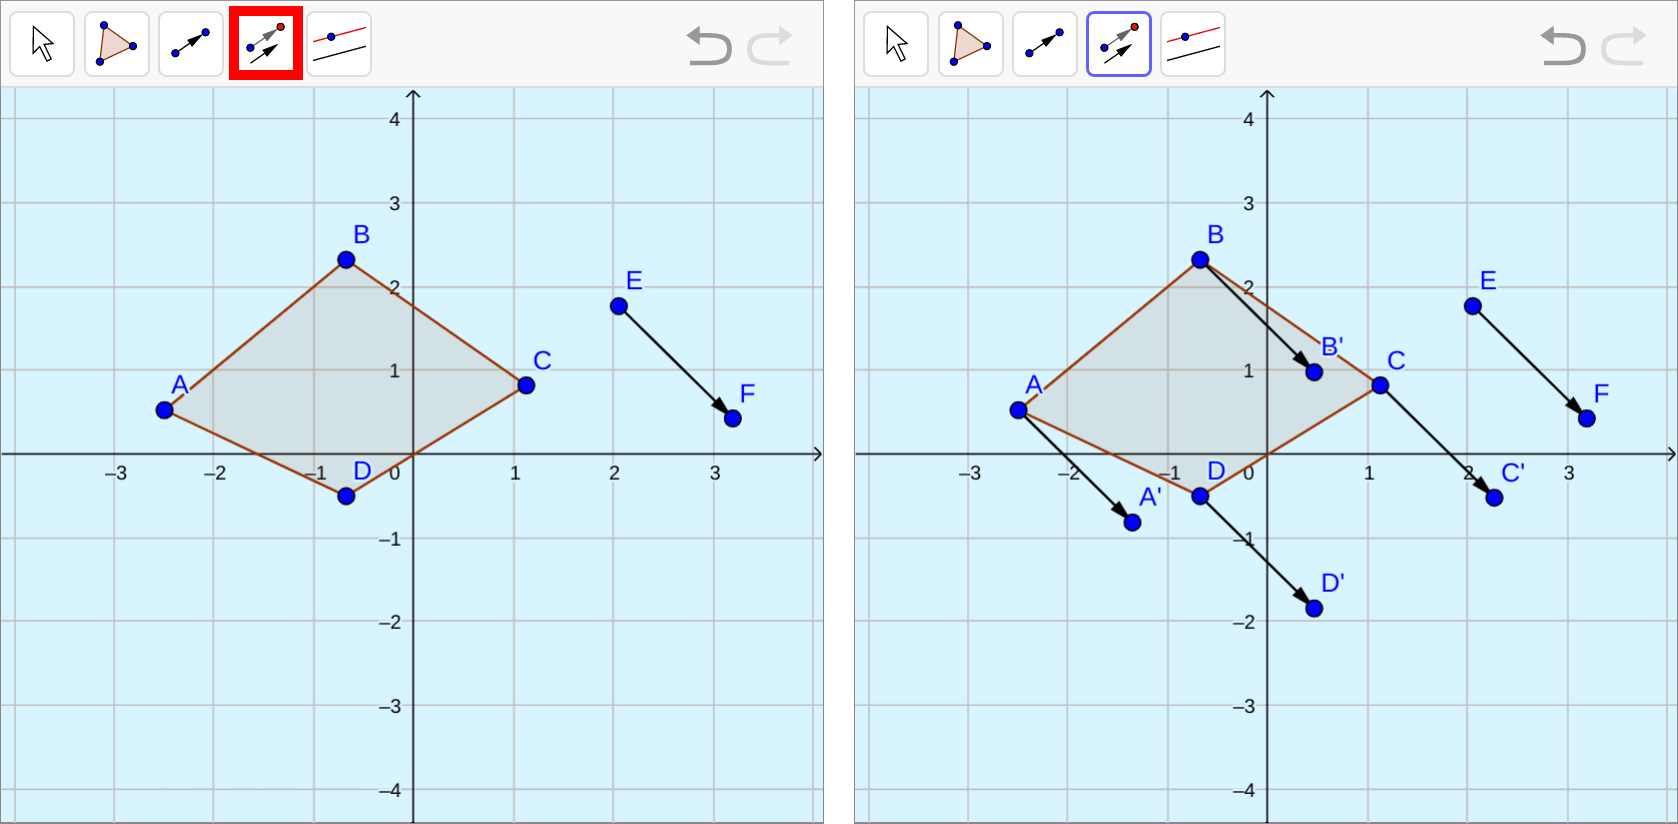
::下一步, 创建一个矢量来定义您的翻译。 从菜单中选择“ 矢量” 工具, 然后单击画布上的两个位置来创建矢量 。To perform the translation, select the "translate" tool in the menu . Click the polygon first and then click the vector to complete the translation .
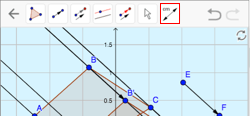
::要执行翻译,请在菜单中选择“翻译”工具。先单击多边形,然后单击矢量完成翻译。Note that the points defining the image are labeled with prime notation. Remember that the specific location of the vector on the graph does not matter. At this point you can drag the vector to another location and your translation will not change. You can also move points or to redefine the vector (or change your original polygon) and the location of your image will move accordingly.
::请注意, 用于定义图像的点用主符号标记。 记住, 图形中的矢量的具体位置并不重要。 您可以将矢量拖到另一个位置, 您的翻译不会改变。 您也可以移动点 D 或 E 来重新定义矢量( 或更改您原来的多边形) , 您图像的位置也会相应移动 。
Examples
::实例实例实例实例Example 1:
::例1:Quadrilateral is translated along vector to create quadrilateral . Show that the segment connecting with is parallel to the vector
::将四边ABCD转换成矢量 EF,以创建四边形 A'B'C'D'。 显示连接 A 和 A 的段与矢量 EF平行。-
F
ollow the steps in the interactive activity above to create and translate a quadrilateral.
::遵循上文交互式活动的步骤创建和翻译四边形。 -
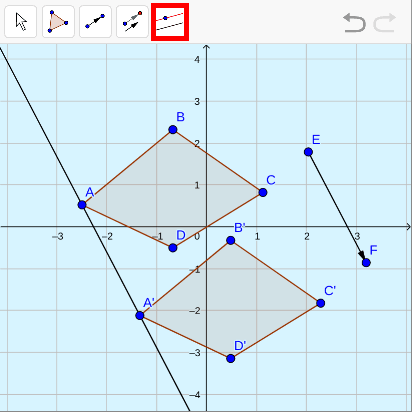
In
the interactive geometry software, select the "parallel line" tool in the menu. Click on the point
, then click on the vector
to construct a line parallel to the vector
through point
. You can see that it also passes through
. This means the
line segment
connecting
with
is parallel to the vector
.
::在交互式几何软件中,选择菜单中的“平行线”工具。单击 A点,然后单击 矢量 EF__ 以构建一条与矢量 EF__ 平行的线,通过 A点。您可以看到它也通过 A 。这意味着连接 A 和 A 的线段与 矢量 EF__ 平行。
Example 2:
::实例2:Use the "translate" tool to independently translate each vertex of the quadrilateral along vector .
::使用“ translate” 工具将四边ABCD 的每个顶点沿矢量 EF__ 独立翻译。(Note - This example illustrates how to use the interactive geometry software to perform the same steps that the "translate" tool uses to translate an object.)
:注 - 本示例说明如何使用交互式几何软件执行与“翻译”工具用于翻译对象相同的步骤。 )
-
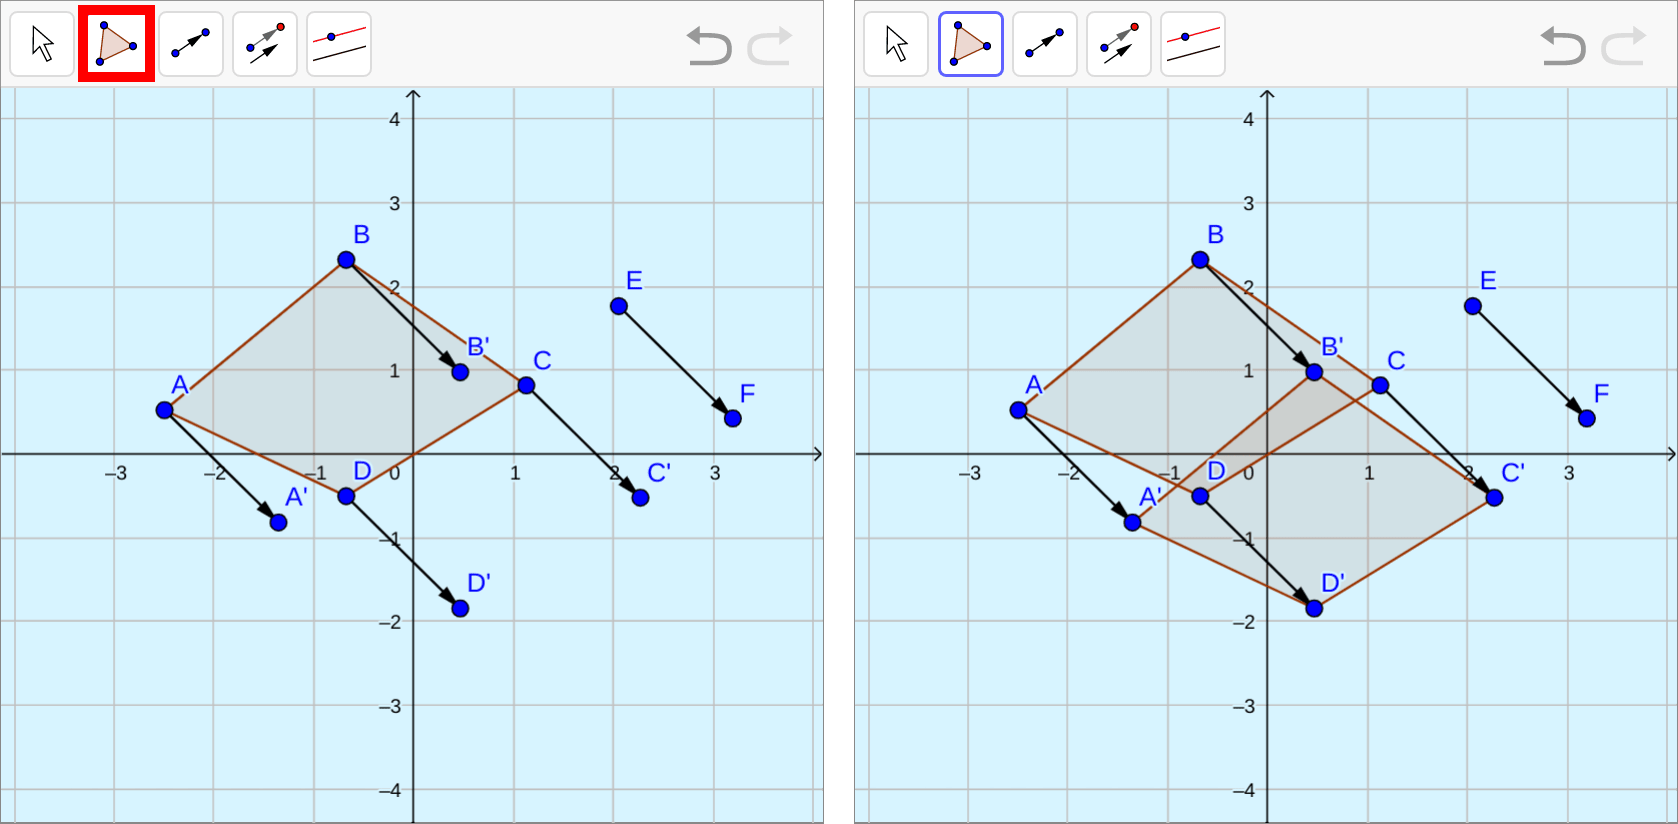
Select the "translate" tool in the menu. Click on vertex
of quadrilateral
, then click on vector
, to create an identical vector from point
.
::在菜单中选择“ translate” 工具。 单击 ABCD 四边形的 A 顶点, 然后单击矢量 EF__ , 从 A 点创建一个相同的矢量 。 -
Repeat for
vertices
,
and
::B、C和D等脊椎重复
Next, select the "polygon" tool and start making your polygon at the point . Continue to the points , and to complete the translation of the original polygon.
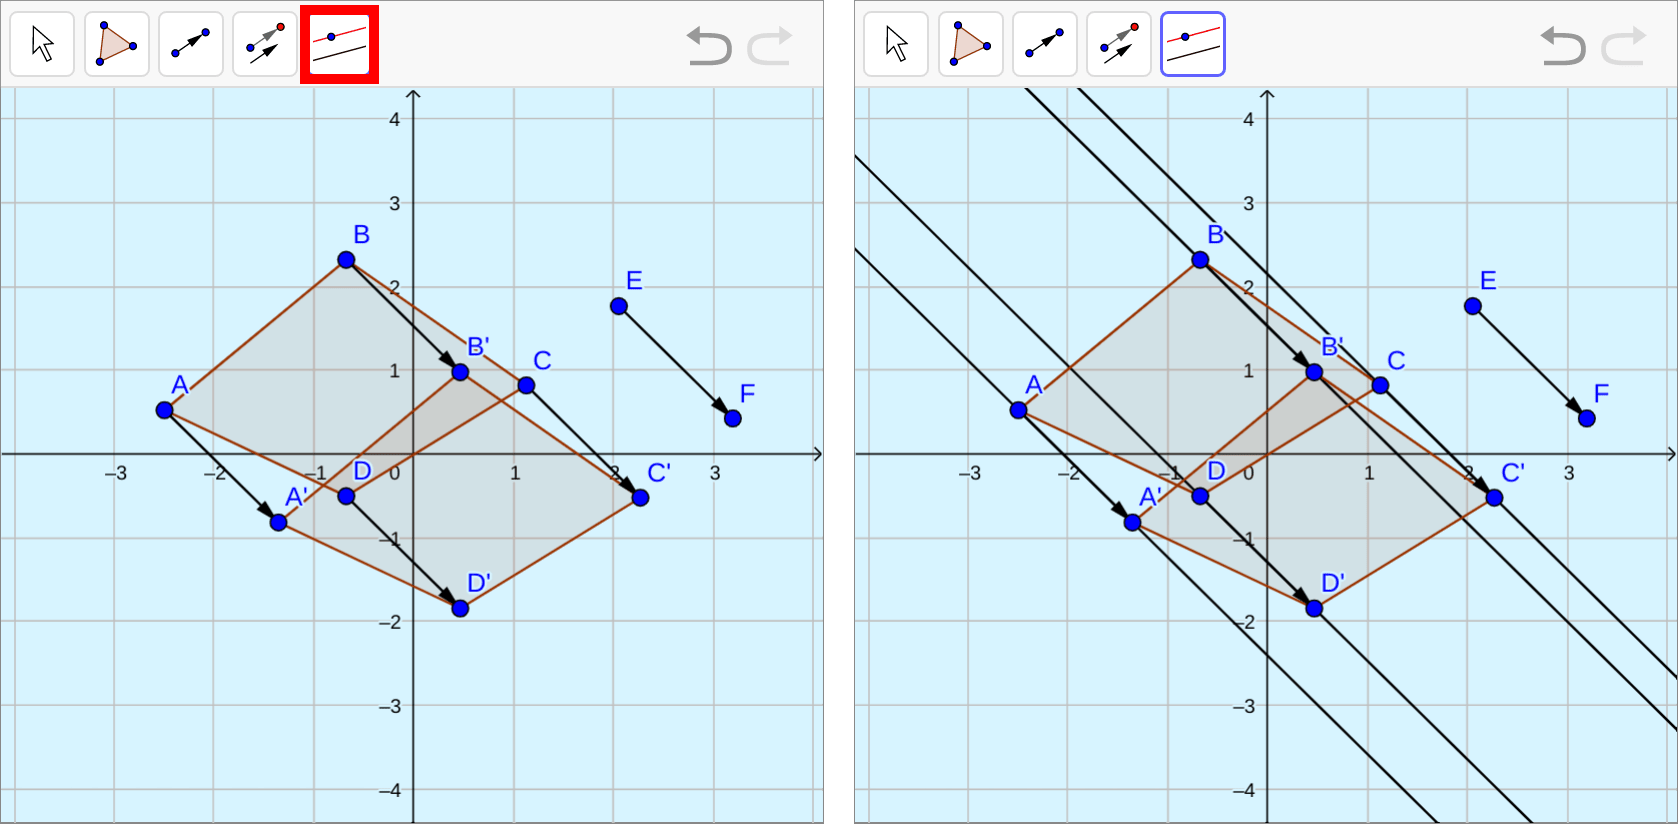
::下一步选择“ polygon” 工具, 然后在 A 点开始生成您的多边形。 继续到 B 点、 C 点和 D 点, 完成原始多边形的翻译 。Use the "parallel line" tool to create a line through vertex , which is parallel to the vector . Repeat for vertices , and . Using these lines, you can check that the vectors are parallel and contain both the original and translated point.
::使用“ 平行线” 工具在矢量 EF__ 平行的顶点 A 上创建一条线。 重复 顶点 B、 C 和 D 。 使用这些直线, 您可以检查矢量是平行的, 并包含原始点和翻译点 。Now compare and contrast the two methods for translating a polygon using the interactive geometry software .
::现在比较比较使用交互式几何软件翻译多边形的两种方法。-
Using the first method is faster, but performing the steps of constructing the parallel
vectors
also works and helps to show the connection between parallel lines, vectors, and translations.
::使用第一种方法的速度更快,但实施建造平行矢量的步骤也很有效,有助于显示平行线、矢量和翻译之间的联系。 -
In both cases you can move the vector or the original shape after the translation has taken place and the image will change and move accordingly.
::在两种情况下,您都可以在翻译完成后移动矢量或原始形状,图像将相应改变和移动。
Summary -
To perform a translation without a grid, find lines parallel to the vector through each of the points that define the shape and move the length of the vector along each of those lines.
::要进行没有网格的翻译,请通过每个点找到与矢量平行的线条,这些点将确定矢量的形状,并沿着这些线条移动矢量的长度。 -
Geometry software simplifies the translation process by providing a translate tool.
::几何软件通过提供翻译工具简化翻译过程。
Review
::审查审查审查审查For questions 1-8, you can use the interactive from the 'Translation Using Geometry Software'. The remaining questions require access to the full suite of tools commonly available in free online or downloaded software.
::对于问题1-8, 您可以使用“ 翻译使用几何软件” 中的互动。 其余的问题需要访问免费在线或下载软件中常用的全套工具 。1. Create a polygon using geometry software .
::1. 利用几何软件创建多边形。2. Create a vector that will move the polygon to the right.
::2. 创建一个将多边形向右移动的矢量。3. Translate the polygon along the vector from #2 using the translate button.
::3. 使用翻译按钮将矢量上的多边形从 # 2 转换为多边形。4. Create another vector that will move the polygon up and to the left.
::4. 创建另一个矢量,将多边形向上移动和向左移动。5. Translate the polygon along the vector from #4 using the translate button.
::5. 使用翻译按钮将矢量的多边形从 # 4 翻译。6. Create a third vector that will move the polygon straight down.
::6. 创建第三个矢量,将多边形向下移动。7. Translate the polygon along the vector from #6 by constructing parallel vectors and creating the polygon at their endpoints .
::7. 通过建造平行矢量并在矢量的终点创建多边形,沿矢量6翻转多边形。8. Check your work to #7 by using the translate button to translate the polygon along the vector from #6. How can you tell if you performed the translation correctly?
::8. 通过使用翻译按钮将矢量的多边形从 # 6 翻译到 # 7, 检查您的工作到 # 7 。 您如何辨别您是否正确进行了翻译 ?9. Translations are rigid transformations which means that distance is preserved. Verify that distance has been preserved by using interactive geometry software to measure sides of your original polygon and their images. Select “distance or length” from the menu. Then, click on each line segment that you want to measure to see its length.
::9. 翻译是僵硬的转换,这意味着保持距离。通过使用交互式几何软件测量您原多边形及其图像的侧面,验证保持了距离。从菜单中选择 " 距离或长度 " 。然后单击您想要测量的每个线段以查看其长度。10. Translations are rigid transformations which means that angles are preserved. Verify that angles have been preserved by using interactive geometry software to measure two corresponding angles. Select “angle” from the same menu as in #9. Then, tell the interactive geometry software what angle you want to measure by clicking on the three points you would use to name the angle. You must click on the points in clockwise order for it to measure the correct angle.
::10. 翻译是僵硬的变换,这意味着角度得到保存。验证角度是否通过使用互动几何软件来保存,以测量两个对应角度。从与 #9 相同的菜单中选择“角 ” 。然后,请告诉交互式几何软件,通过点击您用来命名角的三个点来测量哪个角度。您必须单击时钟键的点,以便测量正确的角度。11. Construct a circle using the interactive geometry software.
::11. 利用交互式几何软件构建圆形。12. Create a vector that will move the circle to the right.
::12. 创建一个将圆向右移动的矢量。13. Translate the circle along the vector from #12 using the translate button.
::13. 使用翻译按钮将第12号矢量的圆形翻转。14. Create another vector that will move the circle up and to the left.
::14. 创建另一个矢量,将圆向上和向左移动。15. Translate the circle along the vector from #14 using the translate button.
::15. 使用翻译按钮将第14号矢量的圆形从第14号转换为圆形。16. Explore how you might be able to translate the circle without using the translate button by creating parallel lines and copying and pasting the vector.
::16. 探索如何通过创建平行线条以及复制和粘贴矢量,在不使用翻译按钮的情况下翻译圆形。17. Create a polygon using the interactive geometry software . Create several vectors. Transform the original polygon by one of the vectors. Translate the image by another vector and so on until you have a final image resulting from a sequence of translations. Find a vector which generates the same final image from the original in one translation. Find a vector which translates the final image back to the original. (Note that you can create vectors which join corresponding points on a polygon.) Explain the results.
::17. 利用交互式几何软件创建多边形。创建多个矢量。通过一个矢量将原始多边形转换为一个矢量。将图像转换为另一个矢量等,直到您从一个翻译序列中产生了最终图像。从一个翻译中找到一个从原版生成相同最终图像的矢量。找到一个将最终图像翻译回原版的矢量。(请注意,您可以创建将多边形上相应点连接到对应点的矢量。))解释结果。18. Create a triangle using the interactive geometry software. Translate the triangle along 3 vectors equivalent in length and direction to the sides of the triangle. (Note that you can create vectors which are coincident with the sides of the triangle.) Explain the results.
::18. 使用交互式几何软件创建一个三角形。将三角形沿3个矢量转换为三角形的两侧,其长度和方向相当于3个矢量。 (请注意,您可以创建与三角形两侧同步的矢量。) 解释结果。19. Create a regular polygon with the interactive geometry software. (It's in the dropdown menu for creating a polygon.) A popup window will allow you to enter the number of sides. Enter the correct number to create a hexagon. Translate the hexagon such that the image intersects with the original in exactly one complete side of the original. Do the same to create the 5 images which coincide exactly with the remaining 5 sides. Describe the result. Notice that none of the polygons overlap and there are no gaps. Why is this possible?
::19. 使用交互式几何软件创建一个常规多边形。 (在创建多边形的下拉菜单中)。 弹出窗口允许您输入边数。 输入创建六边形的正确数字。 翻译六边形, 使图像与原始图像完全相交, 在原始的完整一面。 做同样的事情来创建与其余的5边完全相交的5张图像。 描述结果。 注意多边形没有重叠, 没有空白。 为什么这有可能?Review (Answers)
::审查(答复)Click to see the answer key or go to the Table of Contents and click on the Answer Key under the 'Other Versions' option.
::单击可查看答题键, 或转到目录中, 单击“ 其他版本” 选项下的答题键 。 -
Find lines
parallel
to the vector through each of the points that define the shape.