OpenSCAD教程
Creating and utilizing modules as separate scripts
::创建和使用模块作为单独的脚本
In the previous chapter you learned one of the most powerful features of OpenSCAD, the module, and how it can be used for parametric design. You also had the chance to separate the car into different modules and then recombine them to create a different type of vehicle. Using modules can be also seen as a way to organize your creations and to build your own library of objects. The wheel module could potentially be used in a plethora of designs, so it would be great to have it easily available whenever desired without having to redefine it inside the script of your current design. To do so you need to define and save the wheel module as a separate script.
::在上一章中,你学到了OpenSCAD最强大的功能之一,模块,以及它如何用于参数设计.你还有机会将汽车分成不同的模块,然后重新组合它们来创建不同的车辆类型.使用模块也可以被视为组织你的创作和构建你自己的对象库的一种方式.轮模块可能会被用于大量的设计,所以很好在任何时候都可以轻松使用它,而不必在当前设计的脚本中重新定义它.这样做,你需要定义并将轮模块作为一个单独的脚本保存.
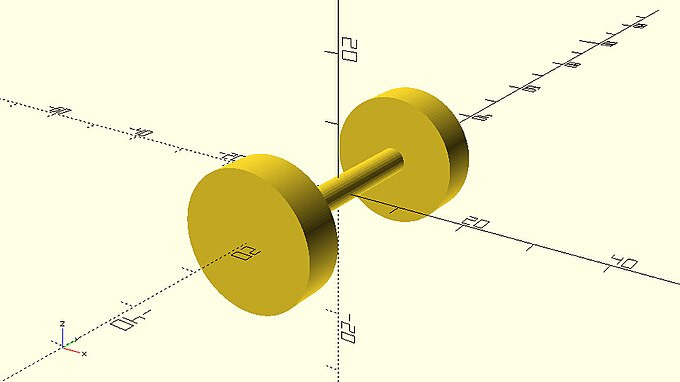
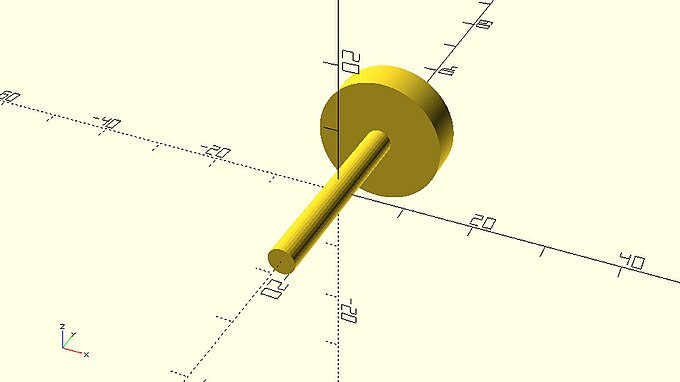
| Define the following simple_wheel module in a separate script file. In the same script make a call to the simple_wheel module so that you visually see what object this module creates. Save the script file as a scad file named simple_wheel.scad. |
|
simple_wheel.scad
$fa = 1;
$fs = 0.4;
module simple_wheel(wheel_radius=10, wheel_width=6) {
    rotate([90,0,0])
        cylinder(h=wheel_width,r=wheel_radius,center=true);
}
simple_wheel();
|
Now it’s time to utilize this saved module in another design. First you need to create a new design.
::现在是时候在另一个设计中使用这个保存的模块了.
| Create a new script with the following car design. Give the script any name you like but save the script in the same working directory as the simple_wheel module. |
|
car_with_simple_wheels.scad
$fa = 1;
$fs = 0.4;
wheel_radius = 8;
base_height = 10;
top_height = 10;
track = 30;
// Car body base
cube([60,20,base_height],center=true);
// Car body top
translate([5,0,base_height/2+top_height/2 - 0.001])
    cube([30,20,top_height],center=true);
// Front left wheel
translate([-20,-track/2,0])
    rotate([90,0,0])
    cylinder(h=3,r=wheel_radius,center=true);
// Front right wheel
translate([-20,track/2,0])
    rotate([90,0,0])
    cylinder(h=3,r=wheel_radius,center=true);
// Rear left wheel
translate([20,-track/2,0])
    rotate([90,0,0])
    cylinder(h=3,r=wheel_radius,center=true);
// Rear right wheel
translate([20,track/2,0])
    rotate([90,0,0])
    cylinder(h=3,r=wheel_radius,center=true);
// Front axle
translate([-20,0,0])
    rotate([90,0,0])
    cylinder(h=track,r=2,center=true);
// Rear axle
translate([20,0,0])
    rotate([90,0,0])
    cylinder(h=track,r=2,center=true);
|
There are two ways in which the simple_wheel.scad script can be utilized in your car design. It can be either included or used. To include the script, you have to add the following statement at the top of car’s script.
::简单_wheel.scad脚本可以在您的汽车设计中使用两种方式. 它可以包含或使用. 为了包含脚本,您必须在 cars脚本的顶部添加以下语句.
include <simple_wheel.scad> |

You should notice that something unexpected happened. A wheel has been created at the origin. This is the object of the simple_wheel script. When you use include, OpenSCAD treats the whole external script that you are including as if it was a part of your current script. In the simple_wheel.scad script, aside from the simple_wheel module definition, there is also a call to the simple_wheel module which creates a wheel object. As a result of using the include command this object is also created in the car’s model. This is something that you are going to change by using the use instead of the include command, but don’t bother about it for a moment.
::你应该注意到发生了一些意想不到的事情. 在原始状态下已经创建了一个轮子. 这是 simple_wheel 脚本的对象. 当你使用 include 时,OpenSCAD 将你正在包含的整个外部脚本处理成你当前脚本的一部分. 在 simple_wheel.scad 脚本中,除了 simple_wheel 模块定义之外,还有一个调用到 simple_wheel 模块,它创建了一个轮子对象. 由于使用 include 命令,这个对象也在 cars 模型中创建. 这是你将通过使用include 命令而不是使用include 命令来改变的,但不要一会儿烦.
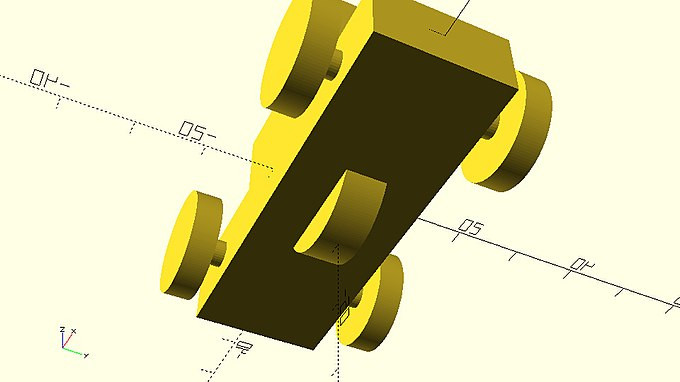
| The car’s wheels are currently created with the cylinder command. Since the simple_wheel.scad script has been included in the car’s script, the simple_wheel module should be available. Replace the cylinder commands with calls to the simple_wheel module. Do any rotate commands become unnecessary? The calls to the simple_wheel module shall not contain any definition of parameters. |
|
car_with_wheels_created_by_included_module.scad
include <simple_wheel.scad>
$fa = 1;
$fs = 0.4;
wheel_radius = 8;
base_height = 10;
top_height = 10;
track = 30;
// Car body base
cube([60,20,base_height],center=true);
// Car body top
translate([5,0,base_height/2+top_height/2 - 0.001])
    cube([30,20,top_height],center=true);
// Front left wheel
translate([-20,-track/2,0])
    simple_wheel();
// Front right wheel
translate([-20,track/2,0])
    simple_wheel();
// Rear left wheel
translate([20,-track/2,0])
    simple_wheel();
// Rear right wheel
translate([20,track/2,0])
    simple_wheel();
// Front axle
translate([-20,0,0])
    rotate([90,0,0])
    cylinder(h=track,r=2,center=true);
// Rear axle
translate([20,0,0])
    rotate([90,0,0])
    cylinder(h=track,r=2,center=true);
|

| Define the wheel_radius and wheel_width parameters in the calls to the simple_wheel module. To do so use the existing wheel_radius variable as well as a wheel_width variable that you are going to define. Set the variables equal to values that you like. |
|
car_with_narrower_wheels_created_by_included_module.scad
include <simple_wheel.scad>
$fa = 1;
$fs = 0.4;
wheel_radius = 8;
wheel_width = 4;
base_height = 10;
top_height = 10;
track = 30;
// Car body base
cube([60,20,base_height],center=true);
// Car body top
translate([5,0,base_height/2+top_height/2 - 0.001])
    cube([30,20,top_height],center=true);
// Front left wheel
translate([-20,-track/2,0])
    simple_wheel(wheel_radius=wheel_radius, wheel_width=wheel_width);
// Front right wheel
translate([-20,track/2,0])
    simple_wheel(wheel_radius=wheel_radius, wheel_width=wheel_width);
// Rear left wheel
translate([20,-track/2,0])
    simple_wheel(wheel_radius=wheel_radius, wheel_width=wheel_width);
// Rear right wheel
translate([20,track/2,0])
    simple_wheel(wheel_radius=wheel_radius, wheel_width=wheel_width);
// Front axle
translate([-20,0,0])
    rotate([90,0,0])
    cylinder(h=track,r=2,center=true);
// Rear axle
translate([20,0,0])
    rotate([90,0,0])
    cylinder(h=track,r=2,center=true);
|
From the above examples you should keep in mind that when you include an external script in your current script, the modules of the external script become available in your current script, but additionally any objects that were created in the external script are also created in the current one. Since the wheel at the origin is not desired in this case, it’s time to use the use command instead of the include.
::从上述例子中,你应该记住,当你在当前脚本中包含一个外部脚本时,外部脚本的模块就会在当前脚本中可用,但此外,在外部脚本中创建的任何对象也会在当前脚本中创建.由于在这种情况下不需要源头的轮子,所以现在是使用使用命令而不是包含的时间.
| Replace the include command of the last example with a use command. |
|
car_with_wheels_created_by_used_module.scad
… use <simple_wheel.scad> … |
You should notice that a wheel is no longer created at the origin. You should keep in mind that the use command works like the include command with the only difference being that the use command doesn’t create any objects, but rather just makes the modules of the external script available in the current script.
::您应该注意到,在源头不再创建轮子.您应该记住,use命令与include命令一样,唯一的区别在于,use命令不会创建任何对象,而是仅仅在当前脚本中提供外部脚本的模块.
Using a script with multiple modules
::使用多个模块的脚本
In the previous example, the simple_wheel.scad script had only one module. The simple_wheel module. This doesn’t have to always be the case.
::在上一个例子中,simple_wheel.scad脚本只有一个模块. simple_wheel模块. 这并不一定总是如此.
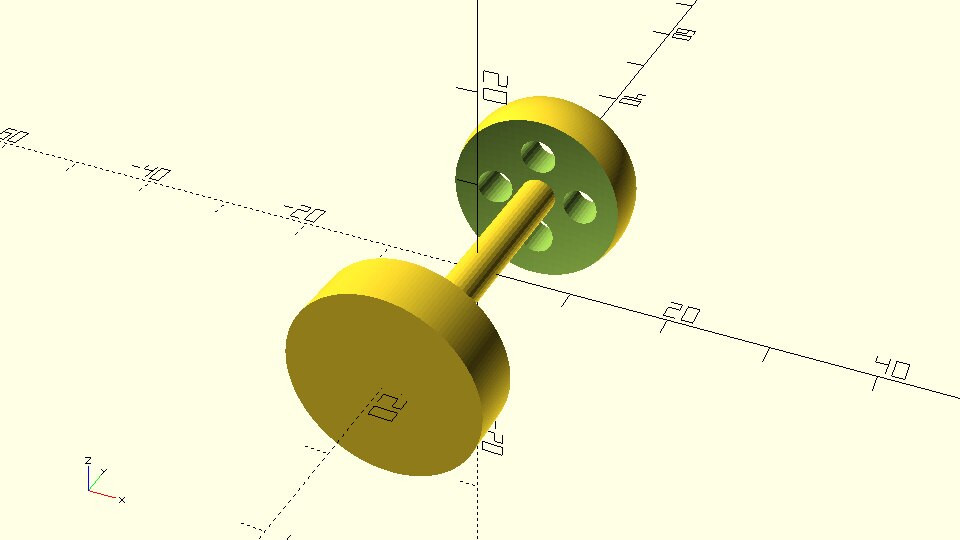
| Add the following module in the simple_wheel.scad script. Rename the simple_wheel.scad script to wheels.scad. |
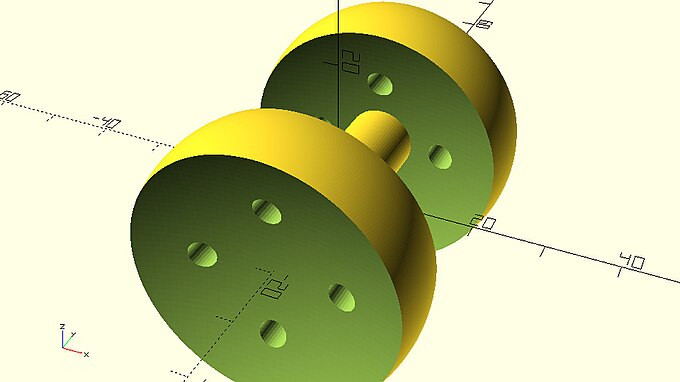
module complex_wheel(wheel_radius=10, side_spheres_radius=50, hub_thickness=4, cylinder_radius=2) {
    cylinder_height=2*wheel_radius;
    difference() {
        // Wheel sphere
        sphere(r=wheel_radius);
        // Side sphere 1
        translate([0,side_spheres_radius + hub_thickness/2,0])
            sphere(r=side_spheres_radius);
        // Side sphere 2
        translate([0,- (side_spheres_radius + hub_thickness/2),0])
            sphere(r=side_spheres_radius);
        // Cylinder 1
        translate([wheel_radius/2,0,0])
            rotate([90,0,0])
            cylinder(h=cylinder_height,r=cylinder_radius,center=true);
        // Cylinder 2
        translate([0,0,wheel_radius/2])
            rotate([90,0,0])
            cylinder(h=cylinder_height,r=cylinder_radius,center=true);
        // Cylinder 3
        translate([-wheel_radius/2,0,0])
            rotate([90,0,0])
            cylinder(h=cylinder_height,r=cylinder_radius,center=true);
        // Cylinder 4
        translate([0,0,-wheel_radius/2])
            rotate([90,0,0])
            cylinder(h=cylinder_height,r=cylinder_radius,center=true);
    }
}
|
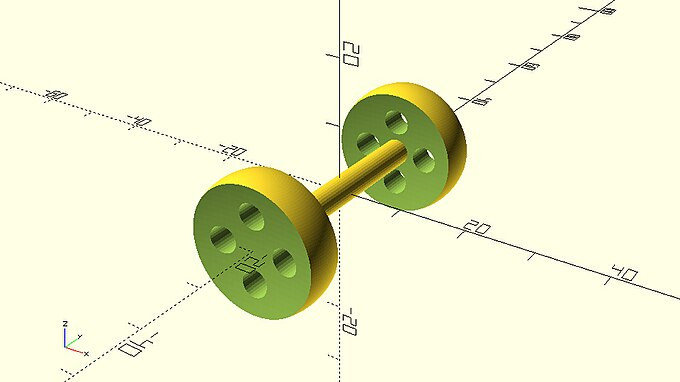
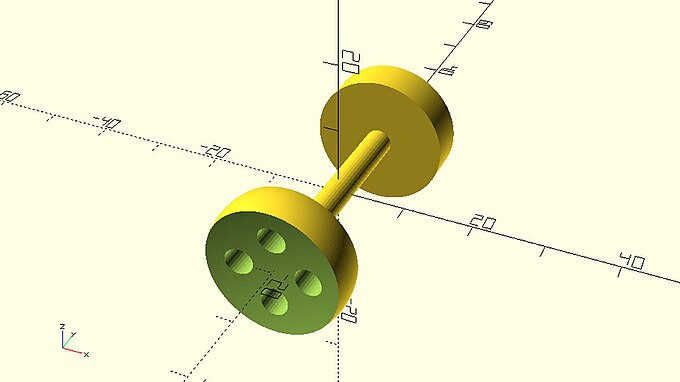
| Use the wheels.scad script in your car script. Use the simple_wheel module to create the front wheels and the complex_wheel module to create the rear wheels. |
|
car_with_different_wheels_from_used_modules.scad
use <wheels.scad>
wheel_radius = 8;
wheel_width = 4;
base_height = 10;
top_height = 10;
track = 30;
// Car body base
cube([60,20,base_height],center=true);
// Car body top
translate([5,0,base_height/2+top_height/2 - 0.001])
cube([30,20,top_height],center=true);
// Front left wheel
translate([-20,-track/2,0])
simple_wheel(wheel_radius=wheel_radius, wheel_width=wheel_width);
// Front right wheel
translate([-20,track/2,0])
simple_wheel(wheel_radius=wheel_radius, wheel_width=wheel_width);
// Rear left wheel
translate([20,-track/2,0])
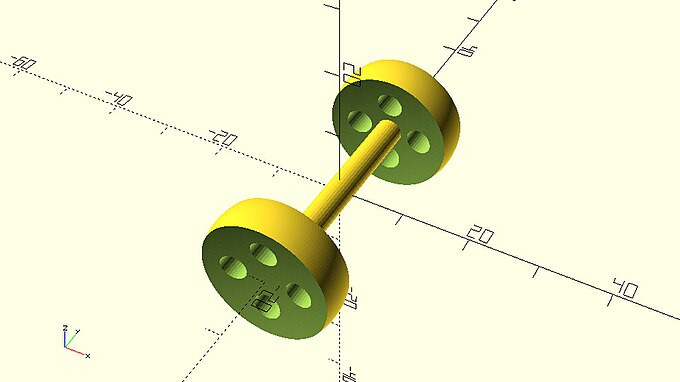
complex_wheel();
// Rear right wheel
translate([20,track/2,0])
complex_wheel();
// Front axle
translate([-20,0,0])
rotate([90,0,0])
cylinder(h=track,r=2,center=true);
// Rear axle
translate([20,0,0])
rotate([90,0,0])
cylinder(h=track,r=2,center=true);
|
With this example it should be clear that the name of the script doesn’t have to be the same as the name of the module as well as that a script can contain multiple modules. There is no right or wrong way on how you should go about organizing your library of modules. In the last example a wheels.scad script which defines the different wheel modules was used. Alternatively you could have saved each module as a separate *.scad script.
::通过这个例子,应该清楚地看到脚本的名称不一定与模块的名称相同,并且脚本可以包含多个模块. 没有正确或错误的方法来组织您的模块库. 在上一个例子中,使用了定义不同轮模块的wheels.scad脚本. 另外,您可以将每个模块保存为单独的*.scad脚本.
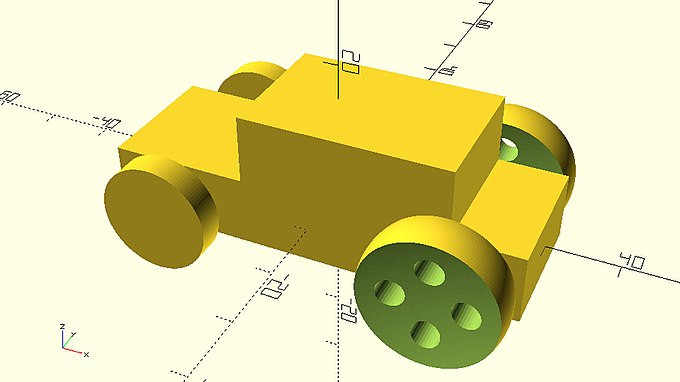
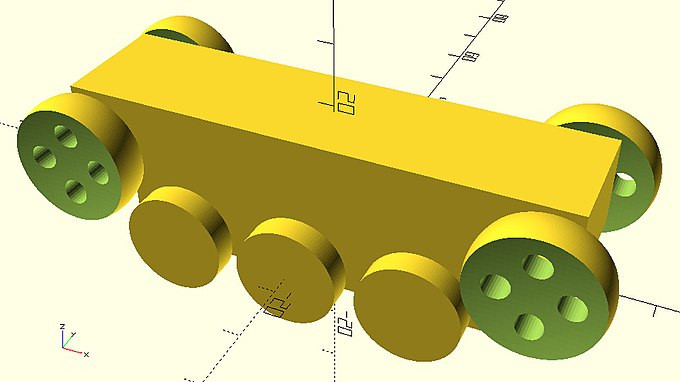
| Create a vehicle_parts.scad script. Inside this script define a simple_wheel, complex_wheel, body and axle module. Use this script in another script named vehicle_concept to make the corresponding modules available. Use the modules to create a vehicle concept that looks similar to the following. |
|
car_with_ten_wheels.scad
use <vehicle_parts.scad>
$fa = 1;
$fs = 0.4;
wheel_radius = 8;
wheel_width = 4;
base_length = 60;
top_length = 80;
track = 30;
wheelbase_1 = 38;
wheelbase_2 = 72;
z_offset = 10;
body(base_length=base_length, top_length=top_length, top_offset=0);
// Front left wheel
translate([-wheelbase_2/2,-track/2,z_offset])
    complex_wheel();
// Front right wheel
translate([-wheelbase_2/2,track/2,z_offset])
    complex_wheel();
// Rear left wheel
translate([wheelbase_2/2,-track/2,z_offset])
    complex_wheel();
// Rear right wheel
translate([wheelbase_2/2,track/2,z_offset])
    complex_wheel();
// Front axle
translate([-wheelbase_2/2,0,z_offset])
    axle(track=track);
// Rear axle
translate([wheelbase_2/2,0,z_offset])
    axle(track=track);

// Middle front left wheel
translate([-wheelbase_1/2,-track/2,0])
    simple_wheel(wheel_radius=wheel_radius, wheel_width=wheel_width);
// Middle front right wheel
translate([-wheelbase_1/2,track/2,0])
    simple_wheel(wheel_radius=wheel_radius, wheel_width=wheel_width);
// Middle left wheel
translate([0,-track/2,0])
    simple_wheel(wheel_radius=wheel_radius, wheel_width=wheel_width);
// Middle right wheel
translate([0,track/2,0])
    simple_wheel(wheel_radius=wheel_radius, wheel_width=wheel_width);
// Middle rear left wheel
translate([wheelbase_1/2,-track/2,0])
    simple_wheel(wheel_radius=wheel_radius, wheel_width=wheel_width);
// Middle rear right wheel
translate([wheelbase_1/2,track/2,0])
    simple_wheel(wheel_radius=wheel_radius, wheel_width=wheel_width);
// Middle front axle
translate([-wheelbase_1/2,0,0])
    axle(track=track);
// Middle axle
translate([0,0,0])
    axle(track=track);
// Middle rear axle
translate([wheelbase_1/2,0,0])
    axle(track=track);
|
Using the MCAD library
::使用MCAD库
The MCAD library (
https://github.com/openscad/MCAD
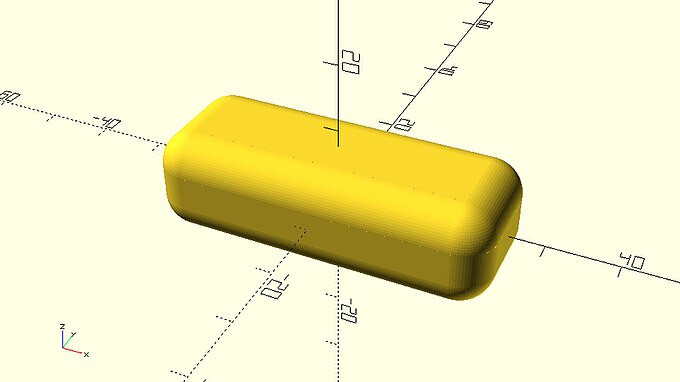
) is a library of components commonly used in mechanical designs that comes with OpenSCAD. You can utilize objects of the MCAD library by using the corresponding OpenSCAD script and calling the desired modules. For example, there is a boxes.scad script which contains the model of a rounded box. The boxes.scad script contains one module, which can be used to create the corresponding box. You can open this script to check what the parameters of this module are and then use it to add rounded boxes in your design. You can create a fully rounded box with side lengths of 10, 20 and 30 units as well as fillet radius of 3 units using the following script.
::机械设计中常用的MCAD库 (https://github.com/openscad/MCAD) 是一个与OpenSCAD一起提供的机械设计中的组件库.您可以使用相应的OpenSCAD脚本并调用所需模块来利用MCAD库的对象.例如,有一个boxes.scad脚本,其中包含一个圆框的模型.box.scad脚本包含一个模块,可以用来创建相应的框.您可以打开这个脚本来检查这个模块的参数,然后使用它在设计中添加圆框.您可以使用以下脚本创建一个完全圆的框,其边长为10,20和30单位,以及3个单位的片半径.
|
completely_rounded_box.scad
use <MCAD/boxes.scad> $fa=1; $fs=0.4; roundedBox(size=[10,20,30],radius=3,sidesonly=false); |
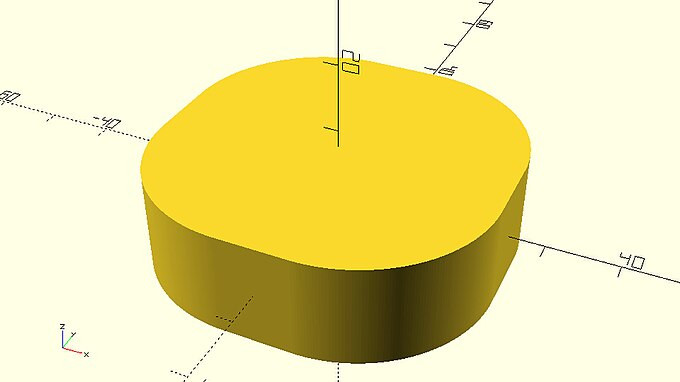
By setting the sidesonly parameter equal to true you can create a box of similar dimension that has only 4 rounded sides.
::通过将单边参数设置为true, 您可以创建一个只有4个圆边的相似尺寸的框.
|
sides_only_rounded_box.scad
use <MCAD/boxes.scad> $fa=1; $fs=0.4; roundedBox(size=[10,20,30],radius=3,sidesonly=true); |
The boxes.scad script is located in the MCAD directory which is under the libraries directory. The latter can be found in OpenSCAD’s installation folder. Should you wish to have any of your own libraries accessible from any directory, you can add it in the libraries directory. You can also browse other available OpenSCAD libraries at
https://www.openscad.org/libraries.html
. Though, you should be aware that there are a very wide number of libraries available on GitHub and Thingiverse that far exceed those linked at OpenSCAD’s libraries page.
::boxes.scad脚本位于库目录下的 MCAD 目录中.后者可以在 OpenSCAD 的安装文件中找到.如果您希望从任何目录中访问您自己的库,您可以在库目录中添加它.您也可以在 https://www.openscad.org/libraries.html 上浏览其他可用的 OpenSCAD 库.尽管如此,您应该知道,GitHub 和 Thingiverse 上有非常多的库,远远超过 OpenSCAD 的库页面上的链接.
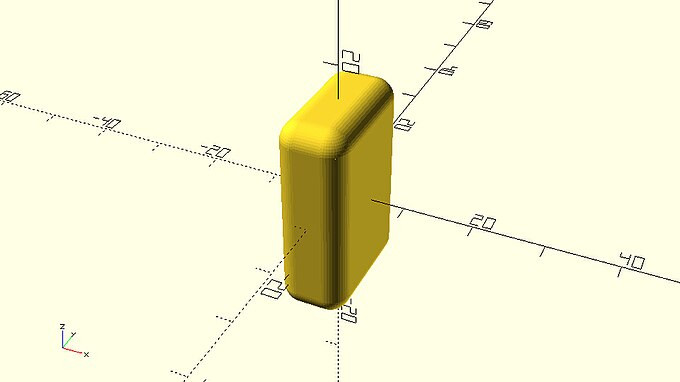
| Use the boxes.scad script of the MCAD library to create a fully rounded box with side lengths of 50, 20 and 15 units as well as fillet radius of 5 units. |
|
horizontal_completely_rounded_box.scad
use <MCAD/boxes.scad> $fa=1; $fs=0.4; roundedBox(size=[50,20,15],radius=5,sidesonly=false); |
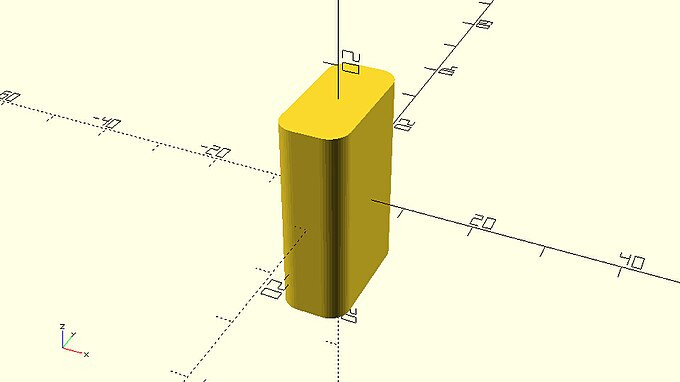
| Use the boxes.scad script of the MCAD library to create a rounded box with only 4 rounded sides with side lengths of 50, 50 and 15 units as well as fillet radius of 20 units. |
|
short_sides_only_rounded_box.scad
use <MCAD/boxes.scad> $fa=1; $fs=0.4; roundedBox(size=[50,50,15],radius=20,sidesonly=true); |
Creating even more parameterizable modules
::创建更多可参数化的模块
So far, the only input to the modules that have been created was through the module’s input parameters that were defined for each case. The complex_wheel module for example was able to create a plethora of parameterized wheels according to the chosen input parameters such as wheel_radius, hub_thickness etc.
::到目前为止,创建的模块的唯一输入是通过每个案例定义的模块的输入参数.例如,复杂_轮模块能够根据所选的输入参数创建大量参数化的轮子,例如轮_半径,枢纽_厚度等.
In your vehicle designs you have been using body, wheel and axle modules which when combined can produce various types of vehicles. In all the vehicle designs, two wheels along with an axle have been used together to form a set of wheels. You may have considered the need for an axle_wheelset module to simultaneously define all three objects with a single statement. And you would have been right to consider it! But there is a reason this module hasn’t been created yet, and you are now going to find out why.
::在您的车辆设计中,您一直使用车身,轮和轴模块,这些模块组合起来可以生产各种类型的车辆.在所有车辆设计中,两轮和轴一起被用于组成一组轮.您可能已经考虑过 axle_wheelset 模块的必要性,以单一的语句同时定义所有三个对象.您将会对此进行考虑!但是这个模块还没有被创建的原因,现在您将了解原因.
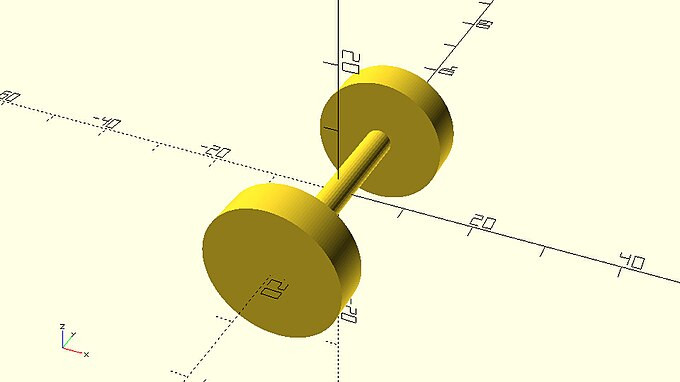
Throughout the previous chapters you have created two different wheel designs (simple_wheel and complex_wheel) and a single axle design. You can use your existing knowledge to combine the simple_wheel and axle modules in the following way.
::在前几章中,你已经创建了两个不同的轮设计 (简单_轮和复杂_轮) 和一个单轴设计.你可以使用你现有的知识来以以下方式组合简单_轮和轴模块.
|
axle_with_simple_wheelset_from_module.scad
use <vehicle_parts.scad>
$fa = 1;
$fs = 0.4;
module axle_wheelset(wheel_radius=10, wheel_width=6, track=35, radius=2) {
    translate([0,track/2,0])
        simple_wheel(wheel_radius=wheel_radius, wheel_width=wheel_width);
    axle(track=track, radius=radius);
    translate([0,-track/2,0])
        simple_wheel(wheel_radius=wheel_radius, wheel_width=wheel_width);
}
axle_wheelset();
|
If you simply wanted to only use the above set of simple_wheels, that approach would be just fine. The problem though is that this axle_wheelset module is not really flexible and parameterizable to the desired degree. On one hand you can customize all input parameters, but on the other hand, could you swap the simple_wheel design with the complex one? The fact is that with the above approach in order to do so you would have to define a completely new module.
::如果您只想使用上述的 simple_wheels 组,那么这种方法就很好. 问题是,这个 axle_wheelset 模块并不是真正灵活和可参数化的. 一方面,您可以自定义所有输入参数,但另一方面,您是否可以将 simple_wheel 设计与复杂的设计交换? 事实上,使用上述方法,您必须定义一个全新的模块.
|
axle_with_complex_wheelset_from_module.scad
use <vehicle_parts.scad>
$fa = 1;
$fs = 0.4;
module axle_wheelset_complex(wheel_radius=10, side_spheres_radius=50, hub_thickness=4, cylinder_radius=2, track=35, radius=2) {
    translate([0,track/2,0])
        complex_wheel(wheel_radius=10, side_spheres_radius=50, hub_thickness=4, cylinder_radius=2);
    axle(track=track, radius=radius);
    translate([0,-track/2,0])
        complex_wheel(wheel_radius=10, side_spheres_radius=50, hub_thickness=4, cylinder_radius=2);
}
axle_wheelset_complex();
|
If you can’t see yet how this is a problem, imagine the case where you had six different wheel designs and two different axle designs in your library. If you wanted to implement the axle_wheelset module you would need to define 12 different modules to cover all combinations of wheel and axle designs. Furthermore, if you were to add a new wheel or axle design in your collection, you would need to define a number of additional axle_wheelset modules which would make maintaining your library very hard.
::如果您还不能看到这是一个问题,请想象一下您在库中有六个不同的轮设计和两个不同的轴设计的情况.如果您想实现 axle_wheelset 模块,您需要定义 12 个不同的模块来覆盖轮和轴设计的所有组合.此外,如果您要在您的库中添加一个新的轮或轴设计,您需要定义一些额外的 axle_wheelset 模块,这将使您的库维护非常困难.
The good thing is that the two modules above look very similar. If you could keep the structure of the module the same but have the specific choice of wheel design parameterized, then the problem could be solved. Fortunately, OpenSCAD supports this functionality and parameterizing the specific choice of wheel design can be achieved in the following way.
::好消息是上面的两个模块看起来非常相似.如果您可以保持模块的结构相同,但具有特定的轮设计选择参数化,那么问题可以解决.幸运的是,OpenSCAD支持这种功能,并通过以下方式实现特定的轮设计选择参数化.
|
axle_with_simple_wheelset_from_parameterized_module.scad
use <vehicle_parts.scad>
$fa = 1;
$fs = 0.4;
module axle_wheelset(track=35, radius=2) {
    translate([0,track/2,0])
        children(0);
    axle(track=track, radius=radius);
    translate([0,-track/2,0])
        children(0);
}
axle_wheelset() {
    simple_wheel();
}
|
The wheel design can now be effortlessly changed, making this module a truly parametric one.
::现在可以轻松地改变轮子的设计,
|
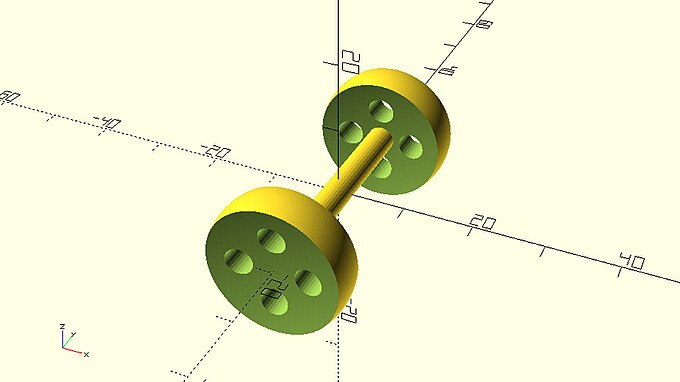
axle_with_complex_wheelset_from_parameterized_module.scad
axle_wheelset() {
    complex_wheel();
}
|
|
axle_with_large_complex_wheelset_from_parameterized_module.scad
axle_wheelset(radius=5) {
    complex_wheel(wheel_radius=20);
}
|
There is a very important concept that you should grasp here. The first thing you should notice is the definition of this new module. This new module is similar to the previous ones with the difference that the command children(0) is used in place of a call to a specific wheel module. The second thing you should notice is the call to the axle_wheelset module. The call to the axle_wheelset module contains a pair of curly brackets inside of which the specific wheel design to be used by module is defined each time. OpenSCAD keeps an ordered list of the objects that have been defined inside the curly brackets and numbers them starting from zero. These objects can then be referenced by the children command. The number that is passed inside the children command corresponds to the first, second, third etc. object that was defined inside the curly brackets, counting from zero. In the above example, only one object is defined inside the curly brackets. That is either a simple_wheel or a complex wheel object. This object is created every time the children(0) command is used. The children command is in essence a way to pass objects as input to a module.
::你应该掌握一个非常重要的概念.你应该注意到的第一件事是这个新模块的定义.这个新模块与之前的模块类似,不同的是命令children ((0) 被用于调用特定轮模块的位置.第二件事你应该注意到的是调用axle_wheelset模块.调用axle_wheelset模块包含一对曲括号,其中每个模块使用的特定轮设计每次都被定义.OpenSCAD保持一个被定义在曲括号内的对象的有序列表,并从零开始编号它们.这些对象可以由children命令引用.在children命令中传递的数量与第一个,第二个,第三个等等对象相对应,从零开始计算.在上面的例子中,只有一个对象被定义在曲括号内.这是一种简
The next examples can help make this concept more concrete. In the previous example there is no way to use the axle_wheelset module and end up creating an axle that has different wheels on each side. This would not happen even if you passed/defined two different objects inside the curly brackets when calling the axle_wheelset module, because only the first one, children(0), is referenced for both sides of the axle.
::下面的例子可以帮助使这个概念更具体.在上一个例子中,没有办法使用 axle_wheelset 模块,最终创建一个每个侧面都有不同的轮子的轴.即使在调用 axle_wheelset 模块时通过/定义了两个不同的对象在卷曲括号内,也不会发生这种情况,因为只有第一个, children ((0)),是轴的两侧引用.
|
axle_with_same_wheels_from_module.scad
axle_wheelset() {
    complex_wheel();
    simple_wheel();
}
|
In order to create an axle with different wheels on each side, the definition of the of the axle_wheelset module would need to be modified. Instead of referencing the first object, children(0), for both sides, the axle_wheelset module would need to reference the first object, children(0), for one side and the second object, children(1), for the second side.
::为了创建一个每个侧面都有不同的轮子的轴,则需要修改 axle_wheelset 模块的定义.而不是引用第一个对象, children ((0)),对于两侧,axle_wheelset 模块需要引用第一个对象, children ((0)),对于一侧和第二个对象, children ((1)),对于第二个侧面.
module axle_wheelset(track=35, radius=2) {
    translate([0,track/2,0])
        children(0);
    axle(track=track, radius=radius);
    translate([0,-track/2,0])
        children(1);
}
|
By defining two different wheel objects inside the curly brackets, the following model would be created.
::通过在卷曲括号内定义两个不同的轮子对象, 便可以创建以下模型.
|
axle_with_different_wheels_from_parameterized_module.scad
axle_wheelset() {
    complex_wheel();
    simple_wheel();
}
|
| Try swapping the order in which the wheels are defined inside the curly brackets when calling the axle_wheelset module. What happens? |
|
axle_with_flipped_different_wheels_from_parameterized_module.scad
axle_wheelset() {
    simple_wheel();
    complex_wheel();
}
|
| Try defining only one wheel inside the curly brackets? Do you get an error message? |
|
axle_with_missing_wheel_from_parameterized_module.scad
axle_wheelset() {
    simple_wheel();
}
|
| Add an axle_wheel module on the vehicle_parts.scad script. Make use of the children command to parameterize the specific choice of wheel design. Use the vehicle_parts.scad script on another script to create any vehicle design that you like. |
Challenge
::挑战
The material you have been learning in the last two chapters gives you a powerful set of tools to start creating your own library of objects that can be flexibly combined and customized to create new designs.
::您可以灵活地组合和定制, 创建新的设计. 您可以在您的书中找到您的作品,
| Think of any model that you would like to create. Break it down into different parts. Come up with alternative designs for each part and define modules that create them. What should the input parameters of each module be? Define one or more modules using the children functionality in order to flexibly combine the various parts that you have created. |