Inkscape指南
Paths can be created by Path Tools, Pencil, Bezier, and Calligraphy, rendering and object conversions. Rendering of pre-configuured objects can be created using the
‣Exte
n
sions <Render>
Menu bar features. Converting an existing shape or text object to a path, can also create paths:
::路径可以通过路径工具,笔,贝齐尔和书法,染和对象转换创建. 预先配置的对象的染可以使用"扩展"菜单功能创建. 将现有的形状或文本对象转换为路径,也可以创建路径:
-
‣
P
ath ‣‣
O
bject to path
::路径 对象到路径 -
‣
P
ath ‣‣
S
troke to path
::路径 向路径的冲击
Unlike the use of shape handles for editing, path objects use three types of path nodes. The start/end and corner(s) of a path are referred to as Cusp Nodes
◇
nodes along a path. A path's curve settings are provided by two types of Smooth Nodes,
□
smooth and auto-smooth
○
Nodes . Smooth nodes can have one straight segment and one curved segment on either side of the node. The Cusp and Smooth Nodes have handles that are used to set the node's length (x,y value of the handle itself) its angle and distance, the 'tool-tip message' in the Status Bar displays this dynamic information. Spiro based paths do not respond to node handle positioning edits and if the handles are retracted for auto-smooth nodes, the node will change to either a smooth or cusp node.
::与使用形状手柄进行编辑不同,路径对象使用三种路径节点.路径的开始/结束和角点 () 被称为沿路径的Cusp节点 ◇ .路径的曲线设置由两种类型的Smooth节点提供, □ 顺滑和自动顺滑 ○ 节点 . 顺滑节点可以在节点的两侧有一个直线段和一个曲线段. Cusp和Smooth节点有手柄,用于设置节点的长度 (手柄本身的x,y值),角度和距离,状态中的"工具提示消息"显示了此动态信息.基于Spiro的路径不会响应节点的位置编辑,如果手柄被自动拉回,则节点将改变为一个顺滑节点或一个角节点.
There are thin red lines between path nodes and are used to edit a 'segment' between two nodes. To view the red line segment editing, you must change from the Path Tool (
P
,
B
and
C
) to the Node Tool (
N
). When you mouse-over 🖰 a segment the Node Tool cursor changes to a pointer with a fist. This segment editor can also change a segment from a curve to a straight line or vice versa. Once a segment is selected (clicked) the two adjacent path nodes change color and the edit is applied by either dragging the segment or using the Tools Controls bar edits. The Tool Controls bar can be used for many edits; change selected segment(s) to a line; change selected segment(s) curves; delete the segment between two non-end points. This segment based editing also impacts the editing of Spiro paths.
::路径节点之间有细红线,用于编辑两个节点之间的'段'. 要查看红线段编辑,您必须从路径工具 (P,B和C) 转换为节点工具 (N). 当您鼠标转移一个段时,节点工具光标会以拳头变为指针. 这个段编辑器也可以将段从曲线变为直线或反之. 一旦选择一个段 (点击),两个相邻的路径节点会改变颜色,编辑通过拖动段或使用Tools Controls 编辑进行. Controls 工具可以用于许多编辑;将选定的段 (变为) 改为一行;将选定的段 (变为) 曲线;删除两个非终点之间的段. 这种基于段编辑也会影响 Spiro 路径
The default stroke, fill and
Ctrl
+
Click
settings of the tools can be set using:
::可以使用以下设置来设置工具的默认冲击,填充和Ctrl+Click设置:
-
‣
E
dit ‣‣P
r
eferences
<Pencil>, <Bezier> and <Calligraphy> settings.
::编辑 偏好设置<笔>,<贝齐尔>和<书法>.
|
|
Pencil tool |
|
|
Bezier curve and Straight line tool |
|
|
Calligraphy tool |
Pencil Tool - Bezier (Freehand)


::笔工具 - 刀 (自由手)
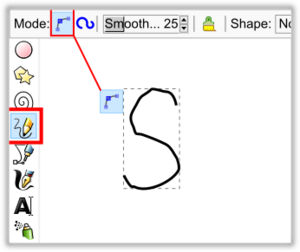
1.) Set to Bezier (Freehand) Mode
Keyboard shortcut:
P
or
F6
::键盘快捷方式:P或F6
The Pencil Tool creates two styles of a path and dots (circle shapes). The first (default) option creates freehand Bezier curves and lines. Freehand drawing can be done in two ways. (1) By dragging (press+hold) the mouse 🖰 on the canvas. (2) By a series of Clicks and Releases, example Click on the canvas (don't drag) then move the cursor to another location and Click again this will create a path segment. Additional segments can be added to the first segment, by clicking on one of the end nodes. This Click-Release method is helpful when creating Spiro paths.
::笔工具创建了路径和点 (圆形) 的两种风格.第一个 (默认) 选项创建了自由手的贝齐尔曲线和线条.自由手绘图可以通过两种方式完成. (1) 通过在画布上拖动 (按+按住) 鼠标. (2) 通过一系列的点击和释放,例如点击画布 (不要拖动),然后将光标移动到另一个位置并再次点击,这将创建路径段.通过点击末端节点之一,可以添加额外的段落到第一个段落中.在创建Spiro路径时,点击释放方法是有用的.
Once a path is created, there are three options for editing the path nodes. (1) To reduce the number of nodes on a given path use the path simplify command;
‣
P
ath ‣‣Si
m
plify
(
Ctrl
+
L
). (2) To add nodes to an existing path place the mouse cursor 🖰 over a start/end node, the node will change color left click and either drag or click to another position on the canvas. (3) Once a path is created the Node Tool can edit the nodes, it has an extensive set of node and segment editing features, available in the Tool Controls bar.
::一旦创建了路径,就有三种方法来编辑路径节点. (1) 为了减少给定路径上的节点数量,使用路径简化命令; Path Simplify (Ctrl+L). (2) 为了添加节点到现有的路径,将鼠标光标放在开始/结束节点上,节点将改变颜色,左键点击,然后拖动或点击到画布上的另一个位置. (3) 一旦创建了路径,节点工具可以编辑节点,它具有广泛的节点和段编辑功能,可在工具控制中找到.
Pencil Tool - Spiros


::笔工具 - 螺旋
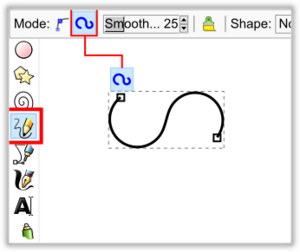
2.) Set to Spiro Mode
Keyboard shortcut:
P
or
F6
::键盘快捷方式:P或F6
The second mode of editing, enabled by using the Tool Controls bar, creates a Spiro based path which involves both cusp
◇
and smooth
○
nodes . Smooth nodes apply spiro based interconnection to adjacent nodes within the path. Once the spiro path is created, the Node Tool must be used to edit the positioning of the spiro's smooth and cusp nodes. Even though smooth node handles are displayed on Spiro paths they do not impact editing of the Spiro. The positioning (vector) of smooth nodes in relation to adjacent cusp/smooth nodes is how a spiro's rendering is calculated. The thin red line segment editor can be used to set a straight or curved segment within a spiro.
::第二种编辑模式,通过使用工具控制条来启用,创建一个基于Spiro的路径,其中包括 cusp ◇ 和 smooth ○ 节点. 顺序节点将基于spiro的互连应用到路径中的相邻节点. 一旦创建了spiro路径,必须使用节点工具来编辑spiro的顺序和点的位置. 尽管在Spiro路径上显示了顺序节点手柄,但它们不会影响spiro的编辑. 顺序节点与相邻的点/顺序节点的位置 (向量) 是spiro的染计算方法. 细线段编辑器可以用于设置spiro中的直线或曲线段.
Note - The pencil tool's spiro rendering is based on the Smooth setting of the Tool Controls bar. Smoothing is how much path simplifying nodes are applied to the spiro being created. If smoothing is set too low, there will be no effect (vector distance between nodes dependent), set to high and the smoothness will render a straight line.
::注意 - 笔工具的螺旋染是基于工具控制的光滑设置.光滑是如何多路径简化节点应用于被创建的螺旋.如果光滑设置过低,将没有影响 (节点之间的向量距离依赖),设置为高,光滑将呈现直线.
Pencil Tool - Dots (Circle Shapes)
::笔工具 - 点 (圆形)
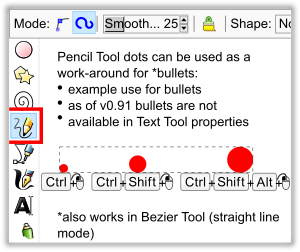
The pencil tool can also create single dots (circle shapes), using command keys;
::笔工具还可以使用命令键创建单点 (圆形);
-
Ctrl
+
L-Click
creates a dot shape
○
::创建一个点形状 ○ -
Ctrl
+
⇧ Shift
+
L-Click
creates a dot twice the size of the
Ctrl + L-Click dot ○
::创建一个点的两倍大小的Ctrl+L-点 ○ -
Ctrl
+
⇧ Shift
+
Alt
+
L-Click
creates a random radius dot
○
::Ctrl+ 转+Alt+L-点击创建一个随机的半径点 ○
Once the dot is created, the editing is now changed over to the
Ellipse Tool
. The dot radius can be set in the Preferences of the pencil tool,
‣
E
dit ‣‣P
r
eferences <Tools> <<Pencil>>
(
Ctrl
+
⇧ Shift
+
P
) "Ctrl+Click radius setting:
xox
times current stroke width".
::一旦点创建,编辑现在会转移到圆工具.点半径可以在笔工具的偏好中设置, 编辑 偏好 <工具> <<笔>> (Ctrl+ 转移+P) "Ctrl+点击半径设置:xox乘以当前冲幅".
This dot creation can be used as a work-around for creating text bullets, as of Inkscape v0.91 there is no internal support, other than Unicode values, for bullets in any native Text formatting.
::这个点创建可以作为创建文本子弹的解决方案,从Inkscape v0.91开始,除了Unicode值之外,没有任何本地文本格式的子弹的内部支持.
Bezier Curve tool

::贝齐尔曲线工具
Keyboard shortcuts:
B
or
⇧ Shift
+
F6
::键盘快捷键:B或 转换+F6
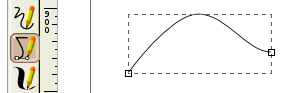
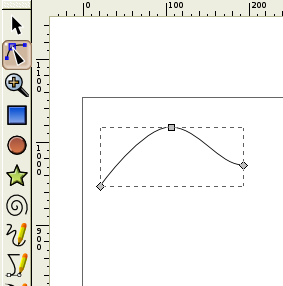
Above is an example of a bezier curve. You can see two nodes in this view. These are the start and end nodes of the curve. But there are path nodes with control handles that you cannot see. These determine how the line curves between the end nodes. In order to view and edit path (stroke) nodes you will need to click on the Node tool button (
N
}.
::上面是一个贝济尔曲线的例子.你可以在这个视图中看到两个节点.这些是曲线的开始和结束节点.但是有路径节点与控制柄,你看不到.这些决定了线路如何在末端节点之间曲线.为了查看和编辑路径 (中风) 节点,你需要点击节点工具按 (N}.
Node tool

::节点工具
Keyboard shortcuts:
N
or
F2
::键盘快捷方式:N或F2
Clicking on the node tool reveals another node in the middle of the curve.
::单击节点工具会显示在曲线中间的另一个节点.
If you then click on the middle node you will see the bezier handles appear.
::您可以在中节点点击, 便会看到贝齐尔手柄.
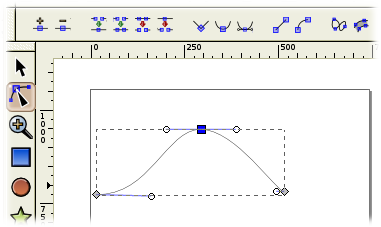
These handles allow you to change the shape of the curves between the nodes. Notice that a list of node tools appear at the top. You can use these to change the nodes. We will not go into detail about these tools in this beginners tutorial.
::这些手柄允许你改变节点之间的曲线的形状. 注意,节点工具列表出现在顶部. 你可以使用这些来改变节点. 我们不会在这个初学者教程中详细介绍这些工具.
The node tool can be used on all the objects created with the other tools to reveal their nodes.
::可以在使用其他工具创建的所有对象上使用节点工具来显示它们的节点.
More on the drawing tools
::更多关于绘图工具
The other two drawing tools also create paths. The top tool of the three is the scribble tool
![]() . Use it like a pencil. The computer will calculate all the nodes and beziers for you. Closed paths can be created by drawing a loop. (With the bezier tool
. Use it like a pencil. The computer will calculate all the nodes and beziers for you. Closed paths can be created by drawing a loop. (With the bezier tool
![]() , click on the start node to close the curve).
, click on the start node to close the curve).
::其他两个绘图工具也创建路径. 三个工具中的顶部工具是涂工具. 使用它像笔一样. 计算机将为您计算所有节点和边数. 通过绘制循环可以创建封闭路径. (使用边数工具,点击开始节点以关闭曲线).
The last tool in the group is the calligraphy tool
![]() . It allows you to do calligraphic writing. The pen creates closed loops in a realistic pen nib like way. Because of this many graphic artists like to draw with this pen all the time.
. It allows you to do calligraphic writing. The pen creates closed loops in a realistic pen nib like way. Because of this many graphic artists like to draw with this pen all the time.
::笔是指指笔的长度,长度和形状.该组的最后一个工具是书法工具.它允许你做书法写作.笔以逼真的笔尖的方式创建闭环.由于这个原因,许多图形艺术家喜欢用这支笔画.
