添加一些立体声深度
章节大纲
-
This tutorial contains some tips for how to work with stereo images.
::这篇教程包含一些关于如何处理立体图像的提示.Stereo viewing is to see the same thing from two slightly different angles. This is what humans normally do with their two eyes. There are many ways to view a stereo image. A perfect method is to use a stereo monitor. But they are quite expensive, and many are of very low quality. In the other end of the price-scale you can use crossviewing. Put the two images next to each other, and look at one with one eye, and the other with the other eye. Needs a bit of practice though. A popular solution is red/blue anaglyph glasses, but they give very bad colors.
::立体视觉是从两个略有不同的角度看同样的事情.这就是人类通常用双眼做的事情.有很多方法来看立体图像.一个完美的方法是使用立体显示器.但它们非常昂贵,而且很多都是非常低质量的.在价格尺度的另一端,你可以使用交叉视觉.把两个图像放在对方旁边,用一只眼睛看一张,用另一只眼睛看另一张.虽然需要一点练习.一个流行的解决方案是红蓝色的形眼镜,但它们给出了非常糟糕的颜色.The stereo camera
::立体声摄像头I wanted a stereo camera rig that was easy to work with. It should have three cameras (center, left, and right), have an easy way to set separation (should be 1/30 of the distance) and the center cam should be used to control position etc, the two others should just follow.
::我想要一个易于操作的立体声摄像机.它应该有三个摄像头 (中间,左边和右边),有一个简单的方法来设置分离 (应该是距离的1/30) 和中央摄像头应该用于控制位置等,另外两个应该跟随.Create it
::创建一个Manually
::手动使用-
Reset the cameras position, rotation and size (you can use Alt + G , Alt + R and Alt + S ). You may want to note these values first, so you can change them back later. I just make sure there's an IPO-curve for them, for example by making a keyframe ( I ).
::设置相机位置,旋转和大小 (可以使用Alt+G,Alt+R和Alt+S). 您可能首先需要记住这些值,以便您可以稍后更改它们. 我只是确保它们有一个IPO曲线,例如通过制作一个关键 (I). -
Create two new cameras. Reset their position, rotation and size too.
::创建两个新的摄像头, 重置它们的位置,旋转和尺寸. -
Name them
Camera.Right
and
Camera.Left
or similar. Set LocX to 1 for
Camera.Right
and -1 for
Camera.Left
. (Press N to see data for selected object, in this window you can change name and values.) (Select a camera by clicking RMB several times on the cameras, until the right one is selected.)
::给它们命名为Camera.Right和Camera.Left或类似的.为Camera.Right设置LocX为1,为Camera.Left设置LocX. (按N以查看所选对象的数据,在此窗口中您可以更改名称和值.) (通过在相机上多次点击人民币来选择相机,直到选择右边相机). -
Create a new cube (remember to press Tab to exit edit mode). Reset position, rotation and size. Name it
Distance Cube
and set these values: LocZ: -30. SizeX: 0.1. SizeY: 0.1. SizeZ: 30.
::创建一个新的立方体 (记得按下 Tab 退出编辑模式). 重置位置,旋转和大小. 命名为距离立方体并设置这些值:LocZ: -30. SizeX: 0.1. SizeY: 0.1. SizeZ: 30. -
Switch to front view. ( 1 )
::切换到前视图. -
Select
Camera.Left
. Then select
Camera
while holding down Shift so both are selected. Press Ctrl + P and press Enter to register
Camera
as parent. Then press Ctrl + L and select
Camera Data
. Repeat with right
Camera.Right
and
Distance Cube
.
::选择相机.左. 然后按住Shift时选择相机,这样两者都被选中. 按Ctrl+P,然后按Enter以注册相机为父. 然后按Ctrl+L,选择相机数据. 按右相机.右和距离立方体重复.
With a script
::带着一个剧本
Editor's note
I tried making a script that creates the rig, it almost works. Any help finishing it?
::编辑的笔记我试图创建一个脚本, 创建的设备, 它几乎工作. 任何帮助完成它?import Blender from Blender import * # Prepare scene = Scene.getCurrent() camera = Object.Get("Camera") # TODO validate that it is a camera oldLocation = camera.loc oldRotation = camera.rot oldSize = camera.size # Create stuff c = Camera.New("ortho") cameraLeft = Object.New("Camera", "Camera.Left") cameraLeft.link(c) scene.link(cameraLeft) c = Camera.New("ortho") cameraRight = Object.New("Camera", "Camera.Right") cameraRight.link(c) scene.link(cameraRight) dEmpty = Object.New("Empty", "Distance") scene.link(dEmpty) # Configure camera.loc = (0,0,0) camera.rot = (0,0,0) camera.size = (1,1,1) cameraLeft.loc = (-1,0,0) cameraLeft.rot = (0,0,0) cameraLeft.size = (1,1,1) cameraRight.loc = (1,0,0) cameraRight.rot = (0,0,0) cameraRight.size = (1,1,1) dEmpty.loc = (0,0,-60) dEmpty.rot = (0,0,0) dEmpty.size = (1,1,1) scene.update(1) # Connect camera.makeParent([cameraLeft, cameraRight, dEmpty], 0, 0) # do that CTRL+LKEY thing cameraLeft.link(Camera.Get("Camera")) cameraRight.link(Camera.Get("Camera")) # Reset original values camera.loc = oldLocation camera.rot = oldRotation camera.size = oldSize # Finish Blender.Redraw()How to use it
::如何使用它-
Never change the cube or the two side-cameras. Only change the center camera. Use that one for positioning, rotation etc.
::永远不要改变立方体或两侧摄像头. 只要改变中央摄像头. 使用一个定位,旋转等. -
To set the separation: As always, select the center camera. Resize it (with S ) so you can see the end of the cube if needed. Point at the end of the cube with the mouse pointer, and press S . Move the mouse pointer to the point of the main motive, that is closes to the camera. The end of the cube may not end exactly there, but that doesn't matter.
::设置分离:如常,选择中心摄像头. 改变尺寸 (用S),以便您可以看到立方体的尽头,如果需要. 用鼠标指针指向立方体的尽头,并按S. 将鼠标指针移动到主动机的点,即接近摄像头. 立方体的尽头可能不会完全结束,但这并不重要. -
To render (or preview) with one of the side cameras, select it and press Ctrl + 0 .
::选择它,然后按Ctrl+0.
What needs improvement
::需要改进的内容The cube is visible
::立方体是可见的Instead of using a cube, I'd rather use something that doesn't render. It could be an "empty", but see below.
::我宁愿使用一些不呈现的东西. 它可以是"空",但请参见下面.The cube is hard to see
::很难看到立方体It can be hard to see where the cube ends, even in a simple scene. You can select the center camera AND the cube, then it is clearly visible. But you must remember to only select the camera, before you insert a keyframe, so your changes to the cube doesn't get saved.
::很难看到立方体的终点,即使在简单的场景中.你可以选择中央摄像头和立方体,然后它是清楚可见的.但是你必须记住只选择摄像头,在插入一个键框之前,所以你对立方体的更改不会被保存.Distance plane is at infinity
::距离平面在无限The distance plane is where "zero depth is". When viewing a stereo image, the distance plane is where the medium is. In this rig the distance plane is at infinity, meaning everything is in front of it. While stuff popping out in front of the screen is cooler than stuff being "inside" the screen, it's a lot harder to make it look nice. Specially because with everything in front of the screen, it's easy to get stuff that is just way to close to the viewer. It can get so hard to see that the 3d-effect is completely gone.
::距离平面是"零深度"的位置. 当观看立体图像时,距离平面是介质的位置. 在这个装置中,距离平面是无限的,这意味着一切都在它的前面. 虽然屏幕前的东西比屏幕"内部"的东西更酷,但让它看起来更好看是很难的. 特别是因为屏幕前的一切,很容易得到接近观众的东西. 很难看到3D效应完全消失了.A different solution is to make the side cameras point at the end of the cube, or add a plane to the rig, and point at that. But then the cameras are no longer parallel, and that creates distortion.
::另一种解决方案是让侧摄像头指向立方体的末端, 或者在钻机上添加一条平面, 指向它. 但那时摄像头不再平行, 这就会造成扭曲.The compromise solution is to (conceptually) render the images too wide, and then crop the excess from the left side of the left image, and the right side of the right image. Then it will look like it points just like in the previously mentioned solution, but without the distortion.
::妥协的解决方案是 (概念上) 让图像变得太宽,然后从左图像的左侧和右图像的右侧剪切多余的图像. 然后它会看起来像上面提到的解决方案一样,但没有扭曲.But this give a lot of problems. First, I'd like to do this a smarter way, instead of just following the path describe above. But I don't think that's possible in Blender. (I think povray can actually do this.) So I need to render the image too wide. But if I increase width in output, it actually renders the same width of the motive, but decreases height. Then I need to do some weird math to get the right FOV, and I don't know half the formulas. Cropping must be done outside Blender, and the rest of "the production line" is hard to get back into Blender if wanted.
::但是这给了很多问题.首先,我希望用更聪明的方式来做,而不是只按照上面描述的路径.但我不认为在Blender中这是可能的. (我认为povray实际上可以做到这一点.) 所以我需要染图像太宽.但如果我增加输出宽度,它实际上染了动机的相同宽度,但降低了高度.然后我需要做一些奇怪的数学来获得正确的FOV,我不知道一半的公式.剪切必须在Blender外完成,如果想要的话,剩下的"生产线"很难回到Blender.I guess a couple of planes in the rig close to the cameras could simulate the cropping, but that is of limited value. To make an adjustable distance plane with them seems quite hard to me, it would need some scripting I guess.
::机器人可以模拟剪切, 但这有有限的价值. 让它们的距离可以调整,Stereo viewing with the rig
::通过该装置进行立体视觉This is where it gets exciting, now you are actually getting something to look at.
::现在你真的有什么可看的了.-
Create a new screen, you could call it
Stereo View
.
::创建一个新的屏幕,你可以叫它"立体视图". -
The screen should have one big area from side to side.
::屏幕应该有一个从一边到另一边的大区域. -
Set the area to
3D View
::将该区域设置为3D视图 -
Unlock it (The
Locks layers and used Camera to Scene
-lock)
::解锁它 (锁层和使用的摄像机到现场锁) -
Select
Camera.Right
and press Ctrl + 0
::选择摄像头.右键,然后按Ctrl+0 -
Split the area in half so there is two parts next to each other
::让我们把这个区域分成两半, -
In the
right
area, select
Camera.Left
and press Ctrl + 0
::在右边选择摄像头. 左边按Ctrl+0 -
Adjust zoom in both areas so the frame that shows what is rendered is completely visible, but fill as much as possible. If you can't make them same size, the two areas are not same size.
::调整两部分的缩放,使显示染的完全可见,但尽可能填充. 如果无法使它们相同大小,则两部分的尺寸不相同. -
Use cross-view method to see the 3d-effect. Look at the left area with the right eye and right area with the left eye. (It's a skill you need to learn and practice.)
::使用交叉视图方法来看到三维效应.用右眼看左部和左眼看右部. (这是你需要学习和练习的技能.) -
Press Shift + Alt + A to see your scene animated in stereo.
::按下Shift+Alt+A, 便可以在立体声中看到动画.
If you cannot see these, there is a lot of help with viewing them on the web. Use a search engine to find them.
::您可以在网上查看这些信息.Stereo rendering
::立体声染Anaglyph
::形文字Create two render layers in the Render Layers tab.
::在"染层"选项卡中创建两个染层.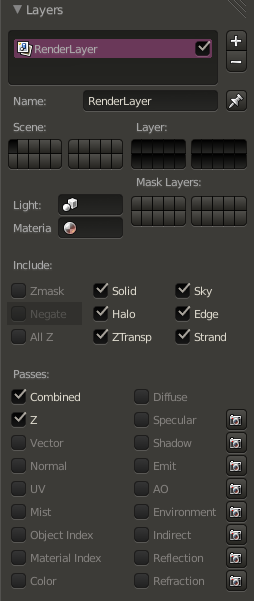

Editor's note
You need to find how to associate one camera with one render layer
::编辑的注意 你需要找到如何将一个摄像机与一个染层关联Then go the Node Editor and click on the button with a human face. Click on Uses nodes and remove the created items by selecting the items and clicking on Del . Now, using the Add menu, you need to do this diagram:
::然后进入节点编辑器,点击带有人脸的按.点击使用节点,并通过选择项目并点击Del删除创建的项目.现在,使用添加菜单,您需要做这个图表: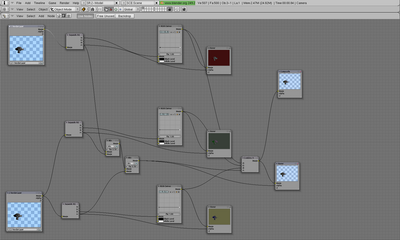
Once done, return to the Buttons window and select the button Do Composite on the Anim tab:
::在 Anim 选项卡上选择"做组合"按: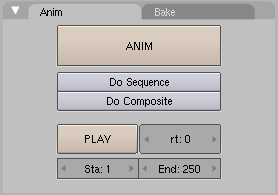
Then click on the button Render on the Render tab:
::然后点击"染"按在"染"选项卡上:
You should see your objects as an anaglyph:
::你应该把你的物体看作是个形文字: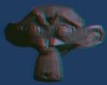
-
Reset the cameras position, rotation and size (you can use Alt + G , Alt + R and Alt + S ). You may want to note these values first, so you can change them back later. I just make sure there's an IPO-curve for them, for example by making a keyframe ( I ).