职等职等
章节大纲
-
In this lesson, you'll use two images, "07_Stonehenge.jpg" and "08_AlaskaLandscape.jpg." Before continuing, click on the Resources tab and download these images.
::在此课中, 您将使用两个图像, “ 07_ Stonehenge. jpg ” 和 “ 08_ AlaskaLandscape. jpg ” 。 在继续之前, 请点击资源标签并下载这些图像 。
So far, you’ve been using less complex image adjustment tools. Levels is a more powerful tool that allows you to set the black point and white point limits (shadows and highlights) of an image’s tonal range (the difference between the darkest and brightest pixels). It also lets you adjust the midtones in relation to the tonal range.
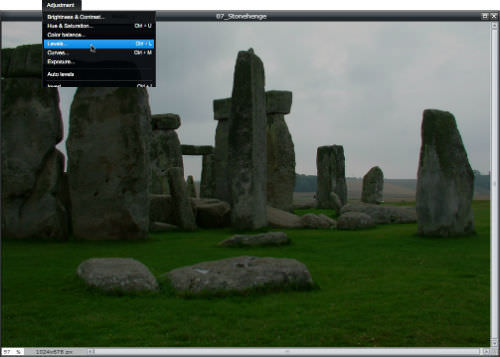
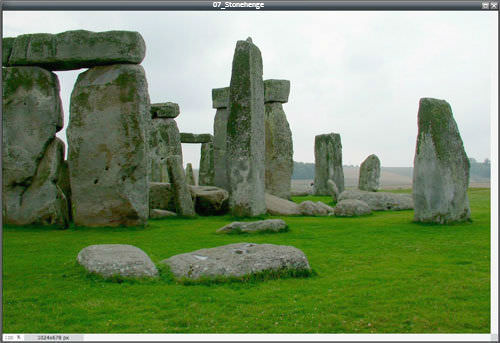
::到目前为止,您一直在使用不那么复杂的图像调整工具。 级别是一个更强大的工具,使您能够设定图像的音量范围的黑点和白点限制( 阴影和亮点 ) ( 最暗和最亮的像素的区别 ) 。 它还允许您根据音量范围调整中点 。Open the image “07_Stonehenge.jpg” in Pixlr Editor. This image as been edited to be underexposed. Click on the Adjustments m enu and choose Levels .
::在 Pixlr 编辑器中打开图像“ 07_ Stonehenge.jpg ” 。 此图像已被编辑过, 要曝光不足。 点击调整菜单并选择关卡 。
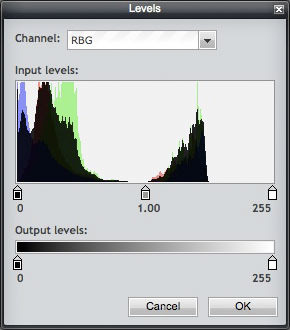
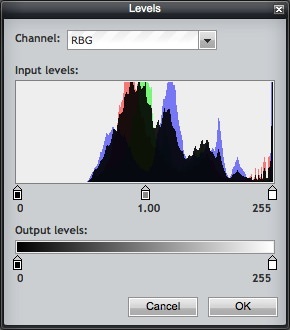
In the Levels dialog box, find the mountain-looking picture called a histogram in the Input levels section. A histogram is a graphical representation of the distribution of the shadows, midtones, and highlights of an image. In the histogram, the left “mountain” represents the shadows. The right “mountain” represents highlights. The lowest value possible in a tonal range of 0-255 is 0 (black), and the highest value possible is 255 (white). Below the histogram are the black point (0), midtones (1.00), and white point (255) sliders.
::等离子对话框中,请在输入级别区域中找到称为直方图的山区图景。直方图是图像阴影、中点和亮点分布的图形表示。在直方图中,左“mountain”代表阴影。右“mountain”代表亮点。在 0-255 的线性范围中,最低可能值为 0-255 (黑色),最高值为 255 (白色)。直方图下方是黑点( 0) 中点( 1. 00) 和白点( 255) 幻灯片。Notice that the right end of the Input levels histogram ends far short of 255, nowhere near bright white, while the Output levels setting uses the entire 0-255 tonal range. There are no bright highlights to use the output range, and this is why the image is so dark.
::注意输入级别直方图的右端距离255远, 远离亮白, 而输出级别设置则使用整个 0-255 吨位范围。 没有亮亮亮亮亮的亮光显示来使用输出范围, 这就是为什么图像如此暗 。
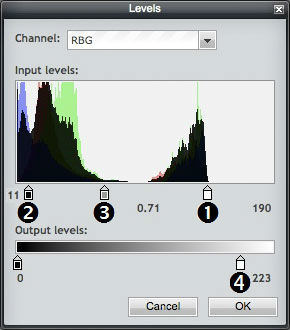
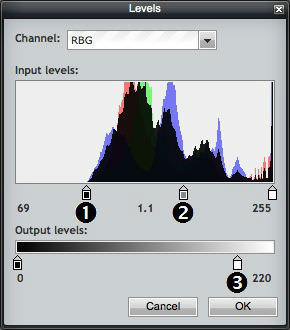
Make the following adjustments in the Levels dialog box:
::在“关卡”对话框中做以下调整:-
Drag the white point slider to the left, stopping at the right end of the highlights histogram. This moves the white point that displays will the 255 level of brightness and lightens the image.
::向左拖动白色点滑动器,停在亮度直方图的右端。 这将移动显示的白点, 显示的亮度将达到255度, 使图像更亮 。 -
Drag the black point slider a little to the right to restore a touch of shadows.
::将黑点滑块拖到右侧,以恢复阴影的触觉。 -
Drag the midtone slider to the left to balance the contrast – midtone relationship to the white and black points.
::将中调滑块拖到左侧以平衡对比度 - 中调与白点和黑点的关系 。 -
Drag the
Output levels
white point slider a little to the left to keep the highlights from being blown out and give the appearance that it was overcast when the image was taken.
::将输出水平的白点滑块拖到左侧一点,以免亮点被吹出,并显示图像拍摄时被覆盖。 -
Click the
OK
button.
::单击“确定”按钮。
Use the History panel in Pixlr Editor to undo the Levels adjustments, and try it several more times with slightly different settings to see what happens. Write down your settings numbers each time and decide which version you like best. Redo that version.
::使用像素编辑器中的历史面板来撤销关卡调整, 并用略微不同的设置多试几次来查看发生的情况。 每次写下您的设置编号, 并决定您最喜欢哪个版本。 重做该版本 。
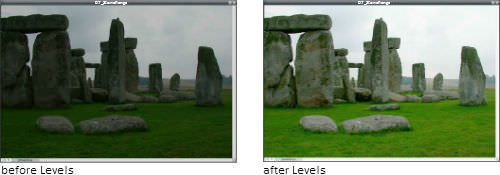
Save this first Levels -adjusted image, and be prepared to discuss how it shows what you’ve learned.
::并准备讨论它如何显示你学到的东西。
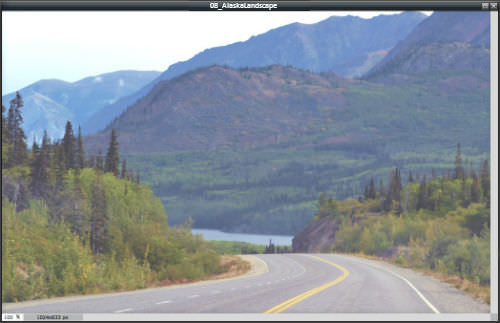
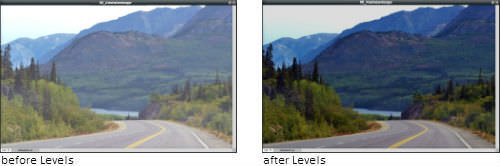
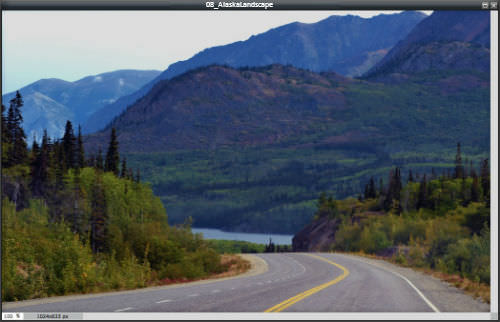
Now, you’ll use Levels to adjust an overexposed image. Open the image “08_AlaskaLandscape.jpg” in Pixlr Editor. Like the previous image, this one was edited for this activity to make it overexposed. Click on the Adjustments m enu and choose Levels .
::现在, 您将使用“ 关卡” 来调整过度曝光的图像。 在 Pixlr 编辑器中打开图像“ 08_ AlaskaLandscape. jpg ” 。 和先前的图像一样, 此图像被编辑为此活动使其过度曝光。 点击“ 调整” 菜单并选择“ 关卡 ” 。
The Input levels histogram shows no data at the black point shadows slider (left). The data is mostly in the midtone slider area (middle), with some data at the white point highlights slider (right). There are no shadows to balance the midtones. This is why the image appears overexposed.
::输入级别直方图显示黑点阴影滑动器( 左侧) 没有显示数据。 数据大多位于中点滑动器区域( 中点) , 白点部分数据突出显示滑动器( 右侧) 。 没有阴影来平衡中点 。 这就是为什么图像显示过度曝光的原因 。Make the following adjustments in the Levels dialog box:
::在“关卡”对话框中做以下调整:-
Drag the
Input levels
black point slider to the right, stopping at the left end of the histogram. This moves the black point that displays at the 0 level of darkness and darkens the image.
::将输入水平的黑点滑块拖到右边,在直方图的左端停止。这移动了显示在 0 层黑暗中的黑点,使图像暗化 。 -
Drag the midtone slider a little to the right to balance the midtone relationship to the white and black points.
::将中间调滑动滑动滑动器拖到右侧一点,以平衡中调与白点和黑点的关系。 -
Drag the
Output levels
white point slider a little to the left. This limits the top end of the highlights to keep the highlights from blowing out.
::将输出水平的白点滑块拖到左边一点。这样会限制亮点的顶端, 以防亮点被吹出 。 -
Click the
OK
button.
::单击“确定”按钮。
You can see that Levels is a more powerful adjustment than Brightness/Contrast or Exposure. With Levels , you have more control over the shadows, midtones, highlights, as well as the ability to limit the darkest and lightest output levels.
::您可以看到, 水平比亮度/ Contrast 或 曝光值更强大的调整。 有了级别, 您对阴影、 中点、 亮度以及限制最黑暗和最亮输出值的能力具有更大的控制权 。
Getting good at using Levels takes some practice, so you may want to undo your Levels adjustments using the History panel or open the original image again, and try it a few more times. Also, if you want to learn more about using Levels, check out this online tutorial:
::成功使用关卡需要一些练习, 所以您可能想要使用历史面板撤销关卡调整, 或者再次打开原始图像, 然后再尝试几次 。 另外, 如果您想要了解更多使用关卡的情况, 请查看此在线教程 :
Save this second Levels -adjusted image, share both Levels images (Stonehenge and Alaska Landscape with your teacher, and be prepared to discuss how they show what you’ve learned.
::保存第二个级别调整后的图像, 分享两个级别图像( Stonehenge 和 Alaska 地貌与您的老师一起讨论, 并准备讨论它们如何显示您学到的东西 。
RECORD YOUR FINDINGS
::记录你的调查结果-
What is a histogram?
::什么是直方图? -
What is tonal range?
::什么是音量范围? -
How do the positions of the black point, white point, and midtones sliders affect the appearance of an image?
::黑点、 白点和中点滑块的位置如何影响图像的外观 ? -
In what ways is
Levels
different from
Exposure
and
Brightness & Contrast
?
::水平与曝光、亮度和对比度有何不同?
-
Drag the white point slider to the left, stopping at the right end of the highlights histogram. This moves the white point that displays will the 255 level of brightness and lightens the image.