影响图层和图层不透明度
章节大纲
-
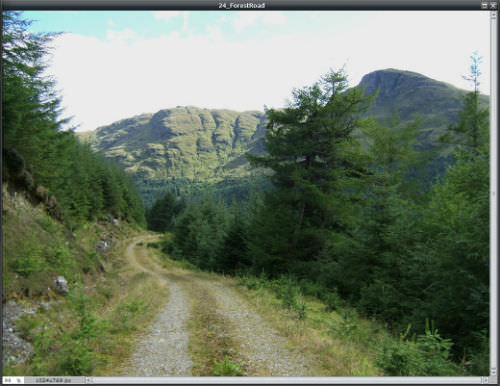
In this lesson, you'll use the image, "24_ForestRoad.jpg." Before continuing, click on the Resources tab and download the image.
::在此课中, 您将使用图像“ 24_ ForestRoad. jpg ” 。 在继续之前, 请点击资源标签并下载图像 。
Another use of layers is overlaying an effects layer that changes the appearance of the image. Overlay means to place over/in front of an image.
::层层的另一个用途是覆盖一个改变图像外观的效果层。 覆盖意味着在图像上方/ 在图像前方放置 。Open the image “24_ForestRoad.jpg” in Pixlr Editor.
::在 Pixlr 编辑器中打开图像“ 24_ ForestRoad.jpg ” 。The colors are a little dull, so you’ll fix this before overlaying an effects layer.
::颜色有点枯燥, 所以在覆盖效果层之前,-
Keep the original image by duplicating the
Background
layer
::复制背景层以保持原始图像 -
Rename the layer copy
Color Adjustment
.
::重命名图层复制颜色调整 。 -
Make sure
Color Adjustment
is the active layer.
::确保色彩调整是活动层 。 -
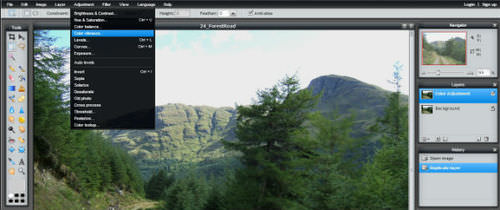
Click on the
Adjustment
menu, and choose
Color vibrance
. Like
Hue & Saturation
,
Color vibrance
can be used to increase (or decrease) color saturation. It just doesn’t have as many adjustments.
::点击调整菜单, 并选择颜色振动。 像色调和饱和度一样, 颜色振动可以用来增加( 或减少) 颜色饱和度。 它只是没有那么多的调整 。
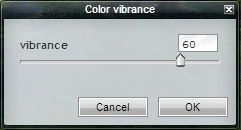
Drag the Color vibrance slider to the right to increase the color saturation. Click the OK button.
::将颜色振动滑块拖到右侧以增加颜色饱和度。单击“确定”按钮。
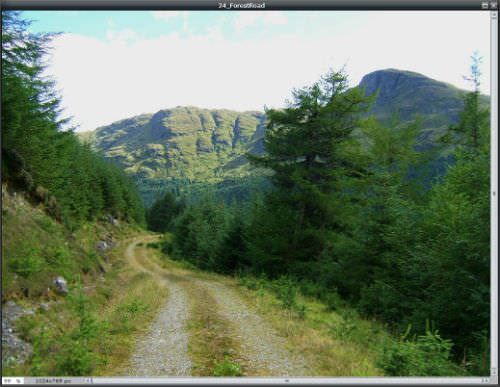
Now, the image looks like this.
::现在,图像看起来是这样的。It’s time to overlay an effects layer. Instead of duplicating an image layer, create a new layer.
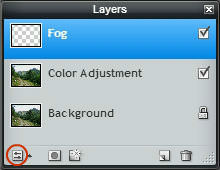
::现在该是覆盖效果层的时候了。 与其重复图像层,不如创建一个新的层。There are two ways to create a new layer: Click on the Layers menu and select New Layer . -OR- Click on the New Layer icon in the Layers panel.
::创建新层有两种方式:单击图层菜单并选择新图层。 - OR- 单击图层面板中的新图层图标。Create a new layer, and rename it Fog . Make sure Fog i s the active layer.
::创建新层, 并重命名为雾。 请确认雾是活动层 。
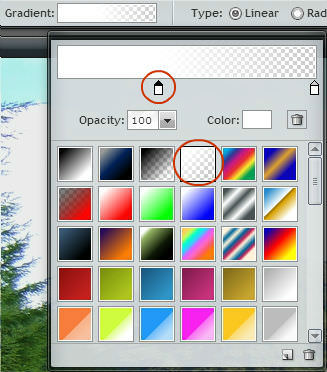
The effects tool you're going to use to overlay a look of fog is the Gradient tool.
::您要用来覆盖雾外观的效果工具是 梯度工具 。
The Gradient t ool is used to create fades from one color to another or from a color to transparency.
::渐变工具用于创建从一种颜色到另一种颜色的淡化或从一种颜色到透明度的淡化。-
Click on the
Gradient
tool to select it.
::点击渐变工具选择它 。 -
Select the
white to transparent effect
(third from the right in the top row).
::选择要透明效果的白色( 最上行右侧的三分之一 ) 。 -
You’ll be dragging a line across the image to add the gradient. Position of the left slider controls the point on that line the gradient effect starts. Moving the left slider about 2/5 to the right, means that 2/5 of the image will be white, 3/5 transparent, with a gradual fade (gradient) from start to end.
::您将会在图像上拖动一条线以添加梯度。 左滑动器的位置控制了该线上的渐变效果开始的点。 左滑动器向右移动了 2: 5 左右, 意味着图像的 2/5 将是白色, 3/5 透明, 从开始到结束会逐渐淡化( 渐变 ) 。
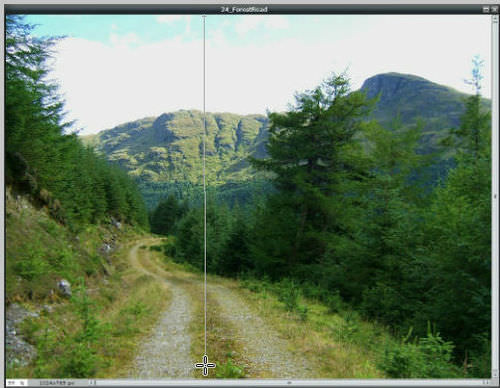
Click back on the image.
::点击回击图像 。-
Click at the top of the image, and hold down the mouse button
::单击图像顶部的图像,按住鼠标按钮 -
Drag out a line to the bottom of the image, and release the mouse button.
::拖出一条线到图像底部, 并释放鼠标按钮 。 -
Keep the line [close to] vertical
. Where you begin, and the direction you drag, control the gradient effect. Feel free to experiment with the tool – different start points and slants – to see what happens. You can always go back in the
History
panel to undo what you’ve done. Make sure your final version looks like
Example 1
below.
::保持线条( 接近) 垂直 。 起点和方向( 拖动方向) 控制梯度效果。 随意尝试工具( 不同的起始点和倾斜点) 来观察结果。 您总是可以回到历史面板, 以推翻你所做的一切。 确保最终版本与下面的例1相似 。
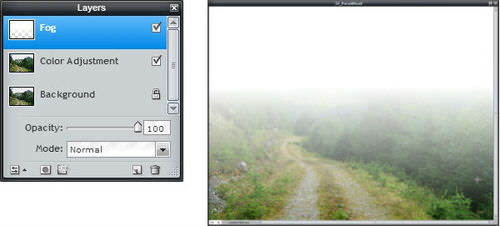
The last thing to do is to adjust the opacity of the Fog layer. Opacity refers how solid or transparent something appears. In this case, it refers to how solid or transparent the F o g layer is, and the degree to which the layers below the Fog layer show through it.
::最后要做的是调整雾层的不透明性。 不透明度是指有多么坚固或透明。 在此情况下, 它指的是雾层的坚固或透明性, 以及雾层下层通过它显示的程度 。-
To adjust layer opacity, click on the
Layer Settings
toggle to show the settings for the active layer.
::要调整图层不透明性,请单击图层设置以切换显示活动层的设置。 -
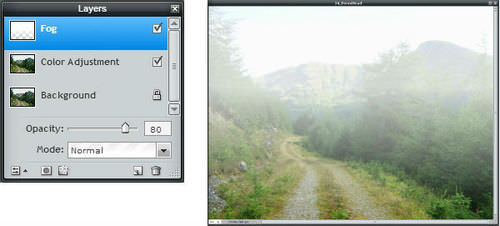
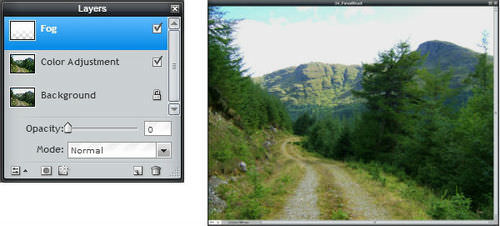
Use the Opacity slider (see examples 1-3 below) to change the percentage of opacity.
::使用不透明度滑块(见下文示例1-3)来改变不透明度的百分比。
Example 1
At 100% opacity, the 2/5 area of the gradient appears solid white. It covers the Color Adjustment l ayer and looks like thick fog.
::示例1 100%不透明, 梯度的 2/5 区域显示为固体白色。 它覆盖颜色调整层, 看起来像厚雾 。Example 2
At 80% opacity, the 2/5 area of the gradient is partially transparent. The Color Adjustment layer shows through, like the fog is not as thick.
::例 2At 80% 不透明, 梯度的 2/5 区域部分透明。 色彩调整层显示像雾一样不厚 。Example 3
At 0% opacity, the gradient appears entirely transparent. The Color Adjustment l ayer shows through, like the effects layer is not there.
::例 3At 0% 不透明, 梯度看起来完全透明。 色彩调整层显示通过, 就像效果层不存在一样 。
Save the 100% and 80% JPEG versions of the edited image. Share them with your teacher and be prepared to discuss the effects of opacity in the images.
::保存已编辑图像的100%和80% JPEG 版本。 与您的老师分享这些版本, 并准备讨论图像中不透明的影响 。
RECORD YOUR FINDINGS
::记录你的调查结果-
What is the difference between an image layer and an effects layer?
::图像层与效果层之间有什么区别? -
How does adjusting the
Fog
layer opacity affect the appearance of the image?
::调整雾层不透明如何影响图像的外观? -
What would the image look like of you deleted the
Color Adjustment
a
nd
Background
l
ayers?
::您删除的颜色调整和背景层的图像看起来像什么 ?
-
Keep the original image by duplicating the
Background
layer