6.4 填充闪光
章节大纲
-
This lesson will help you learn and practice FILL FLASH. In GET THE BASICS, you'll get explanations and photos to build understanding. In EXPLORE, you'll find additional online resources to learn more. It's important to review and learn from these resources also! You'll have opportunities to practice in BUILD YOUR SKILLS. Finally, answer the questions in RECORD YOUR FINDINGS at the end of this topic, be sure to include information you learned from the Explore resources.
::这将帮助您学习和练习 FILL FLASH 。 在获取 BASICS 中, 您将得到解释和照片来建立理解。 在 Explore 中, 您会找到更多的在线资源来学习更多 。 同样重要的是要审查并学习这些资源 ! 您将有机会在 BUILD 您的 SKILLS 中练习 。 最后, 请回答您在此专题结尾处记录的问题, 请务必包含您从 Explore 资源中学到的信息 。
GET THE BASICS
In Silhouettes, you learned about a creative way to use backlighting. While you might want backlit subjects for silhouettes, in other photos you may want to capture the light AND the subject. A common lighting problem is a dark subject caused by backlighting like a sunset, bright sky, or window. The way to fix this is by applying a flash technique called fill flash. Fill flash combines the effects of the natural light from behind the subject with light from your camera's flash in front of the subject.
::获取“ BASICS In Silhouette ” 时, 你学习了一种使用反光照亮的创造性方法。 虽然您可能想要在其它照片中获取“ 反光” 主题, 您可能想要在其它照片中获取“ 光” 和“ 主题” 。 一个共同的照明问题是一个暗点, 是由日落、 明亮天空或窗口等反光引起的。 解决这个问题的方法是应用称为“ 填充闪光” 的闪光技术。 填充闪光将自然光从主题后面的效果与您相机闪光在主题前面的光相结合。Set your camera to forced flash (flash always on) and shoot the photo. What the flash does is to illuminate the subject in the foreground. By about 10-15 feet behind the subject, the flash effect goes away, so the flash doesn't illuminate the background . This brightens the subject while still capturing the natural light of the background.
::设置相机以强制闪光( 总是闪光) 并拍摄照片。 闪光的目的是在前景下照亮对象。 闪光效果在对象后面大约10至15英尺处消失, 这样闪光效果不会照亮背景。 这在仍然捕捉背景自然光的同时, 使对象更加亮亮。Here's an example of a photo without applying fill flash. You can see that the light source behind the subject creates too much of a shadow effect with the subjects. [Note: This photo has been edited to increase the shadowed effect.]
::这是一张照片的例子, 但没有应用填充闪光。 您可以看到, 主题背后的光源对主题产生了太多的阴影效应 。 [注意: 这张照片已被编辑, 以增加阴影效应 。 ]
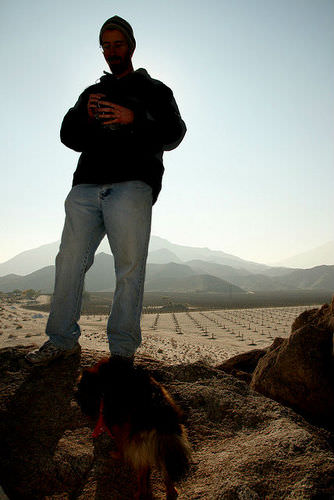
Here's the same photo with fill flash applied. The sky and background remain the same, but the flash illuminates the man, dog, rocks, and ground closer to the camera.
::这是同样的照片,上面有填充的闪光。天空和背景都一样, 但是闪光照亮了人,狗,岩石, 和地面,靠近相机。
EXPLORE
Learn more about fill flash at Fill Flash (4-slide tutorial) from About.com:
::在 Fill Flash (4-滑动辅导) 从 About. com 了解更多关于填充闪光的更多信息:
BUILD YOUR SKILLS
To build your fill flash skills, you're going to shoot four or more pairs of photos. Choose subjects with light coming from behind them. For the first photo in each pair, use the natural light without your camera's flash. For the second photo in each pair, apply fill flash by turning your camera's flash to ON so that it flashes when you shoot the photo.
::BULD你的SKILLS 来建立您的填充闪光技能, 您将会拍摄四对或四对以上的照片。 选择后面有灯光的照片。 选择后面有灯光的对象。 对于每对的第一张照片, 使用自然光, 而不使用相机的闪光。 对于每对照片中的第二张照片, 应用闪光, 将相机的闪光向上显示, 以便在拍摄照片时闪亮 。Compare your fill flash photo pairs. Select FOUR pairs. Share your photo pairs with your teacher, and be prepared to discuss how they show what you’ve learned. Download your photos to a computer to keep them for the portfolio you’ll create in the end-of-course final project.
::比较您填充的闪光相片配对。 选择四对。 与您的老师分享您的相片配对, 并准备讨论他们如何显示您学到的东西。 下载您的相片到计算机上, 以保存您在期末最终工程中创建的投资组合 。
RECORD YOUR FINDINGS
::记录你的调查结果-
What happens to a photo when the subject is backlit?
::照片被反光时会怎么样? -
What is fill flash and how does it correct a backlit subject problem?
::什么是填充闪光,它如何纠正反光主题问题? -
Describe how you applied fill flash in each of the four photo pairs you selected?
::描述您如何在您选中的四对相片中应用填充闪光 ?
-
What happens to a photo when the subject is backlit?