2.7 扭曲图像
章节大纲
-
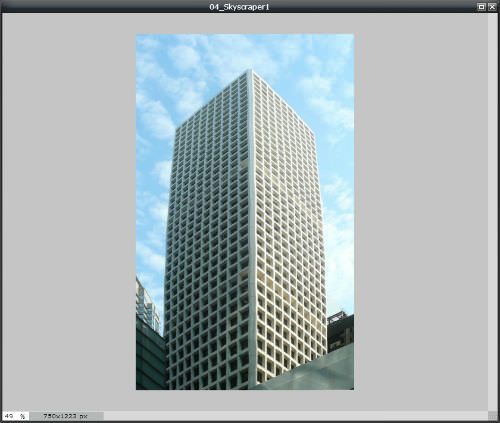
In this lesson, you'll use the image, "04_Skyscraper1." Before continuing, click on the Resources tab and download the image.
::在此课中, 您将使用图像“ 04_ Skyscraper1 ” 。 在继续之前, 请点击资源标签并下载图像 。
When you shoot an image from the base of a tall building, the image shows lines of perspective – wide at the base where you are and narrowing as it goes up and away from you. This is great for bringing out the feeling of height. Sometimes, however, you want to focus on the building as if you are viewing it from the side.
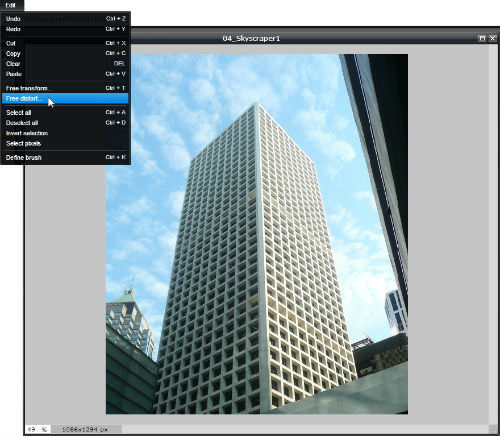
::当你从一栋高楼的底部拍摄一幅图像时,图像显示了视野的线条 — — 在你所在的底部宽阔,而且随着高高高高高高的距离而缩小。 这对产生高度的感觉是件好事。 然而,有时你想要把注意力集中在大楼上,好像你从侧面看一样。Find the image “04_Skyscraper1.jpg” and open it in Pixlr Editor. Note the perspective of the building. To continue, you'll need some area around the image as working space. Drag the Image panel larger. If necessary, depending on your screen size, you may need to zoom out of the image using the Zoom tool. Click on the Edit menu and choose Free distort .
::查找图像“ 04_ skyscraper1. jpg” 并在 Pixlr 编辑器中打开它。 注意该建筑的视角。 要继续, 您需要将图像周围的某个区域作为工作空间。 拖大图像面板。 如果有必要, 视屏幕大小而定, 您可能需要使用缩放工具将图像缩放出来。 点击编辑菜单并选择自由扭曲 。-
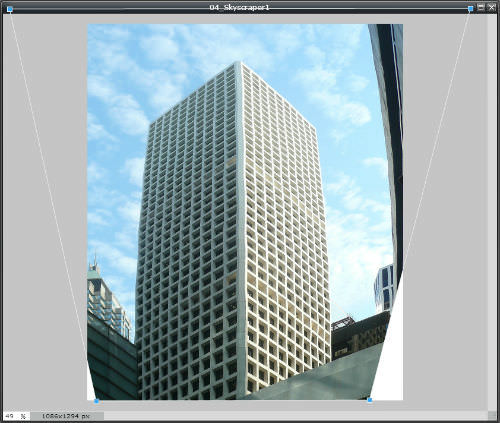
You’ll see four handles (blue squares) at the corners of the image. Click and drag top corner handles outward and the bottom handles slightly inward to straighten the building.
::您可以在图像的角看到四个控点(蓝色方块 ) 。 单击并拖动上角的控点向外, 下端的控点向内一点, 以理顺大楼 。 -
It also makes the building fatter, so you can also drag the top handles up past the top of the image to make the building taller in relation to the width.
::这样也可以把顶部把手拖到图像的顶部, 使建筑的宽度更高。 -
You may need to repeat these steps to get the building as straight as possible from top to bottom.
::您可能需要重复这些步骤, 才能让大楼从上到下尽可能直。
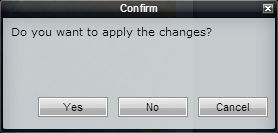
When the building is straight with parallel sides, click anywhere outside the image and the confirm changes dialog box appears. Click the Yes button to apply the distort effect.
::当建筑物与平行侧直线时,请单击图像以外的任何地方,并显示确认更改对话框。单击“是”按钮以应用扭曲效果。
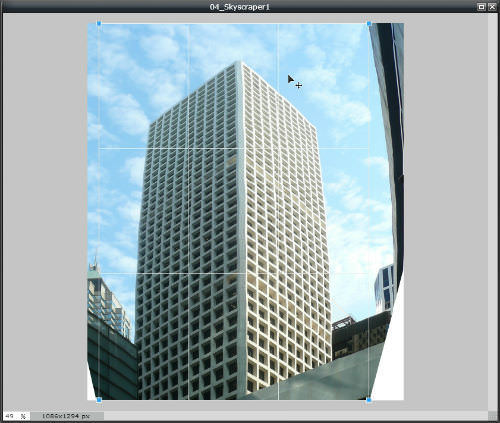
Because the distortion created white triangles at the bottom of the image where you dragged the handles inward, you’ll need to crop it to remove them. Use the crop tool to select the main part of the image from top to bottom, cropping the left and right edges (see Lesson 2.5, Cropping Images).
::由于扭曲在图像底部创建了白色三角形, 将控柄拖入图像底部, 您需要裁剪以移除它们 。 使用作物工具从上到下选择图像的主要部分, 将图像的左边缘和右边缘裁剪( 见 课程2.5, Cropping 图像 ) 。
Applying Distort and Crop makes the building look too wide. The final step is to use Image size (see Lesson 2.2) to resize the width without resizing the height (uncheck Constrain proportions). You may need to experiment with width settings until you're satisfied with the results.
::应用扭曲和裁剪使大楼看起来太宽。 最后一步是使用图像大小( 见第2.2课) 来调整宽度, 而不调整高度( 取消 Cstrain 比例) 。 您可能需要对宽度设置进行实验, 直到您对结果感到满意 。Save and share the finished image with your teacher, and be prepared to discuss how it shows what you’ve learned.
::并准备讨论它如何显示你学到的东西。
RECORD YOUR FINDINGS
::记录你的调查结果-
What are the visual effects of perspective?
::视角的视觉效果是什么? -
How can you straighten an image with perspective?
::你怎么能用视角直截了当的图像呢? -
How does the straightened building change where you appear to be in relation it?
::怎样才能改变你看来与它有关的地方呢?
-
You’ll see four handles (blue squares) at the corners of the image. Click and drag top corner handles outward and the bottom handles slightly inward to straighten the building.