6.5 图像与图层透明度相结合
章节大纲
-
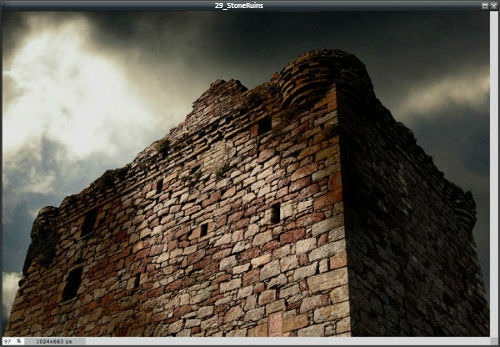
In this lesson, you'll use the images, "29_StoneRuins.jpg" and "30_SunThroughClouds.jpg." Before continuing, click on the Resources tab and download these images.
::在此课中, 您将使用图像, “ 29_ StoneRuins. jpg ” 和 “ 30_ SunthroughClouds. jpg ” 。 在继续之前, 请点击资源标签并下载这些图像 。
This lesson introduces the concept of transparency when combining images with layers. It also introduces an effect called high dynamic range – exaggerating the shadows and highlights. High dynamic range can exaggerate the shadows and highlights to create a surreal look.
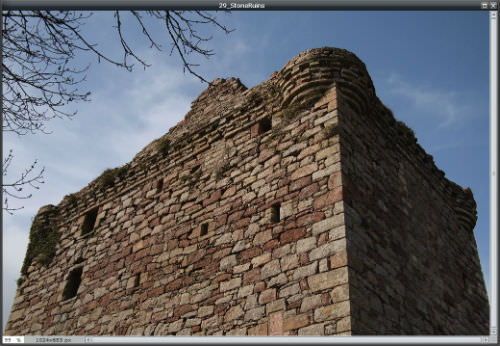
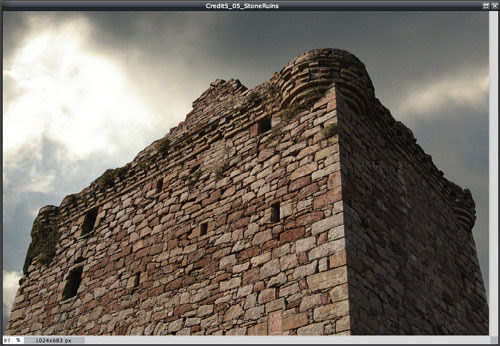
::这一教训引入了将图像与层相结合的透明度概念。 它还引入了一种叫做高动态范围 — — 夸张阴影和亮点 — — 的效果。 高动态范围可以夸大阴影和亮点,以创造超真实的外观。Open the image “29_StoneRuins.jpg” in Pixlr Editor.
::在 Pixlr 编辑器中打开图像“ 29_ StoneRuins.jpg ” 。
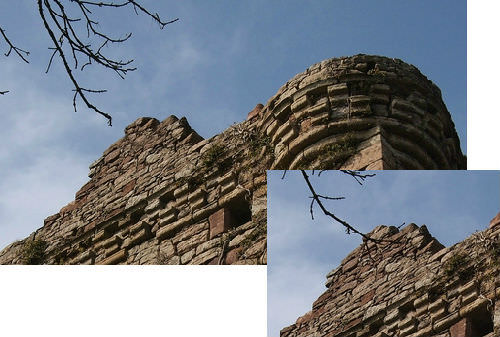
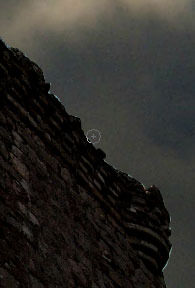
Note that a tree branch hangs in front of the top of the building. You’ll need to use the Clone Stamp tool to remove it. You can clone stones from other areas of the ruins. Be careful to keep a shadow on the right side of the high point.
::请注意树枝挂在建筑物顶部。 您需要使用克隆树枝工具移除树枝。 您可以从废墟的其他地方复制石块。 注意在高点右侧保持阴影 。
Now, you’re going to remove the sky, leaving a transparent area.
::现在,你们要把天空移开,留下一个透明的区域。Double-click the lock on the Background layer convert it to an edit layer. When you delete content from the Background layer, what's left is white. Converting it to an edit layer makes that layer float above the background. Now, if you delete content from the edit layer, what's left is transparent.
::双击背景图层上的锁, 将其转换为编辑图层。 当你从背景图层中删除内容时, 剩下的是白色。 将其转换为编辑图层, 使该图层在背景上方浮动。 现在, 如果您从编辑图层中删除内容, 剩下的是透明的 。
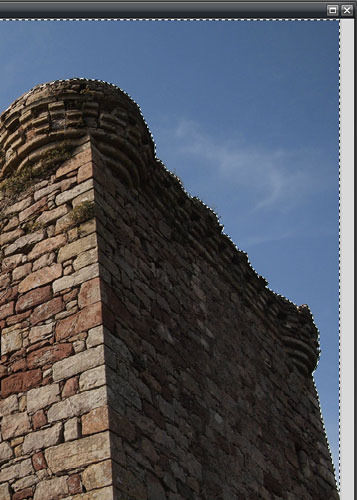
Click on the Lasso tool to select it.
::点击 Lasso 工具来选择它 。
Then select the Polygonal Lasso tool format in the Lasso tool options. The Lasso tool is used to free-draw around an area to select the area. The Polygonal Lasso tool is similar, but you select the area by clicking points along the edge of the area you want to select.
::然后在 Lasso 工具选项中选择多边形Lasso 工具格式。 Lasso 工具用于在区域周围自由拖动以选择区域。多边形Lasso 工具相似,但您选择区域时单击要选择区域边缘的点。-
Start in the lower right or left corner or the image, and click a series of points along the outline of the stone ruins. Since the edge of the ruins is already rough, you don’t have to be perfectly accurate, just stay inside the edge so as not to select any sky. Don’t worry, though, if you accidently include some sky you can fix it later.
::从右下角或左角或图像开始,并按石头废墟的轮廓单击一系列点。 由于废墟的边缘已经很粗糙,你不必完全准确,只需留在边缘内,以免选择任何天空。 不过,不用担心,如果你偶然地包括一些天空,你以后可以修复它。 -
Continue along the ruins and around the edge of the sky.
::沿着废墟和天空边缘继续前进 -
When you completed the selection, the dashed selection line will surround the entire sky.
::当您完成选择时, 折叠的选择线将覆盖整个天空 。
-
Press the
Delete
key to delete the sky.
::按“删除”键删除天空。 -
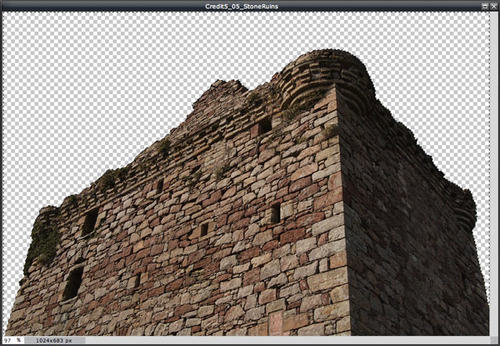
You’ll see a checkerboard pattern where the sky used to be. This pattern indicates that the area is transparent.
::您将会看到天空原来所在的棋盘图案。 这个图案显示这个区域是透明的 。 -
If the area is solid white, you forgot to unlock the layer at the beginning of the activity.
::如果区域是纯白的,则您忘记在活动开始时解锁层。
The checkerboard area will stay selected until you deselect it. Do this by clicking on the Marquee tool and then clicking anywhere outside the selection (like on the stone ruins).
::检查板区域将保持选中状态, 直到您取消选中它 。 点击 Marquee 工具进行此项操作, 然后单击选中范围以外的任何地方( 如在石头废墟上) 。
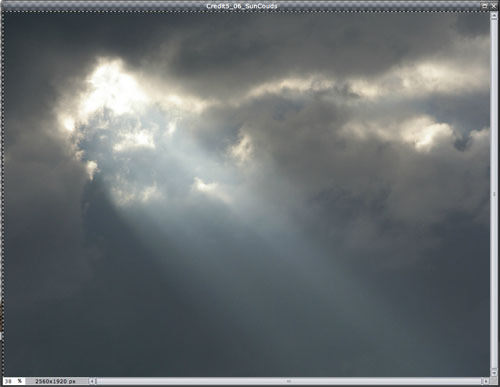
Keep the stone ruins image open, and open the image “30_SunThroughClouds.jpg” in Pixlr Editor.
::并打开像素编辑器中的“30_SunthroughClouds.jpg”图像。-
Click on the Pixlr Editor
Edit
menu, choose
Select All.
::点击 Pixlr 编辑器编辑编辑器编辑菜单, 选择全部 。 -
Click on the
Edit
menu again, and choose
Copy
to copy the entire image.
::再次点击编辑菜单, 并选择复制以复制整个图像 。 -
Close the sun/clouds image. When prompted to save, click the
No
button.
::关闭日光/ 光圈图像。 当被提示保存时, 请单击“ 无” 按钮 。
-
Click on the Pixlr Editor
Edit
menu again, and choose
Paste
.
::再次点击像素编辑器编辑编辑器编辑菜单, 并选择粘贴 。 -
The sun/clouds image appears on top of the stone ruins.
::太阳/云层图像出现在石头废墟的顶端。 -
In the
Layers
panel, click and drag the sun/clouds layer below the stone ruins layer. Now, the stone ruins appear in front of the sun/clouds layer.
::在图层面板上,单击并拖曳太阳/云层在石块废墟层下。现在,石头废墟出现在太阳/云层前。 -
(Optional) Rename the stone ruins layer
ruins
a
nd the sun/clouds layer
sky
.
::重命名石头废墟层的废墟和太阳/云层层的天空。
Make sure that the sky layer is selected and active.
::确保选中并激活天空层 。Click on the Move tool
::点击移动工具.
Drag the sky ayer to the left so the sun breaking through the clouds appears in the upper left corner of the image. The sun's rays don't shine across the stone ruins yet. Don't worry. You'll fix this later.
::将天空向左拖曳, 使太阳从云层中破碎, 出现在图像的左上角。 太阳的光线尚未在石头废墟上照亮 。 别担心。 您稍后会修好的 。
Now, you're going to use Brightness & Contrast , to create a high dynamic range (HDR) effect in each layer. HDR refers to the ratio of shadows to highlights. The HDR effect starts with an image a camera would typically capture and boosts the tonal range (shadows, mid-tones, and highlights) beyond the normal range. The resulting effect looks exaggerated and even surreal.
::现在,你将使用Brightness & Contrast, 在每个层中创建高动态范围效果。 人类发展报告指的是阴影与亮点的比例。 人类发展报告的效果从图像开始, 相机一般会捕捉和提升音量范围( 阴影、 中色调和亮点) 超过正常范围。 结果的效果看起来夸大, 甚至超现实。-
In the ruins layer, move the
Contrast
slider to increase the contrast.
Be careful not to darken the shadowed side of the ruins so much that you can no longer see the details of the stones.
::在废墟层中, 移动对比度滑动器来增加对比度 。 注意不要让废墟的阴影面变暗, 以至于你再也看不到这些石头的细节 。 -
In the sky layer,
move the
Contrast
slider to increase the contrast
while also moving the
Brightness
slider to darken the layer.
::在天空层中,移动对比度滑动器来增加对比度,同时移动亮度滑动器来暗化层。
At this point, you’ll see if you left any sky when deleting it from ruins layer. If you did, the ruins layer sky will appear as a light edge along the ruins.
::在这一点上,你会看到,在从废墟层中去除任何天空时,你是否留下了任何天空。 如果从废墟层中清除,废墟层的天空就会像废墟边一样出现。
To fix this, make sure the ruins layer is selected and active.
::要解决这个问题, 确保废墟层被选中并激活 。Use the Eraser tool to erase the light edge. Since the ruins are already.. well.. ruined, it doesn’t matter if you go slightly into the ruins. When you are finished you shouldn't see the light edge along the ruins.
::使用“ 擦除” 工具来抹去光边缘。 因为废墟已经是. well.... 已经毁坏了, 您是否略微进入废墟并不重要 。 完工后, 您不应该看到废墟周围的光边缘 。
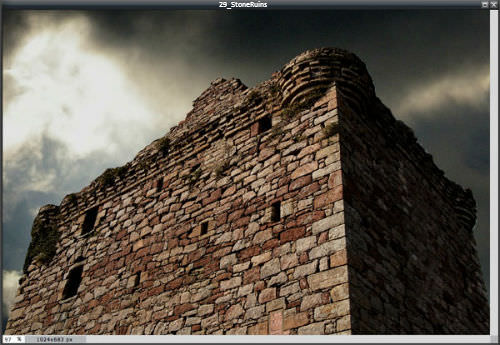
Now it's time to add the sun's rays effect across the ruins.
::现在是时候把太阳的光线效应加到废墟上-
Use the
Dodge
tool with a large feathered brush to lighten a path where the rays would be shining across the ruins.
::使用道奇工具 用一根大羽毛刷 照亮一条路 光线将闪耀在废墟上 -
Use the
Burn
tool to darken to above and below the rays area.
::使用 Burn 工具将光线区域上下暗化 。
The finished image should look like this.
::完成的图像应该像这个样子 。
RECORD YOUR FINDINGS
::记录你的调查结果-
What is the difference between the
Lasso
tool and the
Polygonal Lasso
tool?
::Lasso 工具与 Poligonal Lasso 工具有什么区别? -
What does the checkerboard pattern indicate in an image layer?
::棋盘图案在图像层中显示什么? -
How do the
Dodge
and
Burn
tools contribute to blending the layers?
::道奇和伯恩的工具如何帮助 混合层? -
What was the most difficult part of editing/combining these images?
::编辑/组合这些图像最困难的部分是什么?
-
Start in the lower right or left corner or the image, and click a series of points along the outline of the stone ruins. Since the edge of the ruins is already rough, you don’t have to be perfectly accurate, just stay inside the edge so as not to select any sky. Don’t worry, though, if you accidently include some sky you can fix it later.