Blender 3D:零基础到专业级-第1单元:背景
Introduction
In this module, you will learn some basics about operating in Object mode. This is normally the default mode Blender is in when you open a new document. It is the mode where you operate on whole objects, rather than on their parts.
::在本模块中,您将学习一些关于在对象模式中操作的基础知识. 这通常是 Blender 在打开新文档时的默认模式. 这是您在整个对象上操作的模式,而不是其部分.
Many of the conventions involving selection and manipulation of objects or parts of objects apply to other modes as well, so this is a good place to become familiar with those conventions.
::许多涉及对象或对象部分的选择和操作的规范也适用于其他模式,所以这是熟悉这些规范的好地方.
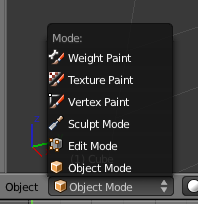
Open a new document, then confirm you are in Object mode by checking the mode menu.
::通过检查模式菜单, 确认您已进入对象模式.
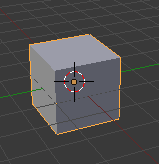
Select the default cube by clicking on it with RMB . You will see it framed in an orange outline.
::选择默认立方体,用人民币点击. 您将看到它被色轮.
Object Origin
When you select an object, you will notice a round dot appears, normally in the middle of the object, the same orange-yellow as the rest of the selection.
::您可以在选项中看到一个圆点, 通常在选项的中间,
This is the object’s
origin
. It is the reference point for the object’s local coordinate system. Certain kinds of edits to the object can cause this origin to end up at a position well outside the object. If that happens, operations like transformations applied with reference to the origin may not behave as expected. However, Blender has capabilities to deal with this. They will be explained when you need them.
::这是一个对象的起源. 它是对象的局部坐标系统的参考点. 对象的某些类型的编辑可以导致这个起源最终在对象之外的位置. 如果发生这种情况,与起源相关的转换等操作可能不会按预期进行. 然而,Blender有能力处理此问题. 当您需要时,将会解释它们.
Multiple Selections
You can select more than one object at a time. With the cube still selected, change your view until you can see both the cube and the default lamp. Select the lamp by clicking on it with SHIFT + RMB ( SHIFT + LMB for versions after 2.8), so both the lamp and the cube are selected. You will notice that the lamp takes on the orange-yellow colour, but the cube now has a more reddish highlight.
::您可以同时选择多个对象. 立方体仍然被选择,改变视图,直到您可以看到立方体和默认灯. 通过单击SHIFT + RMB (在2.8之后的版本中,使用SHIFT + LMB) 选择灯,从而选择灯和立方体. 您会注意到灯采用黄色颜色,但立方体现在具有更红色的亮点.
The active object is the last one selected. Other objects can be part of the selection, but the reddish-orange highlight indicates that they are not active. The Properties window shows properties for the active object, not the entire selection, although operations in the 3D view like moving and deleting objects will affect the entire selection. Some operations (like parenting, which you will learn about later) set up a special relationship between the active object and the rest of the selection, so for these, the order of selection of objects becomes important.
::活动对象是最后一个被选中的对象.其他对象可以是选择的一部分,但红色的突出显示显示它们不活跃.属性窗口显示了活动对象的属性,而不是整个选择,尽管3D视图中的操作,如移动和删除对象将影响整个选择.一些操作 (如你将稍后了解的育儿) 设置了活动对象和其余的选择之间的特殊关系,因此对于这些,对象的选择顺序变得重要.
You can remove the active object from the selection with SHIFT + RMB ; the small spot indicating the origin of the object’s geometry stays highlighted in the yellow-orange colour, even though the rest of the object loses the selection highlight. If you do this to an inactive object, it will make that object active.
::您可以使用 SHIFT + RMB 从选择中删除活跃对象; 显示对象的几何原点的小点会保持黄色色的突出显示,即使对象的其余部分也会失去选择突出显示. 如果您对一个不活跃的对象这样做,它将使该对象变得活跃.
Pressing CTRL + I
inverts
the selection. i.e. it deselects what was previously selected, and selects everything else instead. It does not change the active object.
::按下CTRL+I将选择逆转.即它取消了之前所选的,并选择其他所有东西.它不会改变活动对象.
Selecting Obscured Objects
If multiple objects lie under the mouse, you can choose which one to select by clicking ALT + RMB : this will bring up a menu listing the names of the selectable objects.
::如果鼠标下面有多个对象, 您可以通过点击ALT+RMB来选择哪一个: 这将显示一个列出可选择对象名称的菜单.
Alternatively, you can add an object to the current selection, or remove it from the current selection, by clicking ALT + SHIFT + RMB and selecting it from the menu.
::您可以通过单击ALT+SHIFT+RMB, 从菜单中选择一个对象, 添加到当前选择中, 或从当前选择中删除它.
On Ubuntu 16.04 LTS, it appears that ALT + RMB has the same effect as RMB on a Window's title bar. But ALT + SHIFT + RMB does the trick of
Selecting Obscured Objects
.
::在 Ubuntu 16.04 LTS 上,ALT + RMB 似乎与窗口标题上的 RMB 有相同的效果.但是 ALT + SHIFT + RMB 能够选择隐藏的对象.
Selecting Everything and Nothing
Pressing A does one of two things: if
anything
is selected, it clears the selection (i.e. selected objects are no longer selected). But if
nothing
is selected, then it selects
everything
. You will often see instructions to press A either once or twice, to ensure that either nothing is selected, or everything is selected.
::按A可以做两件事:如果选择了任何东西,它会清除选择 (即已选的对象不再被选择).但是如果没有什么被选择,它会选择所有东西.你经常会看到按A的指令,要么一次或两次,以确保没有什么被选择,要么选择了所有东西.
Hiding Things
When working on a complex model or scene, things are likely to get cluttered, making it hard to see the specific part you’re working on. It is possible to
hide
objects, so they no longer appear in the 3D view. Select the object(s) you wish to hide, and press H . This is purely a convenience for working in the 3D view, i.e. hidden objects remain unchanged when you render them.
::当在复杂的模型或场景上工作时,事情很可能会变得混乱,使您难以看到正在工作的特定部分.可以隐藏对象,因此它们不再出现在3D视图中.选择您想要隐藏的对象,并按H.这纯粹是为在3D视图中工作的便利,即染时隐藏的对象保持不变.
Pressing SHIFT + H hides everything
except
the current selection. This is a quick way to remove the clutter and narrow the view to the objects of interest.
::按 SHIFT + H 将除了当前选择之外的所有内容隐藏. 这是一种快速的方法来清除杂乱,并将视图缩小到感兴趣的对象.
Pressing ALT + H brings back all hidden objects and selects them. If you lose track of what is hidden and what is visible, press this to bring everything back.
::按下ALT+H会带回所有隐藏的对象并选择它们. 如果您无法跟踪隐藏的和可见的,请按下此键来带回所有内容.
Local Versus Global View
Local view is another way of selectively hiding parts of the scene. Pressing NUM/ ( \ for emulated numpad) hides everything that is not selected, and automatically zooms in or out as necessary so the selected objects fill the 3D view. Pressing NUM/ again, restores the items to the normal global view.
::局部视图是选择性隐藏场景部分的另一种方式.按下NUM/ (\ 模拟numpad) 将未选中的内容隐藏,并根据需要自动放大或缩小,以便选定的对象填充3D视图.再次按下NUM/将项目恢复到正常的全局视图.
This differs from simple hiding with H in that a render done in local view only shows the objects currently visible in that view. In particular, if your lights are excluded from the local view, you are liable to see black blobs in place of your objects.
::这与简单的隐藏不同,在本地视图中进行的染只显示当前在该视图中可见的对象.特别是,如果您的灯光被排除在本地视图之外,您可能会看到黑色斑块代替您的对象.
How do I determine the viewing mode?
Look at the words in the upper-left corner of the 3D view. They indicate your current view orientation and perspective settings (e.g. “User Persp”). If the word “(Local)” appears at the end of the string, you are in local view. Otherwise, you are in global view.
::如何确定观看模式?看看3D视图的左上角的单词.它们表示您当前的视图定向和视角设置 (例如: 用户Persp).如果字符串末尾出现了"" (本地) 字,则您处于本地视图中.否则,您处于全球视图中.
Border Select (Box Selection)
A quick way to select many objects at once is with the Border Select (box selection). Press B to activate it. You will see a pair of dotted crosshairs appear centred at the current mouse position. Drag diagonally with LMB to mark a selection rectangle, then release the LMB . Everything within the rectangle will be added to the selection. If you didn't mean to engage box-selection mode, pressing ESC exits border select mode.
::快速选择多个对象的方法是使用边界选择 (框选).按B来激活它.您将看到一对点的十字点以当前鼠标位置为中心.用LMB对角拉动来标记选择矩形,然后释放LMB.矩形内的所有内容都将被添加到选择中.如果您不打算启动框选模式,按ESC就会退出边界选择模式.
Alternatively, to remove things from the current selection, after pressing B , drag the selection rectangle with MMB . When you release the mouse button, everything in the drawn box will be deselected.
::另一个选择是,按下B后,用MMB拖动选择矩形,从当前的选择中删除. 当你释放鼠标按时,绘制的框中的所有内容都将被取消选择.
Circle Select (Brush Selection)
Another way to select several objects at once is with the Circle Select (brush selection), engaged by pressing C . In this mode, clicking or dragging on objects with LMB adds them to the selection, while MMB
removes
them from the selection. Thus the mouse becomes a brush that you can use to “paint” objects in or out of the selection.
::选择多个对象的另一种方法是使用Circle Select (刷选),通过按C进行选择.在这种模式中,点击或拖动具有LMB的对象将其添加到选择中,而MMB将其从选择中删除.因此,鼠标成为一个刷,您可以使用它来画对象在选择中或外.
The circle showing the size of the brush can be adjusted with the mouse wheel. This allows you to use a broad brush for selection of lots of objects at once, or a finer one for better control.
::显示刷子大小的圆圈可以通过鼠标轮进行调整. 这允许您使用宽刷子同时选择许多对象,或使用更细的刷子进行更好的控制.
Clicking RMB or pressing ESC terminates Circle Select mode.
::单击人民币或按ESC结束了圆形选择模式.
The Manipulator
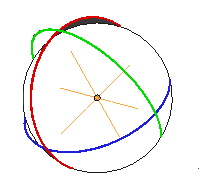
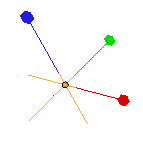
The manipulator appears in the middle of the selection. There are three kinds of manipulator as shown in the illustrations. It can be used to apply translation (position changes), rotation, and scaling (size changes) to objects. Its appearance changes according to which of these functions are enabled. You can click on the menu transformation buttons that appear when the manipulator is visible, to choose a single transformation, or shift-click to enable more than one simultaneously. You can toggle the visibility of the manipulator with CTRL + SPACE , or by clicking the menu button with the red, green and blue arrows.
::操作器出现在选择的中间.有三种操作器,如图所示.它可以用于对象的翻译 (位置变化),旋转和缩放 (大小变化).它的外观会根据这些功能中的哪一个被启用而改变.您可以单击操作器可见时出现的菜单转换按,选择单个转换,或转移按同时启用多个.您可以通过CTRL + SPACE切换操作器的可见性,或者通过使用红色,绿色和蓝色箭头点击菜单按.
If you have troubles selecting the red arcs of the rotation manipulator select File→ User Preferences... System → Selection and change it to "OpenGL Select" or "OpenGL Occlusion Queries".
::如果您在选择旋转操作器的红色弧度时遇到问题,请选择"文件→用户偏好...系统→选择"并将其更改为"OpenGL Select"或"OpenGL Occlusion Queries".
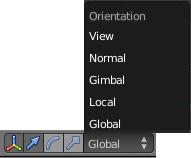
Transform orientations:
the “Orientation” menu governs how the axes of the manipulator are aligned, with the default “Global” corresponding to the global coordinate system. Other useful options are “Local”, which corresponds to the local coordinates system of
each object
, and “View”, which is always aligned to your view.
::转换方向: 方向菜单控制操作器的轴如何对齐,默认的 全球对应于全球坐标系统. 其他有用的选项是 本地,对应于每个对象的本地坐标系统, 和 视图,它总是对应于您的视图.
To demonstrate this, click on the camera with RMB so that it is the only object selected. Set the manipulator to do only translations (blue arrow button is selected in menu), and ensure the orientation is set to “Global”. Drag any of the manipulator's coloured arrows with LMB to move the camera in the corresponding direction.
::为了证明这一点,点击带有RMB的摄像头,使其成为唯一选定的对象.设置操纵器只进行翻译 (菜单中选择蓝色箭头按),并确保定向为"全球".拖动操纵器带有LMB的任何彩色箭头,将摄像头移动到相应的方向.
Now switch the orientation to “Local”. You will see the manipulator arrows re-orient themselves. Note that the Z-direction (blue arrow) is now in the direction of the camera view. The local co-ordinates of the camera have the optical axis of the camera running along the Z axis. By default, that is pointing towards the cube object.
::现在将方向切换为"本地".你会看到操纵器箭头重新定位.请注意,Z方向 (蓝色箭头) 现在是相机视图的方向.相机的本地坐标是相机的光轴沿着Z轴运行.默认情况下,指向立方体对象.
The cube, by default, has its own local Z-direction running vertically.
::立方体默认有自己的Z方向,
With the manipulator orientation still set to Local, add the cube to the selection with SHIFT + RMB . You will see the manipulator move so it is in the centre of the selected objects. It is now between the camera and the cube. Now if you drag the manipulator Z axis arrow with LMB , each object will move along its
own
version of that axis. The camera moves towards or away from the cube and the cube rises or falls.
::随着操纵器的定向仍然设置为Local,将立方体添加到选择中,使用SHIFT+RMB.您将看到操纵器移动,因此它位于所选对象的中心.它现在位于摄像机和立方体之间.现在,如果您用LMB拖动操纵器Z轴箭头,每个对象将沿着其自己的版本的轴移动.摄像机向立方体移动或远离立方体,立方体上升或下降.
Switch the orientation to “Global”, and try dragging a manipulator arrow again. This time, both objects will appear locked together and will move in the same direction, along the same (global) axis.
::将方向切换为"全球",并再次尝试拖动操纵器箭头.这次,两个对象将出现锁在一起,并将沿着相同的 (全球) 轴向相同的方向移动.
Transformation Hotkeys
The manipulator is not the only way to apply transformations to objects. That can also be done via keyboard shortcuts.
::操作器不是唯一对对象进行转换的方法. 这也可以通过键盘快捷键完成.
Hide the manipulator to reduce clutter. Select the cube, and only the cube, with RMB . Now press G to
G
rab the object. The selection outline around the object turns white, as it did when you were dragging with the manipulator, except this time, you didn't press any mouse buttons. Now move the mouse without pressing any buttons, and you will see the object move along with it. Press LMB or ENTER to terminate the movement and leave the selected object at the new position, or RMB or ESC to cancel the operation and leave the object at its original location.
::隐藏操纵器以减少杂乱. 选择立方体,仅仅是立方体,用人民币. 现在按G抓住对象. 对象周围的选择轮变白,就像你在用操纵器拖动时一样,除了这一次,你没有按任何鼠标按. 现在移动鼠标而不按任何按,你会看到对象随之移动. 按LMB或ENTER结束移动并将所选对象留在新位置,或按RMB或ESC取消操作并将对象留在原始位置.
Similarly, use R to
R
otate the object, and S to
S
cale it.
::同样,使用R来旋转对象,并使用S来缩放它.
You can
constrain
the movement to particular axes by pressing the appropriate axis key. For example, press G to start moving the cube again, then press X and you will see a bright colored line appear parallel to the global X-axis. Now when you move the mouse, the cube will move along only that colored line. Similarly Y and Z constrain movement to the Y and Z axes respectively. The colored lines that appear are a brighter reddish, green or blue that correspond to the red, green or blue lines for the X, Y or Z axes, respectively.
::通过按下适当的轴键,可以限制运动到特定的轴.例如,按下G键,开始再次移动立方体,然后按下X键,您将看到一个亮色的线条与全球X轴平行.现在当您移动鼠标时,立方体将只沿着那个彩色线移动.类似地,Y和Z也限制运动到Y和Z轴.出现的彩色线条是分别对应X,Y或Z轴的红,绿或蓝线的更亮的红色,绿色或蓝色线条.
Transform orientations:
to constrain the transformation to a different set of axes, press the constraint key twice. The coordinate system used depends on the selection in the Transform Orientation menu:
::转换方向:为了限制转换到不同的轴集,按下限制键两次.所用的坐标系统取决于转换方向菜单中的选择:
-
Local or Global — the transformation happens in the object’s local coordinate system.
::局部或全球 转换发生在对象的局部坐标系中. -
View — the transformation is aligned to view coordinates.
::视图转换对准到视图坐标.
For example, with the default “Global” selection from this menu, select the camera with RMB , press G to move it, then press Z twice, and you will see the coloured line orient itself along the direction of view of the camera.
::例如,在这个菜单中默认选择"全球",选择使用人民币的相机,按G移动它,然后按Z两次,你会看到彩色线沿着相机的视角方向方向.
The axis constraints also work with scaling, and rotation (which only happens
around
the specified axis).
::轴约束还可以用于缩放和旋转 (仅在指定轴周围发生).
You can also constrain movement and scaling to happen along two axes, but not the third one, by holding down SHIFT when typing the axis constraint. For example, G followed by SHIFT + Z will constrain movement to the global X-Y plane (i.e. any direction
except
along the Z-axis). To constrain movement to the
local
X-Y plane, type the contraint twice: G SHIFT + Z SHIFT + Z .
::您还可以通过在输入轴约束时按住SHIFT来限制运动和缩放在两个轴上发生,而不是第三个轴.例如,G跟随SHIFT + Z将限制运动到全球X-Y平面 (即任何方向,除了沿Z轴).为了限制运动到本地X-Y平面,输入约束两次:G SHIFT + Z SHIFT + Z.
Here's a summary of what the transformation hotkeys do, with and without constraints:
::这里是转换热键所做的事情的总结, 有和没有约束:
| Key | without constraint | followed by axis | followed by SHIFT - axis |
|---|---|---|---|
| G | moves in plane perpendicular to view direction | moves along axis | moves in plane perpendicular to axis |
| R | rotates about view direction | rotates about axis | |
| S | scales uniformly along all axes | scales along axis | scales uniformly in plane perpendicular to axis |
In addition, the hotkey sequence R R enables
free rotate
, i.e. the object can rotate around all three axes as you move the mouse.
::另外,RR快键序列还能自由旋转,即当你移动鼠标时,物体可以在三轴周围旋转.
Transforming by Numbers
::通过数字进行转换
Sometimes you need to position things accurately, using calculated numbers, instead of estimating by eye. Blender can do that too. Simply type the number after the transformation hotkeys before pressing ENTER to confirm the operation. For example, G X 1KEY ENTER will move the selection by 1 unit in the positive X direction. G X −KEY 1KEY ENTER will move by 1 unit along negative X. Decimal points are allowed, thus S 0KEY .KEY 5KEY ENTER will scale the selection by a factor of 0.5, or 50%.
::有时需要使用计算数字来准确定位东西,而不是用眼睛估计. Blender 也可以这样做. 简单地在按 ENTER 之前在转换热键后输入数字来确认操作. 例如,G X 1KEY ENTER 将选择移动 1 单位在正 X 方向. G X −KEY 1KEY ENTER 将沿负 X 移动 1 单位. 允许小数点,因此 SKEY 0 .KEY 5KEY ENTER 将选择缩放 0.5 倍数,即 50%.
Rotation works similarly, using degrees clockwise around the selected X, Y or Z axis.
::旋转也类似,在选定的 X,Y 或 Z 轴周围使用时针方向的度数.
Transformation Menu
::转换菜单
Yet another way is shown at right, in the Transform panel that appears at the top of the Properties shelf (press N to toggle its visibility at the right side of the 3D view). Here you can see the existing transformations values. You can drag the sliders to change them, or click on them and enter new values.
::另一种方法是在右侧的"转换"面板中显示的,它出现在"属性"架的顶部 (按N以在3D视图的右侧切换其可见性).在这里,您可以看到现有的转换值.您可以拖动滑块来更改它们,或者点击它们并输入新的值.
Choosing the Pivot Point

When you do a scaling or rotation operation, you can choose the pivot point, which is the central origin point that remains unaffected by the operation. By default this is the “Median Point”, or centre point of the selection, but the Pivot Point menu lets you choose some other options. For example, select both the cube and the camera, and rotate them ( R ). By default they will rotate around their common centre. Now go to the Pivot Point menu and choose “Individual Origins” and rotate your two selected objects with R again, and you will see each one now rotates about its
own
centre, rather than the common one.
::当你做一个缩放或旋转操作时,你可以选择一个枢纽点,这是一个中央的原点,不受操作的影响.默认情况下,这是中点,或选择的中心点,但枢纽点菜单可以让你选择其他一些选项.例如,选择立方体和摄像头,并旋转它们 (R).默认情况下,它们将围绕它们的共同中心旋转.现在进入枢纽点菜单,选择个别起源,并再次用R旋转你选择的两个对象,你会看到每个对象现在围绕自己的中心旋转,而不是共同的中心.
Another useful pivot option is “3D Cursor”, which places the transformation origin at the 3D cursor location.
::另一个有用的转点选项是3D Cursor,它将转换源放在3D 标针位置.
Finally, the button with three dots and a double-headed arrow immediately to the right of the one that pops up the Pivot Point menu is titled “Manipulate center points.” Selecting this means transformations do not rotate the actual objects themselves, only their positions. To see the effect, you need to choose a pivot point that is not the object’s origin. Now try rotating the object. You will see its centre describes an arc around the pivot point, without changing the object's orientation. Think how the seats in a Ferris Wheel rotate around the wheel's pivot, yet still maintain their orientation.
::最后,在Pivot Point菜单中出现的右边立即出现的三点和双头箭头的按标题为"操纵中心点".选择此意味着转换不会自动旋转实际的物体,而仅仅是它们的位置.为了看到效果,您需要选择一个不是物体的轴心点.现在尝试旋转物体.您将看到它的中心描述了围绕轴心点的弧,而不会改变物体的方向.想想摩天轮中的座椅如何围绕轴心旋转,但仍然保持其方向.
Similarly scaling will change the distance between the chosen pivot point and the object’s origin, but will not affect the size of the object itself. A bursting firework scales rapidly in this way.
::同样,缩放将改变选择的转点和物体的起源之间的距离,但不会影响物体本身的尺寸. 爆发的烟花会以这种方式快速缩放.
Why can't I rotate or scale objects?
One pitfall you might encounter is that you select an object, try rotating with R or scaling with S , and nothing happens, though moving with G still works. It's quite likely you have the “Manipulate center points” button active when you didn't mean to. Check if it's active, and click it to deactivate if so.
::为什么我不能旋转或缩放物体?你可能遇到的一个陷是你选择一个物体,尝试用R旋转或S缩放,没有什么发生,虽然用G移动仍然有效.很可能你在不想的时候已经启动了"操纵中心点"按.检查它是否活跃,然后点击它来禁用.
Hotkeys
— there are keyboard shortcuts for all the above options:
::快捷键 所有上述选项都有键盘快捷键:
| Pivot Option | Key |
|---|---|
| Active Element | ALT + .KEY |
| Median Point | CTRL + ,KEY |
| Individual Origins | CTRL + .KEY |
| 3D Cursor | .KEY |
| Bounding Box Center | ,KEY |
| Toggle Manipulate Center Points | ALT + ,KEY |
Basic Camera Technique
The camera view NUM0 is very useful for making adjustments to your camera while getting continuous feedback on how the render will look. This view shows a framing rectangle covering the area that will appear in the render, surrounded by a
passepartout
which gives a darkened view of the surrounding part of the scene. You can use the mouse wheel to zoom in and out, adjusting how much of your view is the rendered area and how much is passepartout.
::摄像头视图NUM0非常有用,可以对摄像头进行调整,同时对染的外观获得持续的反.该视图显示一个框矩形,覆盖将在染中出现的区域,周围环绕着一个透图,可以对场景周围部分提供暗色视图.您可以使用鼠标轮放大和缩小,调整您的视图中的染区域和透图的比例.
In this view, use RMB on the framing rectangle to select the camera, and it will show the usual orange-yellow highlight. The manipulator will not appear even if enabled, so you must use the transformation hotkeys to perform camera transformations.
::在此视图中,使用RMB在矩形上选择相机,它将显示通常的黄色亮点.即使启用了操纵器,也不会显示,因此您必须使用转换热键来执行相机转换.
Use G to move the camera around parallel to the view plane. Since the view stays locked to the camera, you will see the scene move in the direction
opposite
of what you might expect.
::使用G将相机移动并行于视角. 由于视角保持锁定在相机上,你会看到场景移动的方向与你可能预期的相反.
The camera’s local Z-axis lies along its direction of view. This allows useful operations like G Z Z to move the camera in or out without affecting the direction in which it's pointing. Also the X axis runs left to right in the camera view so rotating around X R X X will adjust the up-and-down
pitch
angle. Rotating around the vertical Y axis R Y Y will change the
yaw
(left-right) angle, and you can rotate around the optical axis of the camera using R Z Z to produce an effect of
rolling
the view around the visual axis.
::摄像机的本地Z轴沿着它的视角. 这允许像GZZ这样的有用操作来移动摄像机进出,而不会影响它指向的方向. 此外,X轴在摄像机视图中从左向右运行,因此在XRXX周围旋转将调整上下角. 旋转在垂直Y轴RYY周围将改变 (左向右) 角,您可以使用RZZ旋转在摄像机的光学轴周围,以产生视图在视觉轴周围滚动的效果.
Another useful technique is to position the 3D cursor at a point of interest, set the pivot point to the 3D cursor, then rotate the camera about a global axis, like the global Z-axis ( R Z ), to adjust the angle of view while keeping the same objects in view, and without altering the distance of the camera from the point of interest. In real life you'd get that effect by walking in a circle around your subject with your camera mounted on a
Steadicam
rig.
::另一个有用的技术是将3D光标定位在一个感兴趣的点,将转点设置在3D光标上,然后将相机旋转在一个全轴上,如全 Z 轴 (R Z ),以调整视角,同时保持相同的物体,并且不改变相机与感兴趣点的距离.在现实生活中,你会通过在你的主题周围绕着你的相机安装在稳定摄像机上,以获得这种效果.
Scaling the camera object changes its size as shown in the 3D view, but has no effect on the actual render. Regardless of what axis constraints you try to apply, the camera object will always scale uniformly along all axes.
::调整相机对象的尺寸会改变,如3D视图所示,但对实际染没有影响.无论您尝试应用什么轴约束,相机对象将始终在所有轴上均调整.
You can also use Fly mode SHIFT + F in camera-view mode to fly around the scene, taking the camera with you.
::您还可以使用飞行模式,在摄像头视图模式中按SHIFT+F,飞行在场景周围,带着摄像头.
Another choice for moving your camera in Camera View is to bring up the Properties panel ( N ) and, in the View section, tick the box next to Lock Camera to View. Now you will be able to use the MMB to "move objects" just as you move things around in other views such as the 3D view. Holding down the MMB and dragging will rotate, Shift + MMB will allow you to "move the object" around in the view (panning), and the scroll wheel will allow you to "move the object" closer or farther from the camera. You are actually moving the camera with these manipulations and not the object(s) themselves.
::移动相机的另一个选择是打开属性面板 (N),在"查看"部分,勾选"锁定相机到查看"旁边的框.现在您可以使用MMB"移动对象",就像您在其他视图中移动物体一样,例如3D视图.按住MMB并拖动将旋转,Shift + MMB将允许您在视图中"移动对象" (移动),滚动轮将允许您"移动对象"离相机更近或更远.您实际上是通过这些操作移动相机而不是对象本身.
|
|
Scaling the Camera:
You can scale the camera object with S as you can most other objects. However, this has
no effect
on what is seen with that camera. Think of it as strictly a cosmetic thing to make the camera object easier to spot (if it's too small relative to other objects in the scene), or scale it down to keep it in proportion when working with smaller objects.
Another way of changing the displayed size of the camera is to look in the Camera
|
Adding/Removing Objects, Undo/Redo, Repeat
Select the cube with RMB again. Press either X or DEL and, after confirming the popup, the cube disappears! It has been deleted from your scene. Unlike mere hiding, it really has disappeared. Press CTRL + Z to undo your last operation, and it reappears.
::选择人民币的立方体. 按 X 或 DEL,确认弹出窗口后立方体消失了! 它已经从您的场景中删除. 与仅仅是隐藏不同,它真的消失了. 按 CTRL + Z 取消您的最后一项操作,它再次出现.
Click with LMB to position the 3D cursor away from the default cube. Press SHIFT + A to bring up the Add menu, go to its Mesh submenu, and add another cube to the scene. Again, undo with CTRL + Z , and you are back to a single cube again.
::按 LMB 将 3D 标针远离默认立方体.按 SHIFT + A 显示添加菜单,进入其网格子菜单,并添加另一个立方体.再次,用 CTRL + Z 撤回,然后你又回到一个立方体.
Now press CTRL + SHIFT + Z : this will undo the undo, and
redo
the last operation you undid, bringing back the second cube.
::现在按Ctrl+Shift+Z:这将取消取消,并重复你最后的操作, 带回第二个立方体.
Try adding a third cube. Now CTRL + Z should undo that and take you back to two cubes, and pressing CTRL + Z again should undo the addition of the second cube, taking you back to one. Try CTRL + SHIFT + Z at this point to restore the second cube, then CTRL + SHIFT + Z again to restore the third one.
::试着添加第三个立方体. 现在CTRL+Z应该取消这个,让你回到两个立方体, 再按CTRL+Z应该取消第二个立方体的加法,让你回到一个. 在这个点尝试CTRL+SHIFT+Z恢复第二个立方体, 然后CTRL+SHIFT+Z再次恢复第三个立方体.
Blender remembers up to the last 32 things you did (depending on the limit set in your user preferences) in its
undo stack
. You can go backward and forward through it with CTRL + Z and CTRL + SHIFT + Z .
::混合器记住你在撤销堆中做了的最多32件事 (取决于用户偏好设置的限制). 您可以通过CTRL + Z和CTRL + SHIFT + Z来往后转.
Sometimes you want to perform an action repeatedly. To repeat the last action, type SHIFT + R .
::有时你需要重复执行某个操作. 要重复上一个操作,请键入 SHIFT + R .
Assigning Layers
Earlier, you learned about showing and hiding layers in the 3D view. To assign layers for selected objects, press M . The same keyboard shortcuts apply here as when choosing which layers to display, i.e. 1KEY for only the first layer, 2KEY for only the second etc, SHIFT + 1KEY to include/exclude the first layer and so on.
::之前,你已经了解到在3D视图中显示和隐藏层. 为了为选定的对象分配层,请按M. 这里使用的键盘快捷键与选择显示哪些层一样,即仅显示第一个层的1KEY,仅显示第二层的2KEY等,包含/排除第一个层的SHIFT+1KEY等.
After assigning an object to a different layer, it disappears!
If this happens to you, it's because the layer(s) you assigned to the object, and the layer(s) you currently have visible in the 3D view, have nothing in common. Simply change the visible layers to include at least one of those you assigned the object to, and it will reappear. For example, if currently only layer 1 is visible, and you assign an object to only layer 2, it will disappear, but reappear when you change the visible layer to layer 2.
::指定一个对象到不同的层后,它就会消失!如果发生这种情况,那是因为你分配给对象的层和你目前在3D视图中可见的层没有任何共同点.只需更改可见层,至少包括你分配对象的其中一个,它就会重新出现.例如,如果目前只有1层可见,你只将对象分配到2层,它就会消失,但当你将可见层更改为2层时,它会重新出现.
Object, Action, Settings
Bring up the Add menu again ( SHIFT + A ). This time, add a new cylinder mesh to the scene. Look to the left of the 3D view, in the Tool Shelf (toggle its visibility with T if it's not visible), at the bottom you should see a new panel has appeared, titled “Add Cylinder”. Near the top of it is the “Vertices” number, initially defaulting to 32, which gives a fairly round-looking cylinder. Reduce it to 6, and adjust the view as necessary to get a good view of your “cylinder”, and you will see it is now a hexagonal prism. Change the number of vertices to 3, and it becomes a triangular prism.
::再打开添加菜单 (SHIFT+A). 这次,将一个新的圆柱状网格添加到场景中. 在3D视图的左侧,在工具架 (如果它不显示,请将其可见性与T交换),在底部,你应该看到一个新的面板出现了,标题为"添加圆柱". 在上面的顶部是"顶点"号,最初默认为32,这给出了一个相当圆的圆柱. 将其减少到6,并根据需要调整视图以获得对你的"圆柱"的良好视图,你会看到它现在是一个六角镜. 将顶点数更改为3,它成为一个三角镜.
This is an example of an important user-interface convention that runs right through Blender: first you select the object you want to perform an operation on as appropriate (not applicable here because we are creating a new object), then you perform the specified action with some default settings, and finally you adjust the settings to give the exact result you want. This way, instead of getting a popup
before
the action is performed, into which you have to put the right settings and hope they will give the right result, you get to interactively adjust the settings and immediately see the results, without having to continually redo the operation and deal with popups.
::这是一个重要的用户界面常规,它直接通过Blender运行:首先你选择你想要执行操作的对象 (不适用于这里,因为我们正在创建一个新的对象),然后你执行指定操作与一些默认设置,最后你调整设置给你想要的确切结果. 这样,而不是在执行操作之前得到一个弹出窗口,你必须把正确的设置,并希望他们会给出正确的结果,你得到交互调整设置,立即看到结果,而不必不断重复操作和处理弹出窗口.