Blender 3D:零基础到专业级-单元2:基本建模和着色
In this module, you'll learn how to extrude and merge vertices of a mesh and how to save a model. This module also introduces the File Browser window type.
::在这个模块中,你将学习如何挤出和合并网状的顶点,以及如何保存模型. 这个模块还介绍了文件浏览器窗口类型.
Your first model will be a house, which we will develop over the course of several modules. Here we will start with four walls and a pyramidal roof. Simple! Since you're going to use the default cube as a base, all you actually need to build is the roof!
::您的第一个模型将是一个房子,我们将在几个模块的过程中开发. 这里我们将从四个墙壁和金字塔形屋顶开始. 简单! 因为你将使用默认立方体作为基础,你实际上需要建造的是屋顶!
Editing in Blender generally involves four steps:
::在Blender中编辑通常包括四个步骤:
-
Selecting an object to edit.
::选择一个要编辑的对象. -
Activating Edit Mode on that object.
::激活该对象的编辑模式. -
Selecting part(s) of the object to act upon.
::选择对象的部分来对其进行操作. -
Specifying the action(s) to be performed on those parts.
::指定在这些部分执行的操作.
Bring up the Default Cube
::显示默认立方体
-
Launch Blender.
::启动混合器 -
Load the factory settings using
File → Defaults → Load Factory Settings
.
::使用文件加载工厂设置 → 默认 → 加载工厂设置.
This should give you a perspective view of a scene containing three objects:
::这应该让你对一个包含三个物体的场景有个视角:
-
a cube,
::一个立方体, -
a light source,
::一个光源, -
a camera.
::一个相机.
Setting up the Viewport
::设置视窗
It will be easier to work on the roof of your house in a perspective side view:
::您可以更轻松地在屋顶上工作,
-
Press Num3 to switch to a "perfect" right side view.
::按下Num3转换到"完美"的右侧视图.
|
|
Num5 puts the viewport into perspective
only
if it's not
already
in perspective. Otherwise, Num5 switches the viewport
back
to orthographic view.
|
"Right Persp" will be shown on the top left of the 3D View. The "up" (Z) direction in the scene is now "up" on your monitor as well.
::现场中的"上" (Z) 方向现在也在您的显示器上"上".
It will also help to zoom in a bit:
::放大图像也可以帮助:
-
Make sure the 3D View window is active (which means your mouse cursor is in it).
::确保3D视图窗口是活跃的 (这意味着你的鼠标标在其中). -
SCROLL or press Num+ a few times until the cube is about 1/3 the height of the viewport.
::滚动或按下Num+几次,直到立方体的高度大约是视窗的1/3.
Because you just loaded the factory defaults, the 3D transform manipulator will be enabled. For mesh editing, it will help to turn the manipulator off:
::因为你刚刚加载了工厂默认值,所以3D转换操作器将会被启用. 对于网格编辑,它将有助于关闭操作器:
-
Make sure the 3D View window is active.
::确保3D视图窗口是活跃的. -
Press Ctrl + Space to toggle the manipulator on or off.
::按Ctrl+空格键可以打开或关闭操作器.
Press Tab once. This puts you into Edit Mode on the selected object, i.e. the cube.
::这将会让你进入所选对象的编辑模式,即立方体.
|
If the lamp and/or camera were selected instead of (or in addition to) the cube, you wouldn't be able to enter Edit Mode. (Cameras and lamps are edited in a different fashion.)
|
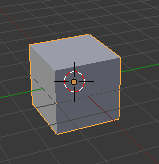
Here's how the cube should look at this point:
::立方体应该在这个点上看起来是这样的:

|
|
The
Occlude Background Geometry
button is only visible when Blender is in Edit Mode and the draw type is Solid, Shaded, or Textured.
|
The default cube is constructed as a mesh. Now that you're in Edit Mode, you can access the individual vertices, edges, and faces that make up the mesh. The default cube consists of eight vertices, twelve edges, and six faces.
::默认立方体是以网格形式构建的.现在你在编辑模式中,你可以访问构成网格的个别顶点,边缘和面.默认立方体由八个顶点,十二个边缘和六个面组成.
Adjusting the Height
::调整高度
Right now, all eight vertices are selected, so any vertex edits you make will affect them all. For instance, if you were to move a vertex, the other seven vertices would follow. In order to build a roof peak for the house, you need to alter just the four top vertices of the cube. To do that, you must change the selection so that only
those
vertices are selected.
::现在,所有八个顶点都被选择了,所以你做出的任何顶点编辑都会影响它们.例如,如果你移动一个顶点,其他七个顶点也会跟着.为了为房子建造一个屋顶顶峰,你需要改变立方体的四个顶点. 要做到这一点,你必须改变选择,这样只有这些顶点才会被选择.
-
Turn 'Occlude Background Geometry' off, so you can see all vertices. Note, in newer versions, this button is called "Limit Selection to Visible." It is one of the buttons to the right of transform orientation which is to the right of the mode select which should be currently set to "edit mode".
::关闭"排除背景几何",这样你就可以看到所有的顶点.请注意,在新版本中,这个按叫做"将选择限制为可见".它是转换定向的右边的按之一,它位于模式选择的右边,该模式应该目前设置为"编辑模式". -
Deselect the bottom four vertices, one by one, using Shift + RMB .
::使用Shift+人民币逐一取消底部四个顶点的选择.
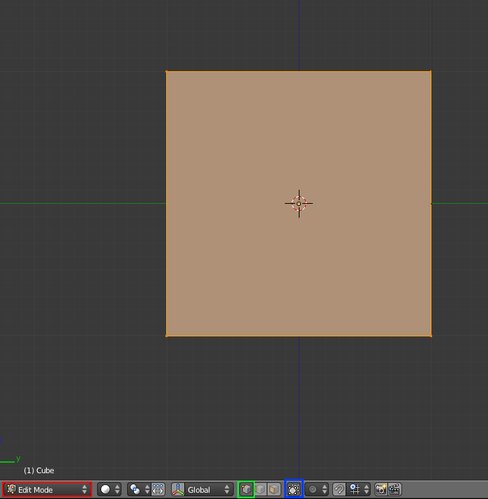
The picture to the right shows the cube (in right perspective view and occlude background geometry "off") with the correct vertices selected.
::右图显示立方体 (在右视角视图中,并遮住背景几何"关闭"),选中正确的顶点.
|
|
Remember, if you make a mistake, you can undo your work step-by-step by pressing Ctrl + Z .
|
Now you'll adjust the height of your house's ceiling. Activate the
grab tool
:
::现在,你将调整屋顶的高度.
-
Make sure Blender is in Edit Mode, with the relevant part(s) of the object selected.
::确保Blender处于编辑模式,并选择了对象的相关部分. -
Make sure the 3D View window is active.
::确保3D视图窗口是活跃的. -
Press G .
::按G.
The 3D View header will be replaced by numbers: "Dx: 0.0000 Dy: 0.0000 Dz: 0.0000 (0.0000)".
::3D视图的标题将被数字所取代:"Dx: 0.0000 Dy: 0.0000 Dz: 0.0000 (0.0000)".
You want to lower the ceiling without making the walls crooked. This is hard to do freehand, but happily the grab tool provides an option for doing just that.
::让墙壁不歪, 让天花板低落. 这很难用自由手, 但幸运的是, 抓取工具提供了一个选择.
With the grab tool activated:
::抓取工具被激活:
-
Press Z to limit movement to the global Z-axis.
::按下Z以限制全球Z轴的运动.
When your ceiling is the height you want, confirm the grab with LMB (or Enter ).
::通过LMB (或Enter) 确认抓住.
Extruding
::挤出
Now you're going to "add on" to your house by
extruding
. Extrusion begins by duplicating selected parts of an object. Then the new parts are pulled away from the old ones, with new faces and edges created as necessary.
::现在你将通过挤出来"添加"到你的房子. 挤出首先是复制物体的选定部分. 然后新的部分从旧的部分中拉开,根据需要创建新的面孔和边缘.
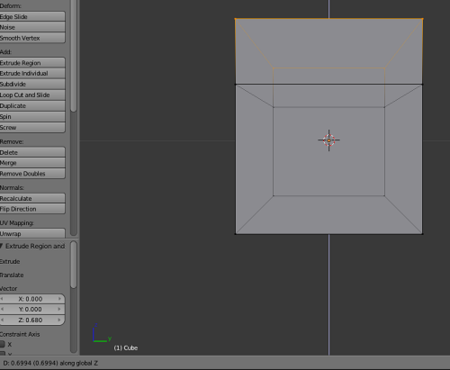
To add an attic to your house:
::为了给你的房子增加一个楼:
-
Make sure Blender is in Edit Mode, with the top four vertices selected.
::确保Blender处于编辑模式, 选择前四个顶点. -
Make sure the 3D View window is active.
::确保3D视图窗口是活跃的. -
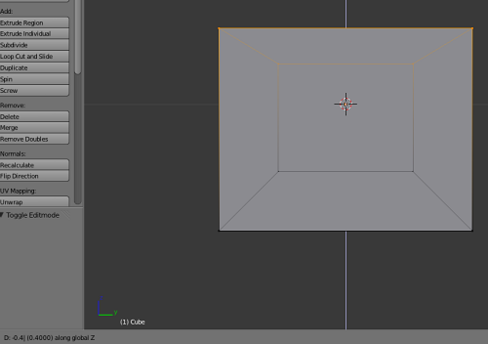
Press E to activate the
extrude tool
.
::按E激活挤出工具. -
Restrict movement to the Z axis and move the mouse pointer upward.
::限制运动到Z轴,并将鼠标指针向上移动. -
When the attic is the height you want, confirm the extrude with LMB or Enter .
::通过LMB或Enter确认挤出. -
Keep the extrusion visible: you will need it for the next exercise.
::保持挤可见:你将需要它进行下一次练习.
|
|
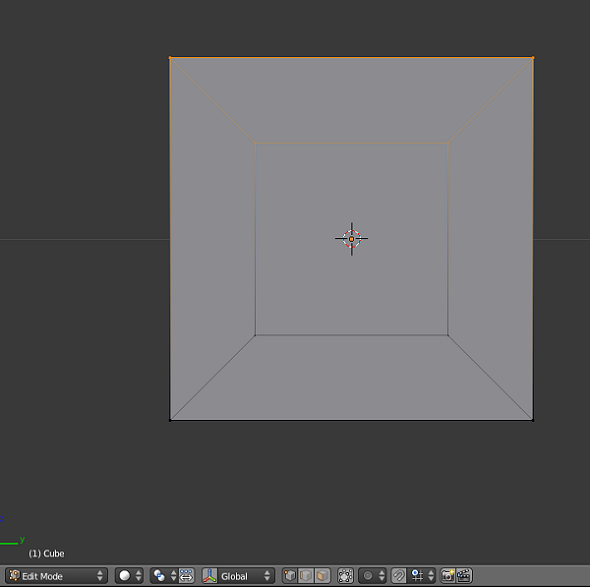
At the end of this process only the four new vertices (the upper corners of the attic) will be selected. The others (including the four that were originally selected) will not be selected.
|
|
|
If you cancel an extrude operation without confirming it, duplicate vertices and edges have already been created. If this isn't what you wanted, use Ctrl + Z to undo the duplication.
|
Merging
::合并
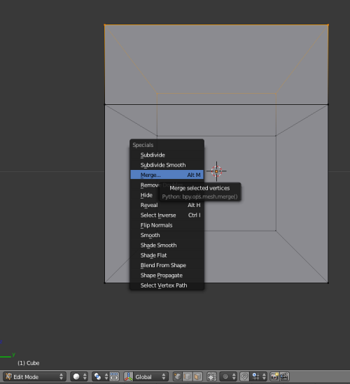
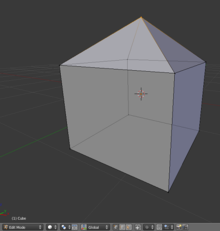
You can change the roof from a flat one to a pyramidal one by merging the vertices of the roof:
::通过将屋顶的顶点合并,
-
Make sure that you still have the extruded roof from the previous exercise visible.
::确保你仍然可以看到前一次的挤压屋顶. -
Make sure Blender is in Edit Mode, with the four top-most vertices selected.
::确保Blender处于编辑模式, 选择了最顶的四个顶点. -
Make sure the 3D View window is active.
::确保3D视图窗口是活跃的. -
Press W to bring up the
Specials
menu.
::按W打开"特别菜单". -
Select
Merge
. (You can also access this by pressing Alt + M .)
::选择合并 (您也可以通过按下 Alt + M 访问此功能) -
The
Merge
menu should pop up, select
At center
.
::应该出现并购菜单,选择"在中心".
A message should appear on the Info header saying that 3 vertices have been deleted, this is because in order to merge four vertices into one, three vertices must be deleted.
::在Info头部应该出现一个消息,说3个顶点已被删除,这是因为为了将4个顶点合并为一个,必须删除3个顶点.
Saving your Work
::保存你的工作
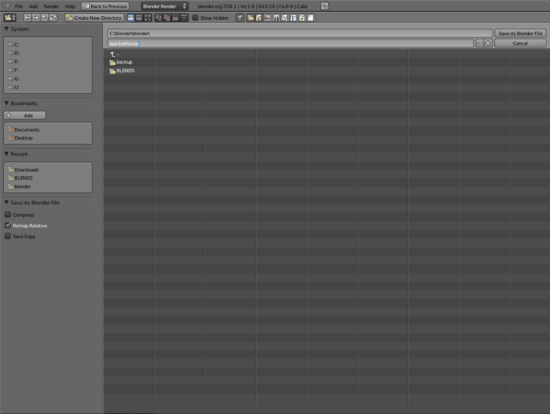
We will be developing the house in later modules, so save your work now. To save the current scene in a
.blend
file:
::现在将把你做的工作保存起来. 要将当前的场景保存到一个 .blend 文件中:
-
Press F2 (or select
File → Save As
). The active window temporarily changes into a File Browser window.
::按F2 (或选择文件 → 保存为). 活跃的窗口暂时会变成文件浏览器窗口. -
Navigate to the directory (folder) where you want to write the file by clicking LMB on directory names in the File Browser window. (Clicking on ".." will take you up one level.)
::通过在文件浏览器窗口中点击目录名的 LMB 导航到您想要写文件的目录 (文件). (点击""...将带您上升一级). -
If you wish to name the file something other than "untitled.blend", type a filename in the text box to the left of the "Cancel" button. (The .blend suffix will be added automatically.)
::如果您希望给文件命名的名称不是"无标题.blend",请在"取消"按左边的文本框中输入文件名称. (将自动添加.blend后). -
Click LMB on the "Save As Blender File" button. As soon as the save operation is complete, the window will automatically revert to its former type.
::在"保存为混合器文件"按上点击 LMB. 保存操作完成后,窗口将自动恢复到原来的类型.
Saving Further Changes
::保存更多的变化
Once you have saved your work to a file for the first time, you can save subsequent changes to the same file name by pressing CTRL + S and confirming you want to overwrite the existing file.
::通过按住Ctrl+S并确认要重写现有文件, 您可以将后续更改保存到同一文件名中.