Blender 3D:零基础到专业级-单元2:基本建模和着色
章节大纲
-
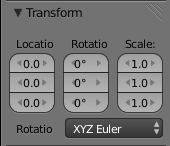
Every object in a scene has common settings in the Object
 Context. This includes the common transform settings shown at right: location in the scene, overall rotation and overall scaling. Most objects also have additional properties, such as the geometry of a mesh and the materials that govern how it appears in the render.
::场景中的每个对象在对象上下文中都有共同的设置.这包括右边显示的常见转换设置:场景中的位置,整体旋转和整体缩放.大多数对象也有额外的属性,例如网格的几何和控制其在染中出现方式的材料.The Empty object has none of these additional properties. It has the overall transform settings, and not much else. And it has no appearance in the final render. So what is the point of having such a thing?
::虚无对象没有这些附加属性. 它有整体转换设置, 没有其他东西. 它在最终染中没有出现. 那么有这样的东西有什么意义呢?In fact, it has many uses, such as:
::实际上,它有很多用途,比如:-
In the Physics
 Context, it can be set as the source of a force field (e.g. wind).
::在物理上,它可以被设置为力场的源 (例如风). -
It can be used as the
parent
for multiple other objects. That way they can be moved together just by moving the Empty, rather than each child object individually.
::它可以作为多个其他对象的父. 这样它们可以通过移动Empty一起移动,而不是每个子对象单独移动. -
It can be used as a target object in an
array modifier
, where it adds its transformation to the copies of the object being modified by the array.
::它可以作为数组修饰器中的目标对象,在此情况下它将其转换添加到被数组修改的对象的副本中. -
It is a handy marker and place holder if you are moving things around. You can mark an object's original position, and then put it back easily where the empty object is.
::移动物品时,它是方便的标记和位置保持器.你可以标记物体的原始位置,然后轻松地将其放回空物体的位置.
In these situations, the invisibility of the Empty in the render is an advantage, because it can be placed wherever necessary, without introducing unwanted clutter into the final image.
::在这些情况下,空格在染中不可见是一个优势,因为它可以在必要时放置,而不会在最终图像中引入不必要的杂乱.Using an Empty With the Array Modifier
::使用数组修改器使用空格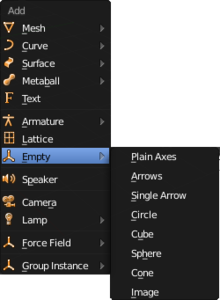
The types of Empties Open a new default Blender document, complete with default cube. Add a new Empty object to the scene. It doesn’t matter what type of Empty you choose; the options just control its appearance in the 3D view, not the actual behaviour of the Empty. Besides, you can change your mind about this later anyway.
::打开一个新的默认的Blender文档,包括默认的立方体. 添加一个新的空对象到场景中. 无论你选择什么类型的空; 选项只控制它的外观在3D视图,而不是空的实际行为. 此外,你也可以改变你的想法.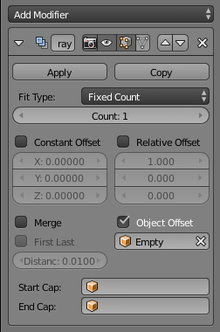
Now select the default cube, go to the Modifiers
 Context and add an Array modifier. In the properties header, there are three different ways the modifier can produce its copies of the original object: via a Constant Offset, Relative Offset, or Object Offset. The Constant and Relative offsets only allow a simple displacement for the copies, but the Object Offset looks at the full transformation of the specified object, which can include rotation and scaling.
::现在选择默认的立方体,进入修改器上下文并添加数组修改器.在属性标题中,修改器可以通过三种不同的方式生成原始对象的副本:通过常量偏移,相对偏移或对象偏移.常量和相对偏移只允许对副本进行简单的移动,但对象偏移则考虑指定对象的完整转换,这可以包括旋转和缩放.Here I have unchecked the default Relative Offset, checked Object Offset, and from the popup menu for selecting the target object, I have selected my Empty (which by default would have been called “Empty”).
::在这里我取消了默认的相对对冲,检查了对象对冲, 从选择目标对象的弹出菜单中, 我选择了我的空 (默认会被称为"空").But if you look at your 3D view, nothing seems to have happened: the cube is still sitting, unmoved, in its original position. In fact, it might be hard to see the Empty, because it would have been inserted in the same position as the cube, so it ends up within it. If you switch to Wireframe Z view, you should be able to see the Empty sitting within the cube.
::但如果你看看3D视图,似乎什么都没发生:立方体仍然在原位置,不动. 事实上,很难看到空白,因为它会被插入与立方体相同的位置,所以它最终会落在其中. 如果你切换到Z视图,你应该能够看到空白坐在立方体内.Before doing anything further, increase the Count field in the cube’s array modifier to 3. This will give you a clearer idea of the effect of subsequent manipulations. Doing so will not have any noticeable effect to start with, because all the copies will be lying right on top of each other.
::在进一步操作之前,将立方体s数组修改器中的 Count 字段增加到 3. 这将让你更清楚地了解后续操作的影响.这样做一开始就不会有任何明显的影响,因为所有副本都会彼此叠加.Now select the Empty, and move it to one side: you will immediately see a second copy of the cube follow the empty, and the third copy move by the same amount in the same direction , so it ends up beyond that.
::立即看到第二个立方体跟随空立方体, 第三个立方体也同样向同一方向移动,Return the Empty to its original location, and this time try moving the cube. As the original cube moves, you will see the second copy stay with the Empty at the centre of the scene, while the third copy moves beyond that, by the same distance and in the same direction as the second copy is removed from the original cube.
::将空置物返回原位置,这次尝试移动立方体.当原立方体移动时,您会看到第二个副本与空置物保持在场景的中心,而第三个副本则移动到其之外,在同样的距离和同样的方向上,因为第二个副本被移除了原立方体.Now if you return the cube to the same location as the Empty, select both and try moving them together, you will see no additional copies of the cube appear, because they remain exactly on top of the original cube.
::现在,如果你把立方体带回空立方体的位置, 选择两者并试着将它们移动在一起, 你会看到没有其他立方体的副本出现,The rule for using an Object Offset with the Array modifier is this:
::使用对象偏移与数组修饰器的规则是这样的:
The transformation applied to copies of the modified object is the difference between the transformations of the target object and the modified object .
::修改对象的副本所应用的转换是目标对象和修改对象的转换之间的差异.In other words:
::换句话说:-
the translation applied is the difference between their origins.
::它们的翻译是它们的来源之间的差异. -
the rotation applied is the difference between their object rotations.
::应用的旋转是它们对象旋转之间的差异. -
the scaling applied is the
ratio
between their object scaling factors.
::应用的缩放是它们对象缩放因子之间的比.
Try moving the Empty to one side, as before; this time leave it there, so the three copies of the cube are nicely spread out. Now try applying a rotation to the Empty; see how this applies the corresponding rotation to the second copy (the one located where the Empty is), while the third copy gets twice that rotation.
::试着像以前一样将空位移到一边;这次把它留在那里,这样立方体的三个副本就会很好地分散.现在试着对空位进行旋转;看看这如何将相应的旋转应用于第二个副本 (位于空位的地方),而第三个副本得到了两倍的旋转.Return the Empty to its unrotated state, and this time try rotating the cube: see how the second copy (where the Empty is) stays unmoved, while the third copy gets the opposite rotation.
::将空白返回未旋转状态,这次尝试旋转立方体:看看第二个副本 (空白所在的位置) 如何保持不移动,而第三个副本则得到相反的旋转.Undo the rotations, and now try scaling: shrinking/enlarging the Empty correspondingly shrinks/enlarges the second copy, while the third copy gets transformed by the square of the shrink/enlarge ratio (the ratio multiplied by itself, or alternatively the ratio raised to the second power). Or shrink/enlarge the original cube, and see the second copy stay unchanged (as before), while the third copy enlarges/shrinks by the inverse ratio.
::取消旋转,然后尝试缩放:缩小/放大空白相应地缩小/放大第二个副本,而第三个副本被缩小/放大比率的平方 (比率乘以它本身,或者是比率升至第二次的权力) 转换.或者缩小/放大原始立方体,并看到第二个副本保持不变 (如之前),而第三个副本则以逆比率扩大/缩小.When you change the transformation of the original cube, the second copy always stays unchanged because the Object Offset transformation is the inverse of the transformation you are applying to the original; hence it always cancels out for the second copy, but you can see corresponding increasing powers of it applied to subsequent copies.
::当你改变原始立方体的转换时,第二个副本总是保持不变,因为对象偏移转换是你对原始应用的转换的反向;因此它总是取消第二个副本,但你可以看到它对应的增强权应用于后续的副本.Editing the Modified Object
::编辑已修改的对象Make sure the Empty is positioned so the array instances are well separated. Select the cube, TAB into Edit mode, select all the vertices, and try transforming them: moving, rotating or scaling.
::确保空置为这样的位置,使数组实例分开.选择立方体,将TAB转换为编辑模式,选择所有顶点,并尝试转换它们:移动,旋转或缩放.Note the difference in behaviour from doing this to the cube in Object mode: this time all the copies of the cube transform along in unison. This is because we are not affecting the object transformation, which is what controls the behaviour of the array modifier.
::注意在Object模式下对立方体的行为有所不同:这次,立方体的所有副本都在一致的转换.这是因为我们没有影响对象转换,这就是控制数组修改器的行为.Arranging Object Copies in a Circle
::摆放在圆圈中的物体副本Which brings us to a convenient trick for a common need: arranging copies of an object in a neat circle.
::让我们来看一下一个方便的小技巧:将某个物体的复制品排列成一个整齐的圆圈.The easiest way to do this is start with the cube and the Empty in their original central positions. Suppose you want 8 copies of the cube in your circle; the angle between them then needs to be 360° ÷ 8 = 45°. So rotate the Empty by 45°. Now select the cube. Set the Fixed Count field of its Array modifier to 8. TAB into Edit mode, and move all the vertices to one side. You should see the other 7 copies of the cube correspondingly move away from the centre in different directions, maintaining a nice neat circle arrangement. Your cube mesh is simply being rotated about its origin, which is not where the vertices are, but where the Empty is!
::最简单的方法是从立方体和空白的原始中心位置开始.假设你想要在圆圈中有8个立方体副本;它们之间的角度需要是360° ÷ 8 = 45°.所以把空白旋转45°.现在选择立方体.将其数组修饰器的固定数字段设置为8.将TAB置于编辑模式,并将所有顶点移动到一边.你应该看到其他7个立方体副本相应地从中心移动到不同的方向,保持一个整洁的圆圈布局.你的立方体网格只是被旋转到它的起源,而不是顶点所在的地方,而是空白所在的地方! -
In the Physics