Blender 3D:零基础到专业级-单元2:基本建模和着色

In this module, you will model a simple human figure. Along the way, you will practice using extrusion and learn additional ways to select vertices, edges, and faces.
::在这个模块中,你将模拟一个简单的人形. 在这过程中,你将练习使用挤出,并学习选择顶点,边缘和面部的其他方法.
Start a New Scene
::开始一个新场景
-
Start with the default cube (
File → Load Factory Settings
) and NumLock "on".
::开始使用默认的立方体 (文件 → 装载工厂设置) 和 NumLock "on". -
Press Tab to edit the cube.
::按TAB来编辑立方体. -
Scale the cube down 50% by pressing S . 5KEY ENTER .
::通过按S. 5KEY ENTER将立方体缩小50%.
Selection Methods
::选择方法
Just as you did for the house model, you will begin by selecting the top four vertices of the cube. This section presents six methods for doing so.
::像你在房子模型中所做的那样,你将从选择立方体的前四个顶点开始.本节介绍了六种方法.
Ease of selection depends partly on the viewport settings and viewpoint. For greatest ease, you want a view in which the parts you are trying to select are both visible and close together.
::选择的方便性部分取决于视窗设置和视角.为了最大方便,您希望在视图中,您试图选择的部分既可见,又靠近.
For clarity, use a view of the cube in which all vertices are visible:
::为了清晰度,使用一个立方体的视图,其中所有顶点是可见的:
-
Go to right side view with Num3 .
::通过Num3转向右侧视图. -
Disable the manipulator widget with Ctrl + Space .
::使用Ctrl + 空间禁用操作器小部件 . -
Make sure the Limit selection to visible option is "off".
::确保限制可见选项的选择是"关闭".

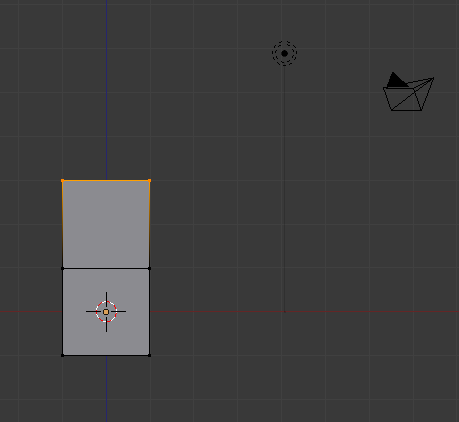
The picture on the right shows the cube with the correct vertices selected.
::图片显示了正确的顶点选定的立方体.
To begin, make sure you start in Vertex select mode.
::首先,请确保您在顶部选择模式下启动.
Border Select Tool
::边界选择工具
The border select tool selects things that lie in a rectangular region of the viewport.
::边界选择工具选择位于视窗的矩形区域中的东西.
-
Activate (place the mouse pointer in) a 3D View window.
::激活 (将鼠标指针放置在) 一个3D视图窗口. -
Deselect all vertices by pressing A .
::通过按A来取消所有顶点的选择 . -
Press B to activate the border select tool. Two dashed gray lines should appear, one vertical and one horizontal, forming a crosshair in the viewpoint.
::按B激活边界选择工具. 应该出现两条点的灰色线,一个垂直,一个水平,在视角中形成一个十字线. -
Click and drag LMB diagonally across the area you want to select. The area will be outlined in dashed gray lines.
::按一下并对角拖动LMB到您想要选择的区域.该区域将以灰色线条划出轮. -
When you release the mouse button, the vertices inside the rectangle will be added to the selection.
::选择的角点将会被添加到选项中.
Practice selecting the top four vertices this way. If you make a mistake, press A and try again.
::练习选择前四个顶点的方式. 如果您犯错误,请按A并再次尝试.
Circle Select Tool
::选择工具的圆圈
The circle select tool selects or deselects things that lie in a circular region of the viewport.
::选择圆圈工具可以选择或取消位于视窗的圆形区域的东西.
-
Activate a 3D View window.
::启动一个3D视图窗口. -
Deselect all vertices by pressing A .
::通过按A来取消所有顶点的选择 . -
Press C to activate the circle select tool. A dashed gray circle should appear. note: Prior to Blender 2.5 B B twice.
::按C激活圆圈选择工具.应该出现一个点点的灰色圆圈. 注意:在混合器2.5 B B之前,两次.
When this tool is active, you can do various things:
::您可以使用该工具进行以下操作:
-
To move the select area, simply move the mouse pointer.
::移动选区只需移动鼠标指针. -
To resize the select area, use SCROLL or Num+ / NUM− ..
::使用SCROLL或Num+ / NUM− .. 改变选择区域的大小. -
To select all vertices within the circle, click LMB .
::选择圆圈内的所有顶点,点击LMB. -
To deselect all vertices within the circle, click MMB or Shift + LMB .
::单击MMB或Shift+LMB, 取消圆圈内的所有顶点的选择. -
To deactivate the tool, press Esc or RMB .
::关闭该工具时,请按 Esc 或 RMB .
Practice selecting the top four vertices this way. If you make a mistake, press A and try again.
::练习选择前四个顶点的方式. 如果您犯错误,请按A并再次尝试.
Lasso Select Tool
::拉索选择工具
Like many graphics programs, Blender 3D has a lasso select tool.
::像许多图形程序一样,Blender 3D有一个拉索选择工具.
-
Activate a 3D View window.
::启动一个3D视图窗口. -
Deselect all vertices by pressing A .
::通过按A来取消所有顶点的选择 . -
Click and hold Ctrl + LMB .
::按下Ctrl+LMB并按住 -
Drag the mouse pointer in a loop around the vertices you want to select. As you drag, a dashed gray line will appear.
::按键拖动鼠标指针绕着要选择的顶点循环. 拖动时,会出现一个点点的灰色线. -
You can deselect with lasso by pressing Ctrl + Shift + LMB .
::您可以通过按住Ctrl + 转换 + LMB来解除选择. -
Release the LMB when you're done.
::完成后释放LMB.
Vertex by Vertex Selection
::顶点选择顶点
You can select (or deselect) vertices one by one, as you did in
the "Quickie Model" module
.
::您可以选择 (或取消选择) 顶点一个接一个,就像您在"快速模型"模块中所做的那样.
-
Click RMB on a vertex to make it the only selected vertex.
::点击一个顶点上的人民币,使其成为唯一选定的顶点. -
Toggle the select state of additional vertices by clicking Shift + RMB .
::通过点击Shift + RMB来切换额外顶点的选择状态 .
Edge Select Mode
::边缘选择模式
You can select (or deselect) edges one by one, as you did in
the "Improving Your House" module
.
::您可以选择 (或取消选择) 边缘一个接一个, 就像您在"改善您的房子"模块中所做的那样.
-
Click LMB on the Edge select mode button in the 3D View header.
::在3D视图标题中,点击边缘选择模式按上的LMB. -
Select the top left edge of the cube by clicking on it with RMB .
::选择立方体的左上边缘 , 点击人民币 . -
Toggle the select state of top right edge of the cube by clicking on it with Shift + RMB .
::通过点击Shift+RMB来切换立方体右上边的选择状态 . -
Switch back to Vertex select mode by clicking LMB on the Vertex select mode button in the 3D View header.
::在3D视图标题中的"选择顶部模式"按上点击LMB,重新切换到"顶部选择模式".
After you switch back to Vertex select mode, all four vertices in the two selected edges are selected.
::在您重新切换到顶点选择模式后, 两个选定的边缘中的四个顶点都被选择.
Face Select Mode
::面部选择模式
You can select (or deselect) faces one by one, as you did in
the "Improving Your House" module
.
::您可以选择 (或取消选择) 面孔一个接一个, 就像您在"改善您的房子"模块中所做的那样.
-
Click LMB on the Face select mode button in the 3D View header.
::在3D视图标题中,点击"脸选择模式"按上的"LMB". -
Select the top face of the cube by clicking on its center dot with RMB .
::通过点击人民币的中间点来选择立方体的顶面. -
Switch back to Vertex select mode by clicking LMB on the Vertex select mode button in the 3D View header.
::在3D视图标题中的"选择顶部模式"按上点击LMB,重新切换到"顶部选择模式".
After you switch back to Vertex select mode, all four vertices in selected face are selected.
::在您重新切换到顶点选择模式后, 选择面的四个顶点都被选择.
Extruding Limbs
::挤出四肢

The illustrations in this section are in front orthographic view, so:
::本部分的图片是正面的正写视图,所以:
-
Use Num5 (or
View → Orthographic
) to switch to orthographic view.
::使用Num5 (或View → Orthographic) 切换到正写视图. -
Use Num1 (or
View → Front
) to switch to front view.
::使用Num1 (或View → Front) 切换到前视图.
Region Extrusion
::区域挤出
-
Make sure you're still in Edit Mode, with the top four vertices selected. (Only two will be visible in front ortho view.)
::确保您仍然处于编辑模式,并选择了前四个顶点. (在正视图中,只有两个顶点可见.) -
Activate the extrude tool by using E (or
Mesh → Extrude Region
).
::通过使用E (或Mesh → 挤出区域) 激活挤出工具. -
Move the mouse pointer upwards. As you do, four
new
vertices will appear, each connected to one of the four that were previously selected.
::移动鼠标指针向上. 在此过程中,将会出现四个新的顶点,每个顶点与之前选择的四个顶点之一相连.
The new vertices and their associated edges will move with the mouse pointer. You can lock them into place with LMB or Enter ).
::随着鼠标指针移动,新的顶点及其相关边缘将移动. 您可以用 LMB 或 Enter 锁定它们.
Extruding a Leg
::挤出一个腿
Suppose you want to extrude a region the same size as the default cube -- in other words, one Blender unit on a side.
::假设你想要挤出一个与默认立方体相同的大小的区域, 换句话说, 一个边上的混合器单元.
-
Undo your previous extrude by pressing Ctrl + Z .
::通过按住Ctrl+Z来撤销您的前一个挤出. -
Activate the extrude tool again by using E (or
Mesh → Extrude Region
).
::通过使用E (或Mesh → 挤出区域) 再次激活挤出工具. -
This time, as you're moving the extruded vertices around, hold down the Ctrl key. You'll see that the new vertices will only move in multiples of a Blender unit. This is called snapping, and it makes it easy to extrude by exactly one blender unit. The size of the snapping depends on the zoom level; if you are zoomed out a long way from the object the snapping will be done in large increments and if you are zoomed in close you can snap in finer amounts.
::这一次,当你在移动挤出顶点时,按住Ctrl键. 你会看到新的顶点只会移动在混合器单元的倍数中. 这称为快速移动,它使其很容易通过一个混合器单元挤出. 快速移动的大小取决于变焦水平; 如果你从对象中放大很远,快速移动将以大增量进行,如果你放大很近,你可以在更细的数量中快速移动.
Continue extruding until you have five cubes of equal size stacked atop one another. This will be one leg of your figure.
::继续挤出,直到你有五个相同大小的立方体堆叠在上面. 这将是你的一个腿.
|
|
Another way to extrude by exactly one Blender unit is to press 1key while the tool is active.
If you press 2key when no tool is active, Blender will switch to the second layer, and your (first-layer) object will disappear. To make it visible again, press 1key .
|
|
|
If you are not using Front Ortho view, the blender unit will be much larger than the cube. Switching to that view will allow for the proper size, although you can manually enter the extrusion as 0.4 units.
|
|
|
Don't extrude any cube more than a unit at a time. You'll want those extra vertices, edges and faces later in this tutorial.
|
|
|
If the mesh gets too big for your view, you can zoom out using SCROLL or NUM−
|
Extruding the Pelvis
::盆外挤出
-
Press A until all vertices are deselected.
::按A直到所有的顶点被取消选择. -
Rotate the view (by dragging MMB ) so you can see all four vertices on the right face of the top cube.
::通过拖动MMB) 旋转视图,以便您可以看到顶部立方体右侧的所有四个顶点. -
Select those four vertices.
::选择这些四个顶点. -
Extrude twice to the right.
::两次向右挤出.
Extruding the Rest of the Body
::身体的其他部位
The same trick is repeated over and over to build the rest of our simple body.
::为了构建我们简单的身体,
|
|
To speed things up, you may want to switch to Face select mode. In Face select mode, you can select a face with a single click.
|
-
Create a second leg by extruding down four times from the last cube of the pelvis.
::通过从骨盆的最后一个立方体挤出四次, 创建第二条腿. -
Create the torso by extruding up five times from the middle cube of the pelvis.
::通过从骨盆中立方体挤出五次来形成干. -
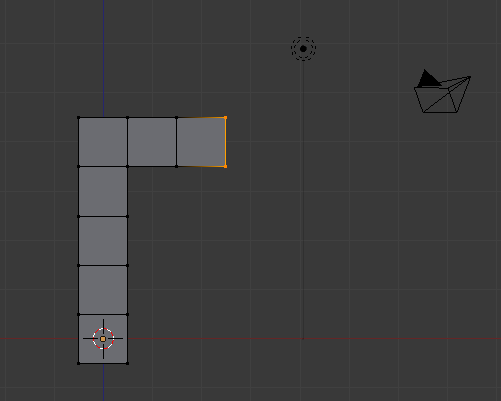
Extrude to each side from the next-to-top cube of the torso to create arms. (Making sure there are five on each side. Refer to the picture on the top of the page)
::从干的顶部立方体向每一侧挤出,以制造臂. (确保每一侧有五个.请参阅页面顶部的图片)
-
 Legs and Pelvis
::腿部和盆地 -
 Torso
Torso
::干部 -
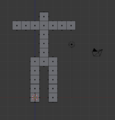 Arms
Arms
::武器
To be safe, remove any double vertices you may have inadvertently created:
::为了安全,删除任何可能无意中创建的双顶:
-
In Vertex select mode, press A until all vertices are selected.
::在顶点选择模式中,按A直到所有顶点被选择. -
Make sure that you are in Edit Mode, Press RMB to bring up the Vertex Context Menu.
::按RMB显示顶部上下文菜单. -
Scroll over Merge Vertices, and then select By Distance.
::滚动到"合并顶点",然后选择"按距离".
Now check your work:
::现在看看你的工作:
-
Return to Object Mode by pressing Tab .
::通过按TAB重返对象模式. -
Make sure the viewport draw type is Solid. (Press Z if it isn't.)
::确保视窗画图类型是固体. (按Z,如果它不是.) -
Rotate the viewpoint and examine the body from every side (it might be useful to return to perspective view for this).
::旋转视角,从各个侧面检查身体 (对于此,重新回到视角可能是有用的).
Adding the Head
::增加头部
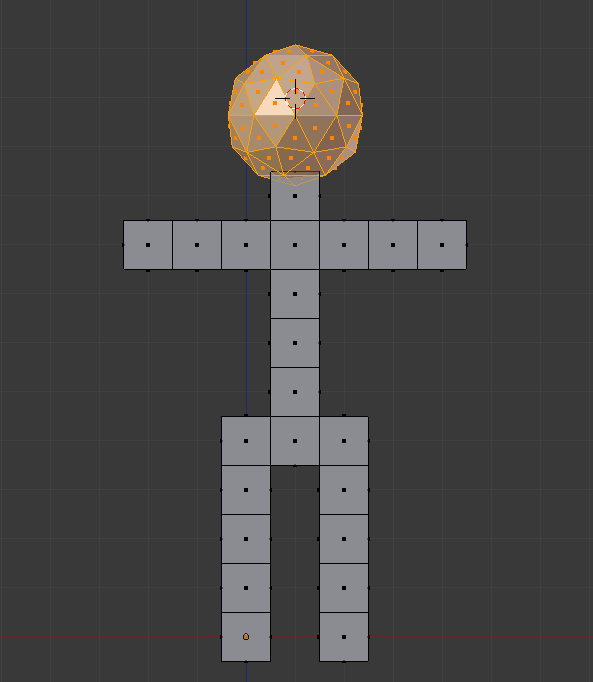
-
Move the 3D cursor to a point above the neck by clicking with the LMB .
::通过点击LMB将3D光标移动到部以上的点. -
Adjust the cursor position in orthographic top, front and side views ( Num7 , Num1 , and Num3 respectively) until the 3D cursor is about where the center of the head should be. It may help to use Shift + S →
Snap
→
Cursor to Grid
.
::在正写上方,前方和侧面视图 (分别为Num7 ,Num1和Num3) 中调整光标位置,直到3D光标处于头部中心位置.使用Shift + S → Snap → Cursor to Grid可能有所帮助. -
Make sure you're in Edit Mode with a 3D View window active. (If you create the head in Object Mode, it will be a separate object from the body, and changes to the body later in this tutorial won't affect the head.)
::确保您处于编辑模式,并启动3D视图窗口. (如果您在对象模式中创建头部,它将是与体的单独对象,并且本教程中稍后对体的更改不会影响头部.) -
Create a sphere using Shift + A →
Mesh
→
Icosphere
.
::使用Shift+A → Mesh → Icosphere创建一个球体. -
Leave the default settings for subdivisions and size in the bottom left of the screen. (Note: Your computer may slow down if you set subdivisions above 6)
::留下默认设置的分区和大小在屏幕的左下方. (注意: 如果您设置分区以上的6)
You should now have a small sphere at the top of the body. To make it more proportional to the body, resize it using the scale tool:
::现在应该有一个小球体在身体的顶部. 为了使它更为比例的身体, 缩小它使用尺度工具:
-
Make sure you're still in Edit Mode, with a 3D View window active and the head selected.
::确保您仍然处于编辑模式, 并且已启动3D视图窗口, 并选择了头部. -
If necessary change the pivot point to
Median Point
.
::如果需要,将转点改为中点. -
Activate the scale tool by pressing S (or
Mesh → Transform → Scale
).
::通过按下S (或Mesh → Transform → Scale) 来激活尺度工具. -
Move the mouse pointer until the head is the size you want.
::移动鼠标指针,直到头部是你想要的尺寸.
You may also adjust its position using the grab tool:
::您也可以使用抓取工具调整其位置:
-
Make sure you're still in Edit Mode, with a 3D View window active and the head selected.
::确保您仍然处于编辑模式, 并且已启动3D视图窗口, 并选择了头部. -
Activate the grab tool by pressing G (or
Mesh → Transform → Grab/Move
).
::通过按G (或Mesh → Transform → Grab/Move) 来激活抓取工具. -
Move the mouse pointer until the center of the head is where you want it.
::移动鼠标指针,直到头部的中心是你想要的地方.
|
|
If you deselect the head and then decide that you want to select it again:
|
Now check your work:
::现在看看你的工作:
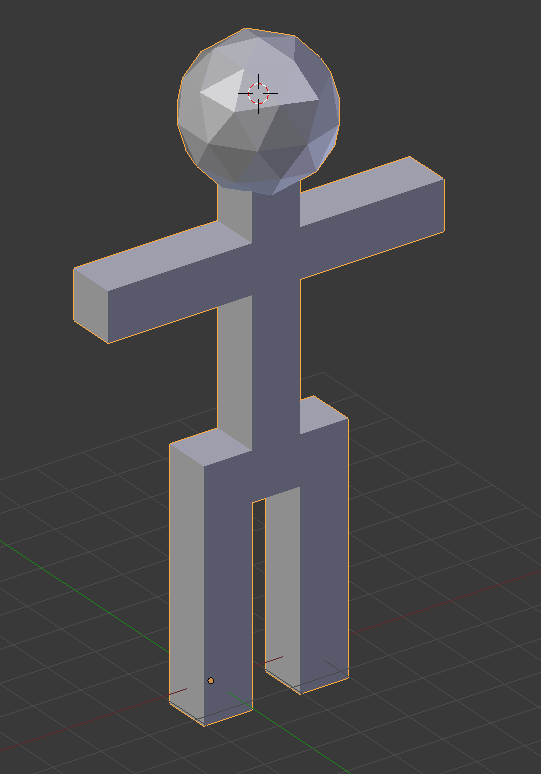
-
Return to Object Mode by pressing Tab .
::通过按TAB重返对象模式. -
Make sure the viewport draw type is Solid. (Press Z if it isn't.)
::确保视窗画图类型是固体. (按Z,如果它不是.) -
Rotate the viewpoint and examine the body from every side. Make sure that the head connects properly to the neck.
::转换视角,从各个角度检查身体.
Save Your Work
::保存你的工作
You will continue working on your simple person model in the next module.
::您将在下一个模块继续研究您的简单人模型.
To save the scene in a
.blend
file:
::为了保存场景到一个.blend文件:
-
Press ctrl + S (or select
File → Save
).
::按下ctrl + S (或选择文件 → 保存). -
Navigate to the directory (folder) where you want to write the file.
::导航到您想要写入文件的目录 (文件). -
Type a filename in the text box to the left of the "Cancel" button.
::在"取消"按左边的文本框中输入文件名. -
Click LMB on the "Save Blender File" button.
::在"保存混合器文件"按上点击 LMB.