Blender 3D:零基础到专业级-单元2:基本建模和着色
Bones are a modeling tool that are especially important for animating characters. Bones allow you to move characters' limbs in a way that is much simpler than trying to re-arrange the vertices every time.
::骨头是动画角色的重要模型工具.骨头可以让你以一种比每次重新排列顶点更简单的方式移动角色的四肢.
It works by associating a bone with particular vertices, causing them to move along with the bone when the position is changed in pose mode. Using bones is fairly simple once you get the hang of it, but, like many things in Blender, can be a little daunting at first sight.
::它通过将骨与特定的顶点联系起来,使它们在姿势模式中改变位置时随着骨移动.一旦你掌握了它,使用骨很简单,但像Blender中的许多东西一样,一看就有点吓人.
Bones don't do much on their own; in fact, they turn invisible at render time. For this following module we'll use the character that we had made by the end of the module
Putting Hat on Person
. You will have to have completed all the modules in
Section 2B
. Note that while we will be using bones on a simple person, the process can be used with any creature or body type you imagine!
::骨头本身没有什么大功用;事实上,它们在染时变得隐形.对于下一个模块,我们将使用我们在模块"戴帽子的人"的结尾所创建的角色.你必须完成第2B节的所有模块.请注意,虽然我们将使用骨头对一个简单的人,但该过程可以用于任何你想象的生物或身体类型!
Laying down bones
::骨头的安置
Note: This just shows the basics of adding bones to an object. Go to the
advanced animation
page for a more comprehensive guide on this.
::注意:这只是显示添加骨头到一个对象的基础.请访问高级动画页面以获得更全面的指南.
First of all, we'll need a model to put some bones on! For this tutorial, we're going to use a humanoid model. Open the model that you had created by the end of the
Putting Hat on Person
tutorial, or download a pre-made model from
here
.
::首先,我们需要一个模型来装上一些骨头!对于这个教程,我们将使用一个人形模型. 打开你在"戴帽子戴人"教程结束时创建的模型,或从这里下载预制模型.
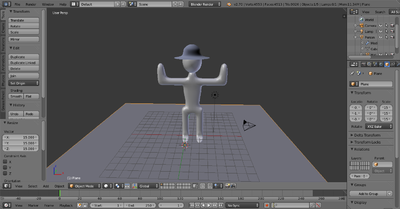
Here's our setup, with Block Dude standing on a plane. You can add a plane by pressing Shift + A →
Mesh
→
Plane
. Scale the plane to an appropriate size and move it so that it is approximately underneath the person.
::这里是我们的设置, 区块Dude站在一个平面上. 你可以通过按住Shift+A → Mesh → Plane来添加一个平面. 将平面缩小到适当的大小, 并移动它, 使它大约在人身下面.
Noob note:
You will be placing armatures ("bones") inside your humanoid, so you must work in "wireframe mode", not "solid mode". Otherwise, you will not be able to see the armatures when you place them. To toggle between "solid" and "wireframe", press Z . You may find it helpful to make the wireframe less complex by hiding the subsurface mesh. You can do this by going to the Modifier context panel
![]() of the Properties window
of the Properties window
![]() and deselecting the eye button.
and deselecting the eye button.
:::你将在人形中放置具 ("骨头"),所以你必须在"线框模式"中工作,而不是"固体模式".否则,你将无法在放置它们时看到具. 要在"固体"和"线框"之间切换,按Z. 隐藏地底网格可以使线框更简单.你可以通过进入属性窗口的修改器上下文面板并取消选择眼睛按来做到这一点.
Note:
An alternative to working in "wireframe mode" is to turn "X-Ray" on for the armature. To do this, select the armature. In the properties panel under
object
there is a display menu. Click "X-Ray" in the second field of buttons. This will allow the armature to show through other objects.
::注意:在"线框模式"中工作的另一个选择是打开"X-Ray"的具.为了做到这一点,选择具.在对象下的属性面板中有一个显示菜单.点击"X-Ray"在按的第二个字段.这将允许具通过其他对象显示.
Add a bone
::添加一个骨头
Now, let's put some bones on Block Dude! In Object Mode press Shift + A
→ Armature → Single Bone
.
::现在,让我们把一些骨头在块Dude! 在对象模式按转移+A → 具 → 单个骨头.
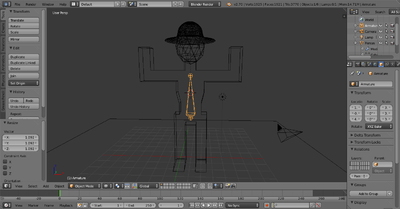
What we are looking at is an armature. This is a single bone. Now, we need to put the bone in Block Dude! Move and rotate the bone so that it's in the middle of Block Dude's chest. If your bone does not have the correct length, then change the size of the bone by moving one of the ends of the bone: switch to Edit Mode, select one of the ends of the bone, then move it using G . Alternatively, you can scale it using S
::我们正在看的是一个具. 这是一个单一的骨头. 现在,我们需要把骨头放在Block Dude! 移动和旋转骨头,使其位于Block Dude的胸部中间. 如果你的骨头没有正确的长度,然后通过移动骨头的一端来改变骨头的大小:切换到编辑模式,选择骨头的一端,然后使用G移动它. 另一个选择,你可以使用S来缩放它
Extrude a second Bone
::挤出第二个骨头
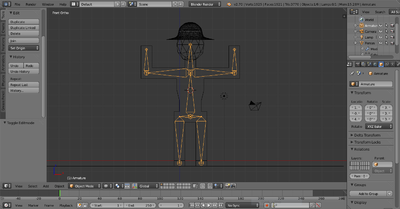
To create a second bone starting from one of the ends of the first bone, switch to Edit Mode with the bone selected, select the end of the bone, then extrude E the end. A second bone appears, with its start point on the selected end of the first bone. Move the mouse to position the end point, then press LMB , Enter , or Space . Scale the bone as needed to fit it in his body, and continue adding bones by extruding the end points. These operate much the same way as vertices: you can extrude, rotate, move, and even subdivide. Your finished result should look something like this:
::为了从第一个骨头的某个端开始创建第二个骨头,切换到编辑模式,选择骨头的末端,然后挤出 E 端.第二个骨头出现,其起点位于第一个骨头的选择末端.移动鼠标定位末端,然后按 LMB , Enter 或空格.按需要调整骨头,以适应其体内,并继续添加骨头.这些操作与顶点相同:您可以挤出,旋转,移动甚至分成部分.您的最终结果应该看起来像这样:
Name the bones
::命名骨头
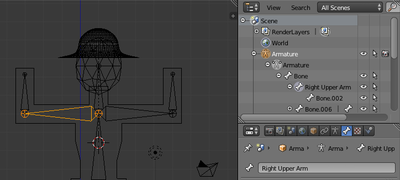
Now, just to make things easier, we're going to name the bones. For example, my bones are named "Right Forearm", "Left Forearm", "Right Upper Arm", etc. While in Edit mode, select the bone you want to rename. In the Outliner
![]() , the bone you have selected will be visible with a circle around it
, the bone you have selected will be visible with a circle around it
![]() . You may need to expand the Armature Object
. You may need to expand the Armature Object
![]() , Armature Data Object
, Armature Data Object
![]() and any parent bones before being able to view the selected bone. In the Bone context panel
and any parent bones before being able to view the selected bone. In the Bone context panel
![]() of the Properties window click the name field to edit the name.
of the Properties window click the name field to edit the name.
::现在,为了让事情更容易,我们将命名骨头.例如,我的骨头被命名为"右前臂", "左前臂", "右上臂"等.在编辑模式中,选择您要重命名的骨头.在线图中,您选择的骨头将与周围的圆圈可见.您可能需要扩展具对象,具数据对象和任何父骨头才能查看所选骨头.在属性窗口的骨头上下文面板中,单击名称字段来编辑名称.
Noob Note:
When you are naming the bones remember that if you are looking at the person from the front, your left is the person's right. To make the naming easier switch to viewing the person from behind using Ctrl + Num1 .)
::笔记:当你命名骨头时,请记住,如果你从前面看着这个人,你的左边是这个人的右边.为了更轻松地命名,请使用Ctrl + Num1来切换到从后面看这个人.
Parent the bones
::骨头的父母
Now, we need to parent the bones to the mesh. Go back into Object Mode and select Block Dude (and the Hat, assuming you made one). Now, select the Armature as well, so that it is the last object selected, and press Ctrl + P . The Parenting Menu will pop up. Select
Armature Deform
→
With Automatic Weights
. The person (and hat) are now children of the armature.
::现在,我们需要将骨头与网格进行父关系.回到对象模式,选择"封锁人" (和帽子,假设您已经制作了一个).现在,选择"具",使其成为最后一个选定的对象,然后按Ctrl + P. 育儿菜单将弹出.选择"具变形 → 具有自动权重".这个人 (和帽子) 现在是具的子女.
Noob Note:
The selection order is important in defining which object is the parent, so you cannot select both objects at the same time. You must select the armature last to make it the parent. Also please note if you have problems with deformation you need to rest the rest position of the bones this is easily achieved by going to pose edit mode select all bones and CTRL -A then apply pose as rest position .
::笔记:选择顺序对于定义哪个对象是父是很重要的,所以你不能同时选择两个对象.你必须选择最后的具使它成为父.也请注意,如果你有变形的问题,你需要休息的骨头的休息位置,这很容易通过进入姿势编辑模式选择所有骨头和CTRL-A然后应用姿势作为休息位置.
Moving the Bones
::移动骨头
To move individual bones, you have to go into Pose Mode. Select the Armature in Object Mode and switch to Pose Mode by pressing Ctrl + Tab or selecting the mode in the mode selection menu of the 3D Viewer. Try moving a bone around by pressing RMB (sic) to select it, and then hitting G or R to move it.
::要移动个别的骨头,你必须进入"姿势模式".在"对象模式"中选择"具",然后按Ctrl + Tab或在3D观看器的模式选择菜单中选择"姿势模式".尝试通过按RMB (sic) 选择一个骨头,然后按G或R来移动它.
If you've done everything correctly, your mesh should move when you move the bones! If this doesn't happen, scale the bones up so that they fit better in the mesh, and scale up the bones until they do what you want (read comment in the parenting section above on adjusting the bones envelopes if you do not get an effect while moving/rotating the bones). With the bones now, you can put Block Dude into a lot of different positions without moving individual vertices.
::如果您已经做了一切正确,您的网格应该移动当你移动骨头!如果没有发生这种情况,将骨头缩放,以便它们更好地适合网格,并将骨头缩放,直到它们做你想要的 (阅读上述育儿部分的评论,如果移动/旋转骨头时没有效果,则调整骨头包裹).现在使用骨头,您可以将Block Dude置于许多不同的位置,而无需移动单个顶点.
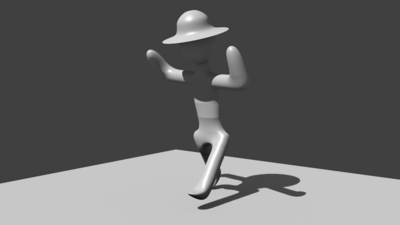
To the right is an example of how you can move Block Dude with the bones.
::右边是一个例子, 如何用骨头移动Block Dude.
Also while in pose mode if after a RMB (Right Mouse Button) click you can't move bones with G or R , check the "Move Object Centers Only" button (just to the right of the Rotation/Scaling Pivot button).
::在静止模式下,如果在RMB (右鼠标按) 后,您无法使用G或R移动骨头,请检查"仅移动对象中心"按 (位于旋转/缩放转向按的右侧).
In-Depth Info on Selected Bone Topics
::关于骨的深入信息
Add/remove mesh from bone control
::从骨检测中添加/删除网格
Noob Note:
If you've been adding bones to your simple person from the previous lessons, you will have likely noticed that the hat seems to stretch when you move the arms in pose mode. To fix this, you will need to remove the hat from the forearm vertex groups created in the Parenting step.
:::如果你从上一课中添加了简单人骨头,你可能会注意到当你在姿势模式下移动手臂时,帽子似乎会伸展.为了解决这个问题,你需要从育儿步骤中创建的前臂顶点组中移除帽子.
To manually change the mesh areas that the bones control, go to Object Mode and select the object you want to add/remove (if the mesh is inside the same object, then select only the areas of the mesh you want to work with in Edit Mode).
::为了手动更改骨头控制的网格区域,请进入对象模式并选择您想要添加/删除的对象 (如果网格位于同一对象内,请仅选择您想要在编辑模式中使用的网格区域).
In this case, select the Hat.
::在这种情况下,选择帽子.
Switch to the Object Data context panel in the Properties window and scroll to the "Vertex Groups" submenu.
::在属性窗口中切换到对象数据上下文面板, 滚动到"顶部组"子菜单.
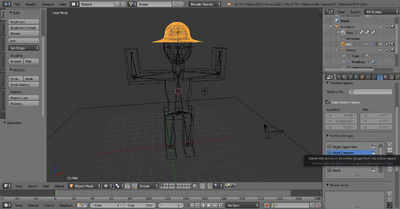
Now pick the bone group from the dropdown above the Assign/Remove buttons, and then hit Assign (or Remove) as necessary. Usually vertices will be assigned to one group, but can be assigned to multiple groups. In this case, we want to remove the Hat from the Forearm vertex groups. Select the Forearm vertex groups and press the remove button, as pictured. With both of the Forearm vertex groups removed from the hat, it should be able to move properly with the rest of the armature.
::现在从分配/删除按上方的下拉列表中选择骨组,然后按下所需的分配 (或删除).通常顶点将被分配给一个组,但可以分配给多个组.在这种情况下,我们希望从前臂顶点组中删除帽子.选择前臂顶点组并按下删除按,如图所示.当前臂顶点组从帽子中删除后,它应该能够与其余的具一起正常移动.
Mesh deforms like it's far away from the bones
::网状状物变形, 似乎离骨头很远
If the mesh is properly assigned to the bones they will move regardless of whether the bones are inside the volume of the mesh or not (HOW they deform WILL be affected however). The most common mistake in this step is creating and (more importantly) parenting the mesh to the armature while the armature is outside the mesh, which causes Blender not to assign vertices to any bone groups at all.
::如果网格正确分配给骨头,它们将移动,无论骨头是否在网格体积内 (它们如何变形将受到影响).在这个步骤中最常见的错误是创建和 (更重要的是) 将网格与具关联,而具则在网格外,这导致Blender根本不会将顶点分配给任何骨组.
You can check this by editing the object (i.e. select the mesh and switch to Edit Mode, then un-select all vertices by pressing A until nothing is selected). Pick the
Object data
context then select a vertex group in the
Object data tab'
, press
Select
. This will select the vertices associated with the bone group. If the wrong vertices appear selected, you need to assign them manually as explained above.
::通过编辑对象 (即选择网格并切换到编辑模式,然后通过按A取消选择所有顶点,直到没有任何选择) 进行检查.选择对象数据上下文,然后在对象数据选项卡中选择顶点组',按选择. 这将选择与骨组相关的顶点. 如果错误的顶点被选中,则需要按照上面的说明手动分配它们.
If there is no effect, in Edit mode select that bone (or bones) and choose Envelope display mode (
Properties
window
![]() ,
Armature context panel → Display → Envelope
), then press Ctrl + Alt + S and increase its area of influence to cover all faces that should be influenced by the bone.
,
Armature context panel → Display → Envelope
), then press Ctrl + Alt + S and increase its area of influence to cover all faces that should be influenced by the bone.
::如果没有效果,在编辑模式中选择该骨头 (或骨头) 并选择封面显示模式 (属性窗口 , 具上下文面板 → 显示 → 封面),然后按Ctrl + Alt + S,并增加其影响面积,以覆盖所有应受到骨头影响的面部.