Blender 3D:零基础到专业级-单元2:基本建模和着色
You will often need to use reference photos to guide your modeling. Among the many things you can do with photos and other images in Blender, it is possible to use them just as guides in the 3D view, such that they do not appear in the final render. Furthermore these images will only be visible when the view is
orthographic
and exactly aligned to one of the X, Y or Z axes (or the camera view). This way, they can be used as a precise reference for positioning elements of the model.
::您通常需要使用参考照片来指导您的建模.在Blender中,您可以使用照片和其他图像做很多事情,其中包括在3D视图中使用它们作为指导,使它们在最终染中不出现.此外,这些图像只能在视图正确并与X,Y或Z轴 (或摄像头视图) 之一准确对齐时可见.这样,它们可以作为模型元素定位的精确参考.
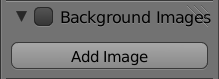
In the 3D view, make sure the Properties Shelf N is visible. Look for the Background Images panel; it will most likely be collapsed, so expand it. Initially it will look like at right, with no background images in your view.
::在3D视图中,请确保属性架N可见. 寻找背景图像面板;它很可能被折叠,所以扩展它. 起初它看起来像右边,在您的视图中没有背景图像.
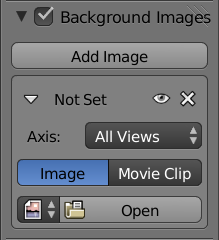
Check the box at the top. Click the “Add Image” button once, and this will add one entry to the list of background images, as at right. Initially there is no image opened in this entry; you will need to click the “Open” button and select an image file.
::选中顶部的框.单击"添加图像"按,将添加一个条目到背景图像列表中,如右图.最初没有图像打开这个条目;您需要单击"打开"按并选择一个图像文件.
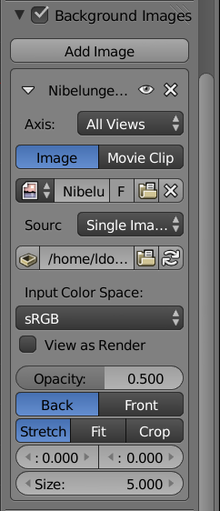
Once you have chosen an image file, the list entry expands with additional options.
::您选择一个图像文件后, 列表条目会扩展到更多的选项.
Clicking on the eye icon lets you temporarily hide a reference image, without actually removing it from the document. Or you can uncheck the box at the top of the Background Images panel to temporarily hide all reference images; just check it to make them visible again. Click the X to delete an entry from the list of background images.
::点击眼睛图标可以让您暂时隐藏参考图像,而不会实际从文档中删除. 或者您可以取消勾选背景图像面板顶部的框,暂时隐藏所有参考图像;只需勾选它才能再次显示. 点击X从背景图像列表中删除一个条目.
If you have multiple scenes in your document, the document’s background image settings apply to all of them.
::如果您的文档有多个场景, 文档的背景图像设置适用于所有场景.

If you don’t have an image handy to experiment with, how about downloading this simple 2D one from Wikimedia Commons. Flat images with no perspective work best for use as a precise modelling reference.
::如果您没有图像可供实验,请从维基媒体公众号下载这个简单的二维图像. 没有视角的平面图像最适合作为精确的建模参考.
Having loaded your image, it might not immediately appear in the 3D view. For it to show, you must be in a
perfect
(axis-aligned) view (i.e. one of NUM1 , NUM3 , NUM7 , CTRL + NUM1 , CTRL + NUM3 or CTRL + NUM7 ) which is in orthographic, not perspective, mode (use NUM5 to toggle between these), or alternatively it will show in NUM0 the camera view.
::图像加载后,它可能不会立即出现在3D视图中.为了显示,您必须处于完美的 (轴对齐) 视图 (即NUM1 ,NUM3 ,NUM7 ,CTRL + NUM1 ,CTRL + NUM3或CTRL + NUM7中的一个) 处于正写,而不是视角模式 (使用NUM5在这些之间切换),或者它将在NUM0中显示相机视图.
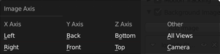
You may not want the same reference image visible in all views. For example, you might have one reference image for top view, another for a side view, and so on. The Axis menu lets you choose which view this image is visible in.
::您可能不希望在所有视图中显示相同的参考图像.例如,您可能有一个参考图像用于顶部视图,另一个用于侧面视图,等等.轴菜单允许您选择该图像可见于哪个视图.
Other Ways To Bring In Reference Pictures
::参考图片的其他方法
Maybe you don’t want to use a reference image for precise, axis-aligned modelling, but only as a rough guide. There is a standard Blender addon called “
Import Images As Planes
”, which will create a plane object and apply an imported image to it as a texture. This can then be aligned whichever way you want in the scene.
::也许你不想使用参考图像来精确的,轴对齐的建模,但仅作为一个粗略的指南.有一个标准的Blender附加程序叫做"导入图像作为平面",它将创建一个平面对象并将导入的图像应用到它作为纹理.然后可以按照你想要的方式对齐在场景中.
In Blender 2.58 or later, an empty with the type of image can be created. In the object data pane an image can be selected. Like the image plane, the image will be present in the 3D view and can be aligned in any orientation.
::在Blender 2.58或更高版本中,可以创建一个图像类型的空格.在对象数据窗格中可以选择图像.像图像平面一样,图像将存在于3D视图中,可以在任何方向对齐.