Blender 3D:零基础到专业级-单元2:基本建模和着色
In this module, you will create a new material called "Green Ooze". Along the way, you will learn how to alter the diffuse, specular, and mirror colors of a material.
::在这个模块中,你将创建一个新材料,叫做"绿色". 一路上,你将学习如何改变材料的扩散,镜面和镜面颜色.
Your First Material
::你的第一篇文章
The cube in the default scene (which you get from
File → Load Factory Settings
) has a simple grey color. Now click on the Materials context
![]() in the Properties
in the Properties
![]() window.
window.
::现在在属性窗口中点击材料上下文.
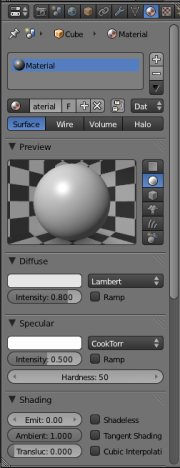
The materials context contains various menus, but for now you only need diffuse, specular and mirror. The material is named and linked in the panel above the preview window. (Linking is a feature that allows materials to be shared between multiple objects (or datablocks). Changing a material affects the appearance of everything it is linked to.)
::材料上下文包含各种菜单,但目前您只需要扩散,镜像和镜像. 材料在预览窗口上方的面板中被命名和链接. (链接是一个允许多个对象 (或数据块) 之间共享材料的功能. 改变材料会影响它所链接的一切的外观.)
The first row of the window above the preview window indicates that:
::预览窗口上方的窗口的第一行表示:
-
there is one material assigned to this object and its name is "Material".
::这个对象只有一种材料,它叫"材料".
The second row of controls indicates that:
::控制的第二行表示:
-
The current selected material's name is "Material".
::目前所选的材料的名称是"材料". -
This material will only be saved if it's in use.
::只有在使用时才能保存. -
It is not a "Nodes" material.
::这不是"节点"的材料. -
Instead of being linked directly to an object, the current material is linked to a datablock.
::现在的材料与数据块连接在一起, 而不是直接与一个对象连接在一起.
To rename the material, click LMB on the name and enter the name you want.
::为了更名该材料,请点击名称上的LMB,然后输入您想要的名称.
To unlink the material, click LMB on the
X
button to the right of the material name ("Material"). Do this now. This deletes the link to the datablock, removing the material from the mesh. As a side-effect, most of the panels in the Material context disappear. You will see in a moment, however, that the material still exists. It hasn't been deleted; it is simply no longer in use.
::要解开材料链接,请点击材料名称 ("材料") 右边的X按上的LMB.现在这样做.这将删除数据块的链接,从网格中删除材料.作为副作用,材料上下文中的大多数面板都消失了.然而,您将在一会儿看到材料仍然存在.它没有被删除;它只是不再使用.
At this point, you could click LMB the "New" button to create a new material, but instead we are going to reapply the old material:
::现在,你可以点击"新"按创建一个新的材料,
-
Click LMB on the
 button to the left of the "New" button.
::在"新"按的左边按上点击LMB. -
You'll see a nifty drop-down list containing all materials you've created so far. Choose
0 Material
.
::您将会看到一个简单的下拉列表, 包含您迄今创建的所有材料. 选择 0 材料.
Materials whose names are preceded by "0" in this list are not in use. By default, Blender doesn't save such materials when it saves the scene. Thus, you can delete a material from the list by saving the scene and then reopening it. You can override this behavior by toggling the "F" button "on" for unused materials you want saved.
::在此列表中,名字前面是 "0" 的材料不被使用.默认情况下,Blender 在保存场景时不会保存这些材料.因此,您可以通过保存场景,然后重新打开它来从列表中删除材料.您可以通过切换"F"按"开启"来覆盖您想要保存的未使用的材料.
Your materials will be much easier to find and manage if you give them brief, descriptive names you can recognize at a glance. Change this one's name to "Green Ooze". In addition, naming of your materials and other objects in your scene is useful when such components of your scene will be appended in another scene of a different Blender file. Naming your materials and other stuff in the scene will enable you to choose the right objects and materials you need whenever you wish to append just a portion of a whole bunch of work you did. For instance, you're working on a new Blender project, but felt the material you used in this Blender file is worth it. Instead of going through the pain of creating a new material (of course you guessed in the initial one in getting the right material appearance), you just append the material to your new work. Pretty simple! Make naming a habit, as it's much used in a production environment.
::您的材料将更容易找到和管理,如果您给他们简短,描述性的名称,你可以一眼就能识别. 改变这个一个名字为"绿色 Ooze". 此外,命名您的材料和其他对象在你的场景是有用的,当你的场景的这些组件将附加在另一个场景的不同的混合器文件.命名您的材料和其他东西在场景中将使您能够选择正确的对象和材料,你需要每当你想附加只是一整堆工作的一部分. 例如,你在一个新的混合器项目,但觉得你在这个混合器文件中使用的材料是值得的. 而不是经历创建一个新的材料 (当然你猜到最初的在获得正确的材料外观),你只是附加材料到你的新工作. 很简单! 习惯命名,因为它在生产
Specifying Colors
::指定颜色
Simple materials are specified by three colors: diffuse, specular and mirror. Rectangular patches (
swatches
) of the colour in their own panel in the Material context allow you to see and change each of these. Diffuse color is the basic underlying color of the material, rendered by the diffuse shader. Specular color is for highlights (small bright spots on a shiny surface) as rendered by the specular shader. Mirror color is for true reflections rendered using ray-tracing.
::简单的材料由三个颜色指定:扩散,镜面和镜子. 材料背景中的颜色的矩形贴片 (样本) 允许您看到和更改每一个. 扩散色是材料的基本底层颜色,由扩散色彩染器染. 镜面色是镜面染器染的亮点 (光亮表面上的小亮点). 镜面色是使用光线追踪染的真反射. 镜面色是使用光线追踪染的真反射. 镜面色是使用光线追踪染的光线. 镜面色是使用光线追踪染的光线追踪染的光线. 镜面色是使用光线追踪染的光线追踪染的光线. 镜面色是使用光线追
There are many ways to define colours. Blender supports three:
::有很多种定义颜色的方法. 混合器支持三种:
-
RGB: By specifying relative amounts of red, green and blue
primary colours
, by giving a number from 0.0 to 1.0 for each component. For example, (R, G, B) = (0, 0, 0) specifies black (no colour at all); (0, 1, 0) is full green; (1, 1, 0) (full red + full green) is yellow; (0.5, 0.5, 0.5) is 50% grey, and (1, 1, 1) is full white (maximum intensity of all components). Note that this is
additive mixing
of colours, which is what happens when you shine lights of different colours onto a white screen, not the
subtractive mixing
that takes place when you mix different-coloured paints or inks on paper or canvas.
::RGB:通过指定红色,绿色和蓝色的相对数量,为每个组件给出从0.0到1.0的数字.例如, (R,G,B) = (0,0,0) 指定黑色 (根本没有颜色); (0,1,0) 是全绿色; (1,1,0) (全红+全绿) 是黄色; (0.5,0.5,0.5) 是50%灰色, (1,1,1) 是全白色 (所有组件的最大强度).请注意,这是添加色的混合,这就是当你在白色屏幕上照射不同颜色的光时发生的,而不是当你混合不同颜色的油漆或纸张或帆布上的油墨时发生的减法混合. -
HSV: By specifying a
hue
(colour position on the rainbow) together with a
saturation
(strength of colour, from garish down to pastel, with zero giving shades of grey) and
value
(brightness). This is generally considered to be easier to use than RGB notation when you are trying to create new colours (as opposed to copying a colour spec from somewhere else), since it is easier to predict what the likely result will be. HSV is commonly represented on a
colour wheel
, where the hue is the angle around the circle, saturation the distance from the centre, and value controlled by a separate brightness slider (as shown below).
::HSV:通过指定色调 (彩虹上的颜色位置),以及和度 (色彩强度,从丽到淡色,灰色的色调为零) 和值 (亮度).当你试图创建新颜色时 (而不是从其他地方复制颜色规格),通常认为这比RGB标记更容易使用,因为更容易预测可能的结果是什么.HSV通常用颜色轮表示,其中色调是圆周的角度,和度是中心的距离,并且值由单独的亮度滑块控制 (如下图). -
By specifying a 6-digit hexadecimal number. This is just an alternative form of RGB notation, commonly used for colour specifications in Web pages.
::通过指定一个6位数的十六进制数字. 这只是RGB标记的另类形式,通常用于网页上的颜色规范.
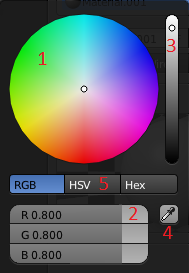
If you click on any colour swatch, the colour picker will pop up, allowing you to change the values. This is the most intuitive way. The window that appears will look like this and will include the following (Figure 2):
::选择颜色的方法是最直观的. 显示的窗口将是这样的,其中包括以下内容 (图2):
-
A color wheel to change the color as you want. In HSV mode, H corresponds to angle around this wheel, while S corresponds to distance from the centre.
::一个颜色轮,可以随心所欲地改变颜色.在HSV模式中,H对应于这个轮周围的角度,而S对应于距离中心的距离. -
Three color sliders that will change if you change the color in the colorwheel. You can also change the values with the sliders.
::通过三种颜色的滑块, 您可以在色轮中改变颜色, 您也可以使用滑块来改变值. -
A slider that controls the intensity of the color. This corresponds to the V in HSV.
::一个滑块来控制颜色的强度. 这与HSV中的V相对应. -
A pipette capable of sampling colors from any Blender window or render window.
::能够从任何混合器窗口或染窗口中取样颜色的管管. -
Buttons that can change it to "HSV" or "HEX" mode.
::按可以将其转换为"HSV"或"HEX"模式.
-
Alternatively you can specify hue, saturation and value components by clicking LMB on the "HSV" button and pushing the sliders around accordingly.
::您也可以通过点击"HSV"按上的LMB并按下滑块来指定色调,和和值组件.
-
You can also press the last button and enter the hexadecimal (or HEX) code. This is simply a different representation for RGB, where the hex digits represent
rrggbb
.
::您也可以按下最后一个按并输入十六进制 (或HEX) 代码. 这只是RGB的不同表示,其中六进制数字代表 rrggbb.
HSV is probably the most easily understandable way of specifying and experimenting with colours. However, as is common with most computer systems, all colours in Blender are represented internally as RGB.
::HSV可能是指定和实验颜色的最容易理解的方式.然而,与大多数计算机系统一样,Blender中的所有颜色都以RGB内部表示.
If you want to get rid of the window just click LMB anywhere else.
::如果您想删除窗口,请点击LMB.
|
|
Duplicate intensity sliders?
There are two ways to control the intensity of the colour: there is the vertical intensity slider at the right of the colour picker popup, and there are also the intensity fields at the bottom of the Diffuse and Specular panels (above), the final intensity being the combination of both values. Why two different ways?
Partly this is to allow a quick way to moderate or intensify the diffuse or specular components, without having to change the actual colour specification. But more importantly, this is to ensure that
intensities are never set to 100%
. The reason is that this can cause rendering calculation problems, leading to total light intensities accumulating to infinity instead of converging to a finite value. This is probably not a big issue with the Blender Internal renderer, but can become a problem with
more advanced renderers
.
|
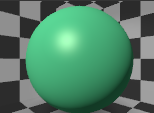
The most used method of creating a color of your own is using the color wheel, but because we want to be sure you will get the exact same color as us we will use the sliders. Use the above methods to set the diffuse color to R=0.149, G=1.000, B=0.446 (or use the HEX code: 6CFFB2). If you look in the "Preview" panel, you will see that the material is now bright green.
::创建自己的颜色的最常用的方法是使用颜色轮,但是因为我们想确保您得到与我们完全相同的颜色,我们将使用滑块.使用上述方法将扩散色设置为R=0.149,G=1.000,B=0.446 (或使用HEX代码:6CFFB2).如果您在"预览"面板中查看,您将看到材料现在是明亮的绿色.
Most real-life materials (other than metals) don't alter the color of specular light. For this reason, Specular and Mirror are usually left at their default values (white). For green ooze, however, you'll disregard this rule-of-thumb:
::大多数现实材料 (除金属外) 不会改变镜光的颜色.因此,镜光和镜子通常会保持其默认值 (白色).然而,对于绿色的粘液,你会忽略这个指令:
-
Click LMB the sample rectangle below the Specular window.
::在镜窗下方的样本矩形中点击 LMB. -
Use the color selection dialog to adjust the specular color and watch the Preview panel to see how this color affects the sample sphere's highlight.
::使用颜色选择对话框调整镜面颜色,并观看预览面板, 查看此颜色如何影响样本球的亮点. -
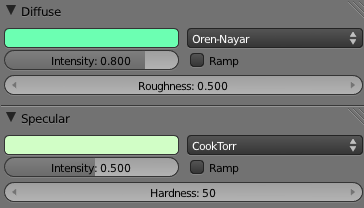
Set the specular color to R=0.640, G=0.990, B=0.566 (or use the HEX code: D1FEC6).
::设置镜面颜色为R=0.640,G=0.990,B=0.566 (或使用HEX代码:D1FEC6).
With these values for Color and Specular, you should be able to get a good ooze later on. The Preview, Diffuse and Specular panel should now look like this:
::通过这些颜色和镜面值,您应该能够在以后得到一个好的粘液. 预览,扩散和镜面面板现在应该看起来像这样:
As you can see, there are many other material buttons. Many of these will be explained in later modules. Suggestions for creating specific materials may be found in
the "Every Material Known to Man" module
.
::您可以看到,还有很多其他材料按.这些将在后面的模块中解释.在"人类所知的每一种材料"模块中可以找到创建特定材料的建议.
Save this scene before proceeding. You will need it for
the "Quickie Texture" module
, in which you will perfect your ooze.
::保存此场景, 继续前进, 您将需要它用于"快速纹理"模块,
|
|
Copying/Pasting Colours:
Quite often, you will want to duplicate or move a colour specified in one place to another. If the two colour swatches are simultaneously visible, you can use the eyedropper button in the colour picker. But if they are not, then the easiest way is to bring up the colour picker for the colour you want to copy, switch to the hex display, select the 6 hex digits, and copy them with CTRL + C . Then go to the colour you want to make the same, bring up its picker in hex mode, select the hex digits, and replace them with what you copied using CTRL + V .
|