Blender 3D:零基础到专业级-单元2:基本建模和着色
You
previously learned
about using diffuse and specular shaders to control the appearance of a material. These settings only affect how the material reflects
direct
light from lamps; but in the real world, objects are also illuminated by
indirect
light bouncing off other lit objects.
::您之前已经了解到使用扩散和反射遮光器来控制材料的外观. 这些设置只会影响材料如何反射来自灯的直接光线; 但在现实世界中,物体也会通过反射到其他照明物体的间接光线来照亮.
In particular, there is the important case of light bouncing off mirrors and other glossy or polished surfaces before travelling to the camera, and also of light passing
through
transparent objects and being
refracted
(bent).
::特别是,光线在进入相机之前反射于镜子和其他光泽或抛光表面,光线通过透明物体并被折射 (曲) 的重要情况.
In the real world, such light can illuminate other objects, and it can also do so after bouncing off non-mirrorlike surfaces. The general problem of modelling such indirect lighting is called
global illumination
, commonly abbreviated “GI”. Unfortunately, the Blender Internal renderer, which is what we have been working with so far, cannot deal with GI in its full generality; to cope with that, we would have to use the Cycles renderer, which is introduced
later
. So for now we will confine ourselves to mirrorlike reflections which do not illuminate other objects.
::在现实世界中,这种光可以照亮其他物体,并且它也可以在反弹非镜像表面后这样做. 建模这种间接照明的一般问题称为全局照明,通常缩写为GI. 不幸的是,Blender内部染器,这是我们迄今为止一直在使用的,无法处理GI的全部一般性;为了应对这一点,我们必须使用后面介绍的Cycles染器. 因此,现在我们将限制自己对不照亮其他物体的镜像反射.
Setting The Scene
::设置场景
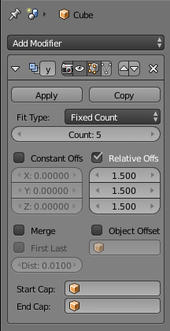
Let’s create a very basic model we can use to experiment with various ray-tracing effects. Open a new Blender document. Make sure the default cube is selected. Go to the Modifiers
![]() context in the Properties window, and add an Array modifier to the cube.
context in the Properties window, and add an Array modifier to the cube.
::让我们创建一个非常基本的模型,我们可以使用它来实验各种光线追踪效果. 打开一个新的混合器文档. 确保默认的立方体被选中. 进入属性窗口的修改器上下文,并添加一个数组修改器到立方体.
The cube will immediately become two cubes, but so close together that they look like a single cuboid. This is because the default settings for the Array modifier are to use a Relative offset of (
X
,
Y
,
Z
) = (1.0, 0.0, 0.0). Change these offsets to (1.5, 1.5, 1.5), so the copies are more widely separated at a more interesting angle, and increase the repetition count to 5.
::立方体将立即变成两个立方体,但它们非常接近,看起来像一个单一的立方体.这是因为数组修改器的默认设置是使用 (X,Y,Z) = (1.0,0.0,0.0) 的相对偏移.将这些偏移更改为 (1.5,1.5,1.5),因此副本在更有趣的角度更广泛地分离,并将重复数增加到5.
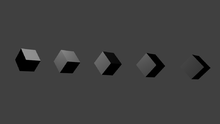
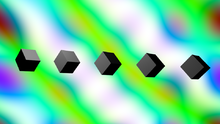
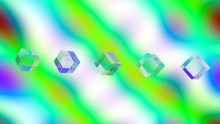
Now try rotating and repositioning the camera and the cubes to get them all in the view. If you hit F12 to render now, you should see something like at right. So far not very exciting. But since we are going to be dealing with reflections and refractions, it would be nice to have something in the surroundings to be reflected and refracted.
::现在试着旋转和重新定位相机和立方体,让它们全部在视图中.如果你按F12来染现在,你应该看到这样的东西. 到目前为止,并不太令人兴奋. 但既然我们要处理反射和折射,很好在周围有东西被反射和折射.
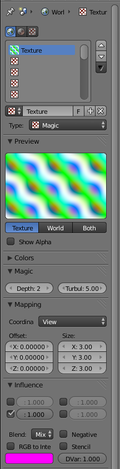
One easy thing to add is a world texture. Go to the Texture
![]() context in the Properties window. Make sure the World texture
context in the Properties window. Make sure the World texture
![]() (the leftmost of the 3 buttons at the top of the topmost panel) is selected. Create a new texture, and change its type to “Magic”, which has a nice variety of different colours. Go to the Influence panel; by default the top-left checkbox (affect background progression) is checked; but this does nothing, because the default sky setting is not to have a progression at all. So uncheck that box, and check the second one on the left (affect horizon colour) instead.
(the leftmost of the 3 buttons at the top of the topmost panel) is selected. Create a new texture, and change its type to “Magic”, which has a nice variety of different colours. Go to the Influence panel; by default the top-left checkbox (affect background progression) is checked; but this does nothing, because the default sky setting is not to have a progression at all. So uncheck that box, and check the second one on the left (affect horizon colour) instead.
::添加一个世界纹理很容易. 进入属性窗口的纹理上下文. 确保选择了世界纹理 (最顶面板上3个按中的最左边). 创建一个新的纹理,并将其类型更改为Magic,它有各种不同的颜色. 进入影响面板;默认地左上选框 (影响背景进展) 被勾选;但这没有任何作用,因为天空默认设置是完全没有进展. 所以取消选框,并检查左边的第二个 (影响地平线颜色).
Also under the “Size:” setting, set the X, Y and Z scaling all to 3.0; by shrinking the pattern, this will bring more detail into the view.
::在"大小:"设置下,将X,Y和Z缩放设置为3.0;通过缩小图案,这将为视图带来更多细节.
Now if you hit F12 , you should get an image with a slightly more interesting background.
::现在如果按F12, 应该得到一个有点有趣的背景的图像.
OK, we are ready to start playing with the material settings...
::现在我们准备好开始玩材料设置了...
Ray-Traced Transparency
::射线追踪透明度
In physics,
refraction
is what happens to light when it crosses the boundary from one material (e.g. air) into another (e.g. water); it slows down when it enters the denser material, and speeds back up when it leaves. The
refractive index
of a material is a measure of how much the speed changes relative to a vacuum (where light travels at full speed). As the speed changes, the light beam also changes direction, giving rise to well-known “bending” effects like you see when you put a teaspoon in a glass of water, or look down into a swimming pool (as at right).
::在物理学中,折射是光从一个物质 (如空气) 穿过界限进入另一个物质 (如水) 时发生的;当它进入更密集的物质时,它的速度减慢,当它离开时,速度回升.物质的折射率是衡量速度相对于真空 (光在全速行驶) 的变化程度的指标.随着速度的变化,光束也改变方向,产生众所周知的"曲"效应,例如当你把茶匙放入一杯水中,或看向游泳池时 (如右图).
Anyway, back to our tutorial model. Make sure the cubes are selected. Go to the Materials
![]() context in the Properties window. Find the Transparency panel, and check the box at the top to enable transparency. In the row of buttons for selecting the type of transparency just below that checkbox, titled “Mask”, “Z Transparency” and “Raytrace”, select “Raytrace”.
context in the Properties window. Find the Transparency panel, and check the box at the top to enable transparency. In the row of buttons for selecting the type of transparency just below that checkbox, titled “Mask”, “Z Transparency” and “Raytrace”, select “Raytrace”.
::无论如何,回到我们的教程模型. 确保选择了立方体. 在属性窗口中进入材料上下文. 找到透明度面板,并勾选顶部的框以启用透明度. 在勾选框下方的按列中,标题为 Mask, Z Transparency和 Raytrace,选择 Raytrace.
In the editable fields immediately below those transparency-type buttons, the one at the top left is titled “Alpha:”; you will have to reduce it below its default value of 1.0 in order to see any actual transparency effect. Try reducing it to 0.5.
::在这些透明度类型按下方的可编辑字段中,左上方的按标题为 Alpha:;您必须将其降低到默认值 1.0 以便看到任何实际的透明度效应.尝试将其降低到 0.5.
Just a bit further down from the Alpha field, look for two more fields: “IOR:” (“Index Of Refraction”) and “Filter:”.
::在阿尔法场的稍微下方,再寻找两个场:IOR: (IOR 和Filter:.
To simulate glass, set the IOR to 1.5 (other useful values are 1.33 for water, 2.4 for diamond
etc
). The Filter value controls how much of the diffuse colour of the material the light takes on as it passes through; set it to something like 0.5, though you probably won’t notice much effect from this unless you specify a strong colour in the diffuse shader settings.
::为了模拟玻璃,设置IOR为1.5 (其他有用值为1.33对于水,2.4对于钻石等). 过器值控制光通过时材料的散色的多少;设置为0.5,尽管你可能不会注意到这 unless unless unless 否则你在散色遮光器设置中指定强烈的颜色.
The “Depth:” setting controls how many times the light passes across material boundaries before the renderer gives up keeping track. Larger values give more realistic results, at the usual cost of increased render times. In more complex scenes where you have transparent objects in front of other transparent objects, this value will have a definite effect; here it probably doesn’t matter too much.
::深度:设置控制光线在呈现器放弃跟踪之前,通过材料界限的次数.较大的值会产生更现实的结果,通常会增加染时间.在更复杂的场景中,你在其他透明物体前面有透明物体,这个值会产生明确的影响;在这里它可能不会太重要.
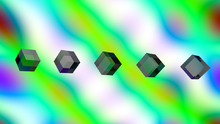
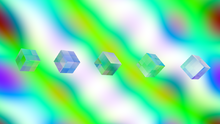
Now if you hit F12 , you should see something like at right. The cubes still look a bit grey; if you set the alpha to 0, they will look much more transparent.
::现在如果按F12,你应该看到右边的东西. 立方体看起来仍然有点灰色; 如果你把alpha设置为0,它们会看起来更透明.
Also try playing with the “Amount:” slider under “Gloss:”: the default value of 1.0 gives perfectly smooth refraction, while values less than 1.0 give a “frosted glass” effect, blurring the light as it passes through the material.
::试试在"光泽度"下使用"数量"滑块:默认值为1.0可以实现完全光滑的折射,而值小于1.0则会产生"结玻璃"效果,在光线穿过材料时会变得模糊.
The Fresnel Factor
::弗雷内尔因素
Real-life materials are never perfectly opaque or perfectly absorbent; even with something like a shiny metal which seems entirely opaque, light still manages to penetrate a little way into the surface, and even with the blackest of black soot, there is still some (tiny) amount of reflection going on.
::现实生活中的材料从来都不是完全不透明或完全吸收;即使有像闪亮的金属一样看起来完全不透明,光仍然能够透到表面,即使是最黑的黑色烟尘,也仍然有一些 (微小) 的反射.
The general behaviour is that a material is most transparent when its surface is viewed directly-on, and it is most reflective when it is viewed almost parallel to the surface (as usual, Wikipedia has all the
gory details
if you’re interested).
::表面最透明,最能反射, 几乎与表面平行 (如常见, 维基百科有所有血的细节, 如果你有兴趣).
If you look back at that Transparency settings panel, you will see to the right of the Alpha field one labelled “Fresnel:”, and another one below that labelled “Blend:”, which comes to life when the Fresnel value is set to something greater than its default of 0.
::如果您回顾透明度设置面板,您会看到Alpha字段右边一个标记为Fresnel:,
The Fresnel (pronounced “
fray-nel
”) value is the
power
, which governs how sharply the transparency of the surface changes with viewing angle; 0 means the transparency stays unchanged at all angles, while higher values cause the transparency to fall off more rapidly towards the edges. The maximum value you can set for this field is 5.0.
::弗雷内尔值 (发音:fray-nel) 是指指控表面透明度随视角变化而变化的功率;0表示透明度在所有角度保持不变,而较高的值则导致透明度更快地向边缘下降.您可以为此字段设置的最大值为5.0.
Ray-Traced Mirroring
::射线追踪镜像

Just below the Transparency panel in the material settings, you will see the Mirror panel. Check the box at the top to enable it. Note the “Reflectivity:” editable field just below the checkbox; you will need to set this to something other than its default of 0.0 in order to actually observe any mirror effect.
::在材料设置中的透明度面板下方,您将看到镜像面板. 选中顶部的框以启用它. 注意在选框下方的可编辑字段"反射率:";您需要将其设置为除了默认的0.0之外的其他东西,以便实际观察任何镜像效应.
If you render now, you should see something like this.
::如果现在翻译, 应该看到这样的东西.
See also the colour swatch specifying the colour of reflections: the default white means that reflections keep their colours unchanged, which is characteristic of reflections off glass, plastic or ceramics. Reflections off metal tend to take on the colour of the metal.
::参见颜色样本,说明反射的颜色:默认的白色意味着反射保持颜色不变,这是玻璃,塑料或陶反射的特征.金属反射往往会变成金属的颜色.
The Gloss setting governs how mirrorlike the reflections are: reducing this from its default of 1.0 adds blurring to the reflections, giving the effect of less-polished surfaces.
::亮度设置控制了反射的镜像程度:从默认值1.0降低,增加了反射模糊,使表面变得更少抛光.
Note the Mirror panel has its own Fresnel settings. Go back to the Transparency panel, and set the Alpha to 0. That will disable the diffuse and specular shaders completely, giving us a pure ray-traced material, and also render the transparency Fresnel ineffective. Instead, we will control the Fresnel here in the Mirror panel. The behaviour for a nonzero Fresnel power is similar to before; however, instead of fading from transparent in surfaces viewed face-on to effects from the shaders when viewed edge-on, it will fade from transparent to mirrored.
::注意镜面板有自己的弗雷内尔设置.回到透明度面板,将阿尔法设置为0.这将完全禁用分散和镜面遮光器,给我们纯光线追踪材料,并使透明度弗雷内尔无效.相反,我们将在镜面板中控制弗雷内尔.非零弗雷内尔功率的行为与以前相似;然而,在面对面的表面上从透明变色到边缘观看时从遮光器的效果,它将从透明变色到镜面.
Set the Fresnel value to something like 2.5. Compare the render to the previous one without Fresnel:
::将Fresnel值设置为2.5左右. 将染与没有Fresnel的前一个进行比较:

Finally, set the Reflectivity to 1.0, and the Fresnel to 0. Now if you render, you should get a completely opaque, mirror-reflective set of cubes.
::最后,将反射率设置为1.0,Fresnel设置为0. 如果染,你应该得到一个完全不透明的,反射镜的立方体.
Why Are My Shadows Black?
::我为什么会有黑色的阴影?
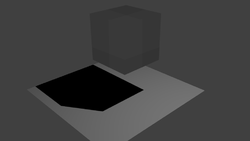
Consider the render at right: this is a default document with a plane added; the cube has ray-trace transparency turned on with an IOR of 1.5, Filter of 0.5, Depth of 5 and Alpha of 0, other settings left at their default. The plane has a material with all settings at their default.
::考虑右边的染:这是一个默认文件,添加了一个平面;立方体的光线痕迹透明度打开,IOR为1.5,过器为0.5,深度为5和阿尔法为0,其他设置默认.平面有一个材料,所有设置都默认.
Light should be able to pass through the cube and illuminate the part of the plane directly behind; so why is the shadow completely black?
::应该能让光线穿过立方体,并照亮直在它后面的部分; 那么为什么影子是完全黑的?
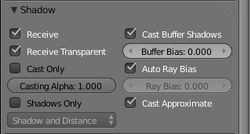
The problem is, by default, the Blender Internal renderer
doesn’t bother to compute transparent shadows
. Instead, it assumes that anything that blocks the light does so completely, presumably because it would slow things down too much to assume the opposite. To fix this, select the plane (
not
the cube), and in its Material
![]() settings, look for the Shadow panel. Note the two checkboxes at upper left: by default the “Receive” one is checked, the “Receive Transparent” one is not. Check the latter as well. Now any object surface with this material assigned will have proper non-transparent shadows computed as appropriate.
settings, look for the Shadow panel. Note the two checkboxes at upper left: by default the “Receive” one is checked, the “Receive Transparent” one is not. Check the latter as well. Now any object surface with this material assigned will have proper non-transparent shadows computed as appropriate.
::问题是,默认情况下,Blender内部染器不费力计算透明的影子.相反,它假定任何阻光线的东西都会完全这样做,可能是因为它会使事情变慢,以假定相反.为了解决这个问题,选择平面 (而不是立方体),并在它的材料设置中,寻找影子面板.请注意左上方的两个选框:默认情况下,接收一个被勾选,接收透明一个没有.同时检查后者.现在任何分配这种材料的对象表面都将有适当的非透明的影子.

Now when you re-render, you should see a more accurate-looking transparent shadow.
::现在当你重新染时, 你应该看到一个更准确的透明影子.
Imagine if you had a scene with lots of non-transparent objects with different materials receiving shadows from lots of transparent objects: you have to check this “Receive Transparent” option on
every single one
of those materials that might be receiving transparent shadows! Yes, this can be a pain. Not to mention the issue of
caustics
, which the BI renderer doesn’t handle at all. If you want to render realistic scenes like this, then you will need to learn about
Cycles
...
::想象一下,如果您有一个场景,其中有很多不透明的物体,不同的材料从许多透明的物体中接收阴影:您必须在可能接收透明阴影的每一个材料上检查这个"接收透明"选项!是的,这可能是个痛苦. 更不用说可热性问题,BI染器根本无法处理. 如果您想染这样的现实场景,那么您需要学习循环...