Blender 3D:零基础到专业级-单元2:基本建模和着色
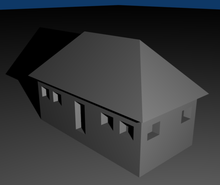
In this module, you'll refine the house model you created two modules ago. In the process, you'll learn how to access Blender's predefined meshes and how to set a pivot point. You'll also learn how to select, extrude, delete, and subdivide the edges and faces of a mesh model.
::在这个模块中,你将改进你两个模块前创建的房子模型. 在这个过程中,你将学习如何访问Blender的预定义网格,以及如何设置一个转点. 你还将学习如何选择,挤出,删除和分类网格模型的边缘和面.
To begin, set up Blender as follows:
::开始,设置混合器如下:
-
Launch Blender and load the factory settings.
::启动混合器并加载工厂设置. -
If you have a numpad, make sure NumLock is on.
::如果您有Numpad,请确保NumLock已启动. -
Load the house model you created in
the "Quickie Model" module
.
::装载你在"快速模型"模块中创建的房子模型. -
If the 3D manipulator is active, disable it.
::如果3D操纵器是活跃的, 禁用它. -
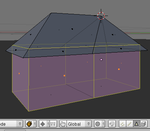
Adjust the viewpoint until you can clearly see two walls of the house and two sides of the roof.
::调整视角,直到你能清楚地看到房子的两面墙和屋顶的两侧.
Adding a Ground Plane
::增加地面飞机
Your house needs some ground to rest on. You can model the ground as an object in your scene. Blender has many predefined mesh objects built in. Happily, one of these is a flat, square surface.
::你的房子需要一些地面来休息. 你可以在你的场景中将地面作为一个对象. 混合器内置了许多预定义的网状对象. 幸运的是,其中一个是平面,方形的表面.
Recall that new objects are added at the 3D cursor. Before creating the ground, you should position the cursor at ground level:
::记住,在3D光标上添加新的对象. 在创建地面之前,您应该将光标定位在地面上:
-
Select the house by clicking RMB on it.
::通过点击人民币来选择房子. -
Enter Edit Mode by pressing Tab .
::通过按TAB进入编辑模式 . -
Select one of the bottom vertices by clicking RMB on it.
::通过点击人民币来选择底部的顶点之一. -
Bring up the
Snap
menu by pressing Shift + S .
::通过按住Shift+S来打开快速菜单 -
Choose
Cursor to Selected
.
::选择选择的标签 -
Leave Edit Mode by pressing Tab so your ground is created as a separate object.
::按下"Tab"即可离开编辑模式,
|
|
There's an "Aligned To View" setting in the "Editing" tab of User Preferences which is off by default in Blender 2.5x. When this setting is on, the orientation of new objects depends on the current viewpoint. Pre-2.48a releases of Blender had "Aligned To View" on by default. If you've turned this setting on (or are using an old release) go to "top view" (by pressing Num7 ) before creating the ground object.
|

Now create the ground object:
::现在创建地面对象:
-
Activate a 3D View window.
::启动一个3D视图窗口. -
Press Shift + A .
::按下Shift+A. 按下Shift+A. -
Choose
Mesh → Plane
.
::选择网格 → 平面.
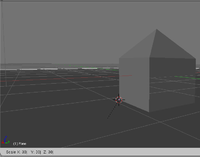
To enlarge (or scale) the ground object, use the scale tool:
::使用尺寸工具扩大 (或缩放) 地面物体:
-
Make sure Blender is in Object Mode.
::确保混合器在对象模式. -
Select the ground by clicking RMB on it.
::选择一个地点,点击人民币. -
Activate the scale tool by pressing S .
::通过按S激活尺度工具. -
Type 7key to enlarge the ground 7x.
::输入7键,扩大地面7倍. -
Press Enter or LMB to confirm and exit the scale tool.
::按 Enter 或 LMB 确认并退出尺度工具.
Scaling with a Pivot
::使用Pivot进行缩放
Suppose you want to shrink the house by 50%. As you can probably guess, this would be done with the scaling tool. However, if you did so right now without the right pivot point, the reduced house would no longer rest on the ground (check this by selecting the house and scaling it to 0.2). Blender scales (and rotates) objects around a pivot point, which by default is located at the median point (geometric center) of the selected object(s).
::假设你想将房子缩小50%.正如你可能猜到的,这将是用缩放工具完成的.但是,如果你现在没有正确的轴心点,则缩小的房子将不再停留在地面上 (通过选择房子并将其缩小到0.2来检查此).混合器将物体缩小 (并旋转) 绕着一个轴心点,默认位置在所选物体的中位点 (几何中心).
In order to scale the house while keeping its base on the ground, you need the pivot point to be at ground level. Since the 3D cursor is at ground level, you can do this as follows:
::为了在保持地面的基础上扩展房子, 需要在地面水平处的旋转点. 因为3D光标处于地面水平, 你可以这样做:
-
Make sure Blender is in Object Mode.
::确保混合器在对象模式. -
Select the house by clicking RMB on it.
::通过点击人民币来选择房子. -
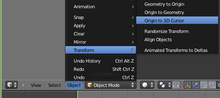
In the 3D View header, click LMB on menu item "Object" and put the mouse cursor over
Transform
and select
Origin to 3D Cursor
from the pop-up menu. This can also be done with Ctrl+Shift+Alt+C, select
Origin to 3D Cursor
from the pop-up menu. (A.K.A. select "Object" which is just left of where you've been going into object mode/edit mode, as shown in the image. So Object>Transform>Origin to 3D Cursor)
::在3D视图头部,点击菜单项"对象"上的LMB,并将鼠标标 cursor放在转换上,并从弹出菜单中选择原始到3D标记. 这也可以通过Ctrl+Shift+Alt+C,从弹出菜单中选择原始到3D标记. (也就是选择"对象",它就在您进入对象模式/编辑模式的左边,如图所示. 所以对象>转换>原始到3D标记)
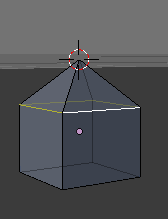
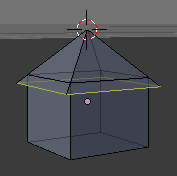
The origin of the house is now at the center of the 3D cursor. If you scale the house, the place where the 3D cursor is located will remain fixed, and everything else will expand or contract from that point. The pivot is marked with an orange-filled circle. Do not mistake it for a selected vertex.
::房子的起源现在位于3D光标的中心.如果您缩放房子,则3D光标所在的位置将保持固定,其他一切都将从该点扩展或收缩.旋转点以一个色圆圈标记.不要将其误认为选定的顶点.
Edge Selection
::边缘选择
It is often useful to select edges instead of vertices.
::选择边缘而不是顶点通常是有用的.

-
Make sure Blender is in Object Mode.
::确保混合器在对象模式. -
Select the house by clicking RMB on it.
::通过点击人民币来选择房子. -
Press Tab to enter edit mode.
::按下"Tab"进入编辑模式. -
Click LMB on the Edge select mode button in the 3D View header.
::在3D视图标题中,点击边缘选择模式按上的LMB.
In Edge select mode, edges appear as orange or white line segments when they're selected and as black line segments when they're not.
::在边缘选择模式中,边缘在被选中时会显示为色或白色线段,而在没有被选中时则显示为黑色线段.
Just as you selected vertices in Vertex select mode, you can now select (and deselect) edges in the same way as vertices. This is also the same for Face select mode.
::您可以在 Vertex 选择模式中选择顶点, 现在您可以在 Vertices 选择边缘 (并取消选择) 的方式. 这对于 Face 选择模式也是如此.
Extruding Edges
::挤出边缘
You can extrude edges in much the same way as you extrude vertices.
::边缘可以用与顶点相同的方式挤出.

To add an overhang to the roof of your house, first move the pivot point to the peak of the roof:
::为了在屋顶上增加一个悬崖,首先把旋转点移到屋顶顶部:
-
Switch to Vertex select mode.
::切换到顶部选择模式. -
Select just the vertex at the peak of the roof.
::选择顶部的顶点. -
Press Shift + S to bring up the Snap menu.
::按下Shift+S, 便可以打开快照菜单. -
In the Snap menu, choose
Cursor to Selected
to move the 3D cursor to the peak.
::在快照菜单中,选择Cursor to Selected将3D光标移动到顶部. -
Use the "Pivot" menu (located to the left of the 3D Manipulator button) in the 3D View header to change the pivot to "3D Cursor".
::使用3D视图头的"Pivot"菜单 (位于3D操纵器按的左侧),将转向更改为"3D标签".
Now extrude by scaling from that point:
::现在从这个点开始,
-
Switch to Edge select mode.
::切换到边缘选择模式. -
Select just the four edges at the base of the roof.
::选择只有四个边缘在屋顶的基础. -
Press E to activate the extrude tool. The effect is that you have just made a copy of the four edges.
::按E激活挤出工具. 效果是你刚刚做了一个四边的副本. -
Press S to scale the four edges uniformly from the pivot point.
::按S使四边从旋转点均缩放. -
As you move the mouse pointer away from the pivot point, the roof of your house will expand.
::随着鼠标指针远离旋转点, -
When the roof is the size you want, confirm by LMB (or pressing Enter ).
::通过LMB (或按Enter) 确认屋顶是您想要的尺寸. -
Press CTRL + SPACE to toggle the manipulator on then make the overhangs slanted by holding LMB on the blue arrow that appears in the center of the house, and dragging down.
::按Ctrl+SPACE将操纵器打开,然后通过按住LMB在房子中间的蓝色箭头上,然后向下拖动,使悬架倾斜.
Face Selection
::面部选择
It is often useful to select faces.
::选择面孔通常是有用的.

-
Make sure you're in Edit Mode on the house.
::确保你在房子的编辑模式. -
Click LMB on the Face select mode button in the 3D View header.
::在3D视图标题中,点击"脸选择模式"按上的"LMB".
In Face select mode, the center of each face is marked with a small square. Faces appear as orange or stippled grey areas with orange edges when they're selected (depending on which face is active), and as grey areas when they're not.
::在面部选择模式中,每个面部的中心都以一个小方形标记.面部显示为色或点灰色区域,边缘为色 (取决于哪个面部是活跃的),而不是灰色区域.
Just as you selected edges in Edge select mode, you can now select (and deselect) faces:
::现在可以选择 (并取消选择) 面部:
-
If any faces are selected, press A to deselect all faces.
::如果有任何面被选中,请按A取消所有面的选中. -
If no faces are selected, press A to select all faces.
::如果没有面部被选中,请按A选择所有面部. -
To select a single face (and deselect the rest), click RMB (or Cmd + LMB ) on the center of the face.
::要选择一个面 (并取消选择其余面),请点击面的中间的RMB (或Cmd + LMB). -
To toggle the selection status of a face (without affecting the rest), click Shift + RMB on the center of the face.
::要切换面部的选择状态 (不影响其余部分),请点击面部中间的Shift + RMB.
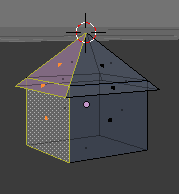
Use these techniques to select all three faces (two roof and one wall) on the +X side of your house, as shown.
::选择房子的+X侧的三面 (两个屋顶和一个墙壁),如图所示.
-
Remember that the positive direction of the axis is the direction the arrows point to.
::记住,轴的正方向是箭头指向的方向.
Extruding Faces
::挤出面
Just as you extruded edges to grow the roof, you can extrude faces to grow the entire house.
::像你挤出边缘来生长屋顶一样, 你可以挤出面部来生长整个房子.
To double the size of your house without changing the pitch of the roof:
::为了增加房屋的面积,
-
With the three faces on the +X side selected, activate a 3D View window.
::选择了 +X 侧的三个面, 激活一个 3D 视图窗口. -
Press E to activate the extrude tool.
::按E激活挤出工具. -
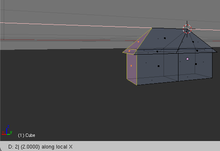
Press X to extrude along the X axis
::按下X沿X轴挤出 -
As you move the mouse pointer in the +X direction, the +X half of your house will expand.
::房子的+X半部分会扩大. -
Press 2 to expand by exactly 2 Blender units. (If you scaled your house earlier, you must change this value accordingly, e.g. scaling by 50% means you press 1 .)
::按2将其扩展到2个混合器单位. (如果您之前缩放了您的房子,则必须相应地更改此值,例如,缩放50%意味着您按1). -
Confirm and exit the extrude tool by clicking LMB (or pressing Enter ).
::通过点击LMB (或按Enter) 确认并退出挤压工具.
Deleting Edges
::删除边缘
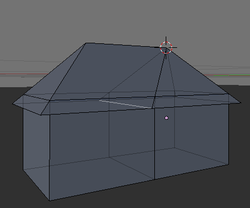
If you look closely at the model, you'll notice an extra edge, inside the house, connecting the seams between the two halves of the roof. To delete this edge:
::房子里面有一个额外的边缘, 连接了屋顶两半之间的接.
-
Edit the house object in Edge select mode.
::在边缘选择模式中编辑房子对象. -
Select just the edge you want to delete.
::选择您想要删除的边缘. -
Press X or Delete .
::按一下X或删除 -
When the "Delete" menu comes up, choose
Edges
.
::当"删除"菜单出现时,请选择"边缘".
|
|
Deleting an edge automatically deletes any face(s) that include that edge.
|
Subdividing Faces
::部分部分的面孔
In order to add openings such as doors or windows to the walls of your house, you'll need to subdivide the wall (vertical) faces into smaller faces.
::为了在家里增加门窗等开口, 需要将墙面 (垂直) 分成较小的面.
To subdivide each wall face into a 10x20 grid:
::将每面墙面分为一个10x20的网格:
-
Make sure you are not in wire-frame mode (otherwise the occlude hidden geometry button will not appear)
::确保您不是在线框模式 (否则隐藏几何键不会出现) -
Edit the house object in Face select mode.
::在面部选择模式中编辑房子对象. -
Select all six wall faces of your house.
::选择所有六个墙面的房子. -
Press W to bring up the
Specials
menu.
::按W打开"特别菜单". -
Choose
Subdivide
.
::选择"分成" -
Set the number of cuts to 9 in the Operator panel (also accessible through F6).
::在操作面板中设置切割数为9 (也可通过F6访问).
|
|
In some versions of Blender older than v2.70, there may be a bug that prevents the subdivide function from operating properly.
|
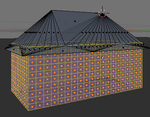
You might be wondering why to make 9 cuts instead of 10, the reason is that in case of dividing a finite surface along one axis there will be always n-1 cuts to generate n single faces. Here the number of cuts is applied in 2 dimensions. So, if you count the number of faces on the subdivided walls, you will find a 10x20 grid. The reason why there are 20 faces instead of 10 lengthwise is because you doubled the size of the house along the X axis (lengthwise).
::你可能想知道为什么要做9个切割而不是10个,原因是,在一个有限的表面沿着一个轴划分的情况下,总会有n-1个切割产生n个单面. 这里切割的数量是2维的. 所以,如果你计算分成墙上的面数,你会找到一个10x20的网格. 长度为20面而不是10面的原因是因为你在X轴 (长度) 上增加了房子的两倍.
Now you can extrude windows and doors:
::现在可以挤出窗户和门:
-
Edit the house object in Face select mode.
::在面部选择模式中编辑房子对象. -
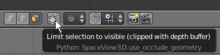
Turn on the "Limit selection to visible (clipped with depth buffer)" (for old Blender versions "Occlude background geometry") option by clicking LMB on the toggle button in the 3D View header.
::通过点击3D View头部的切换按LMB,打开"将选择限制为可见 (用深度缓冲器剪切) " (对于旧版本的Blender"隐藏背景几何") 选项. -
For each wall of the house:
-
Go to the perfect view for that wall:
-
Num1 for "front"
::代表"前面"的数字 -
Ctrl + Num1 for "back"
::Ctrl + Num1表示"回" -
Num3 for "right"
::对于"正确"的数字3 -
Ctrl + Num3 for "left"
::Ctrl + Num3表示"左"
::进入完美的视图,墙:num1为"前"Ctrl + Num1为"后"num3为"右"Ctrl + Num3为"左" -
Num1 for "front"
-
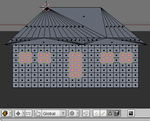
Select faces where you want to create a window or door. An easy way to do this is by:
-
Deselecting all faces by pressing A once or twice.
::通过按A一两次取消所有面孔的选择. -
Pressing B to activate the Border Select tool.
::按B激活边界选择工具. -
Clicking and dragging LMB to delimit a rectangular area.
::点击和拖动LMB以划分一个矩形区域. -
After you release LMB , all faces in the rectangular area will be selected.
::在释放 LMB 后, 矩形区域中的所有面都将被选中.
::选择你想要创建窗口或门的面. 简单的方法是:通过按一两次A来取消所有面的选择. 按B激活边界选择工具. 点击和拖动LMB来划分矩形区域. 释放LMB后,矩形区域中的所有面都将被选择. -
Deselecting all faces by pressing A once or twice.
-
Press E to activate the extrude tool.
::按E激活挤出工具. -
Extrude inward 1/10th of a BU by typing -.1 and confirming it with Enter or LMB .
::输入 - 1 并用Enter或LMB确认一个BU的1/10向内挤出.
::对于房子的每一面墙:进入该墙的完美视图:Num1为"前面"Ctrl + Num1为"后面"Num3为"右边"Ctrl + Num3为"左边"选择您想要创建窗口或门的面.一个简单的方法是:通过按一两次A来取消所有面的选择.按B激活边界选择工具.点击和拖动LMB来划分一个矩形区域.在释放LMB后,矩形区域的所有面将被选择.按E激活挤出工具.通过输入-1/1的BU向内挤出并用Enter或LMB确认. -
Go to the perfect view for that wall:
Final Steps
::最后的步骤
-
Adjust the position of the lamp and aim the camera until you obtain a good render.
::调整灯的位置,并定位摄像机,直到你得到一个好的染. -
Save your work!
::拯救你的工作!