Blender 3D:零基础到专业级-单元2:基本建模和着色
This tutorial is about using guide images to place vertices in their proper places in 3D space. The second tutorial is on how to take good reference pictures. This tutorial assumes that you have completed all previous tutorials.
::这教程是关于使用导图来将顶点放在适当的地方在3D空间. 第二个教程是如何拍摄好的参考图片. 这教程假设你已经完成了所有之前的教程.
This tutorial describes the use of the
background image
feature of Blender to assist in creating models of 3D objects. The background image provides a reference for the dimensions of the object, similar to the way the floor plan and elevation views of a house provide dimension information for the actual house. Guide images are not rendered, and may be removed after the model is completed, or they may be retained as part of the internal documentation of the model. Background images are not generally useful for other "image" purposes such as materials, textures, and actual background images in a scene, just as a floor plan is not actually visible after a house is constructed.
::本教程描述了使用Blender的背景图像功能来帮助创建3D对象模型.背景图像提供对象的维度的参考,类似于房屋的地图和高度视图提供实际房屋的维度信息的方式.导向图像不会染,在模型完成后可以删除,或者它们可以保留为模型内部文档的一部分.背景图像通常不适用于其他"图像"目的,如材料,纹理和现场中的实际背景图像,就像房子建造后地图实际上看不到一样.
Background: orthographic projection
::背景:字体投影
orthographic projection
is a technique used by architects and engineers to describe a three-dimensional object by the use of several two-dimensional images, or "projections." In architecture, the projection as seen from above is called the "plan view" or "floor plan," the projection as seen from the front is called the "front elevation," and the projection as seen from the right side is called the "right elevation." Orthographic projections are intended to assist builders in creating an actual 3D object.
::字体投影是一种由建筑师和工程师使用的技术,用于通过使用多个二维图像或"投影"来描述一个三维物体.在建筑中,从上面看到的投影称为"平面图"或"地图",从前面看到的投影称为"正面的高度",从右侧看到的投影称为"右侧的高度".字体投影旨在帮助建筑师创建一个实际的3D物体.
A Blender user also wants to create a 3D object, in this case a model. Blender provides a way to use a set of one or more orthographic projections as a guide for object creation. Because the images are conceptually "behind" the object from the appropriate point of view, Blender calls these 2D images
background images
.
::混合剂用户还希望创建一个3D对象,在这种情况下是一个模型.混合剂提供了一种使用一组或多个正写投影作为对象创建指南的方法.由于图像在概念上是对象的"后面",因此混合剂将这些2D图像称为背景图像.
Each background image is located "at infinity" in an orthographic view, and there may be one image in each direction: back, front, top, bottom, left, and right. we can use one or more background images to assist our modeling effort.
::每个背景图像都位于"无限"的正写视图中,每个方向可能都有一个图像:后方,前方,上方,下方,左方和右方. 我们可以使用一个或多个背景图像来帮助我们的建模工作.
For example, to model a house, we can put the "floor plan" on the bottom, and build the house above it. We put the front elevation image on the back background, and build the house in front of it. We put the right elevation image on the left background, and build the house to the right of it. The background images can be diagrams such as floor plans, or they can be photographs of an object taken from sufficiently far away to provide undistorted dimensional information.
::例如,为了建模一个房子,我们可以把"地图"放在底部,然后在上面建造房子.我们把前面的高度图像放在后面的背景,然后在它前面建造房子.我们把右侧的高度图像放在左侧的背景,然后在它的右边建造房子.背景图像可以是地图图样的图表,或者它们可以是从足够远的地方拍摄的物体照片,以提供不扭曲的维度信息.
Reasonably enough, an orthographic projection is only useful in Blender when in orthographic mode. Blender enforces this to prevent you from making mistakes: the orthographic image is only displayed in the background when you are in the orthographic view mode.
::合理地说,正写投影在Blender中只有在正写模式下才有用. Blender强制执行此功能以防止您犯错误:正写图像只在正写视图模式下显示在后台.
Making a Simple Pyramid
::建造一个简单的金字塔
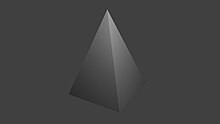
First we are going to create a pyramid the easy way. Then we are going to show how to use different viewpoints and images as a guide to place vertices correctly in 3D space.
::首先我们将以简单的方式创建一个金字塔. 然后我们将展示如何使用不同的视角和图像作为指导,
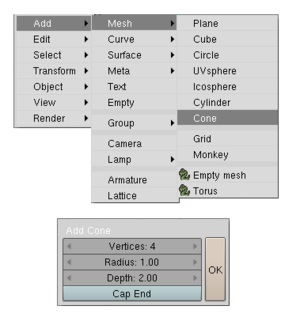
Get rid of the default cube. Press Shift+A and select Mesh→Cone. Set the number of vertices to 4, and Set "Capp fill Type" to "Nothing". Click OK. There’s your pyramid.
::删除默认立方体. 按Shift+A,选择Mesh→Cone. 将顶点数设置为4,并将"Capp fill Type"设置为"Nothing". 点击OK. 这里是你的金字塔.
Note:
Do not render this looking up from the bottom, as it will appear invisible, as the interior faces of models are ignored by most rendering engines.
::注意:不要将此图像从下面向上染,因为它会看起来看不见,因为大多数染引擎都会忽略模型的内部面.
Save the top vertex for later steps
::保存顶点以后的步骤
Enter Edit mode ( TAB ). First, unselect all the vertices by pressing A . Next, select the bottom four vertices of the pyramid and delete them with DEL or X . The only vertex left will be the vertex which makes the tip of the pyramid. This will be used later.
::进入编辑模式 (TAB).首先,通过按A取消所有顶点的选择.接下来,选择金字塔的底部四个顶点并用DEL或X删除它们.剩下的唯一顶点将是构成金字塔尖端的顶点.这将在以后使用.
Using the guide images
::使用指南图像
Now that we have the pyramid the easy way, let's learn how to use guide images as references to build models.
::现在我们已经知道了简单的金字塔, 让我们学习如何使用导向图像作为建模的参考.
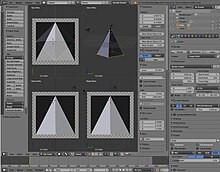
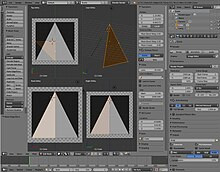
Window Layout
::窗口的布局
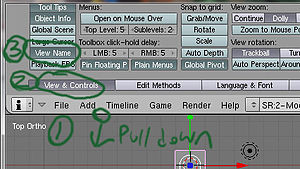
Split the Main 3D view window in to 4 windows (2 x 2).
::将主3D视图窗口分为4个窗口 (2 x 2).
- Reminder : to split windows, move the mouse to the border of the view, when the cursor transforms into arrow, right-click and choose "Split Area". (Explained in the guide: Noob to Pro/Blender Windowing System .)
The point of view in each window are like this:
::每个窗口的视角是这样的:
| NUM7 | NUM0 |
| NUM1 | NUM3 |
And if you click on View, you can see that these windows are respectively:
::您可以看到这些窗口分别是:
-
Top User Front Right
By knowing which view you are looking at you may find that you quickly get the idea of what you are doing and can proceed somewhat intuitively in this section on your own without following all of the step by step instructions.
::通过知道你在看哪个景观,你可能会发现你很快就会有所了解,并且可以在这个部分自己进行一些直观的操作,而不必遵循所有一步一步的说明.
Note: The quick way to achieve this layout is to go into Quad-View (CTRL-ALT-Q)
::注意: 快速的方式来实现这个布局是进入四维视图 (CTRL-ALT-Q)
Guide images
::导向图像
Now, we need some images. These come from a source outside of blender. For this tutorial, we need a floor plan of our pyramid, a front elevation view, and a side elevation view. The floor plan of our pyramid is a square, and the front elevation view is a triangle, as is the side elevation. We will cheat and use the same source image for both the front and side elevation. We can make a picture of a white square and of a white triangle in the GIMP, Paint , or some other image editor. Or we can find appropriate images somewhere.
::现在,我们需要一些图像. 这些来自混合器之外的来源. 对于这个教程,我们需要我们的金字塔的地图,前方的高度视图和侧面的高度视图. 我们的金字塔的地图是正方形,前方的高度视图是三角形,侧面的高度也是. 我们将作弊并使用相同的源图像来显示前方和侧面的高度. 我们可以在GIMP,Paint 或其他图像编辑器中制作白色正方形和白色三角形的图片. 或者我们可以在某处找到合适的图像.
Method 1 download and use
::方法1下载和使用

Download the black and white triangle image on the right of the screen and use that. This image is, minus the checker pattern at the border, 198 x 198. (click it once to get the larger version, right click on the larger one, and save)
::下载屏幕右侧的黑白三角形图像并使用它. 这张图像是,减去边界的支票图案, 198 x 198. (单击一次以获得更大的版本,右键单击更大的版本,并保存)
Method 2 roll your own
::方法2自己滚
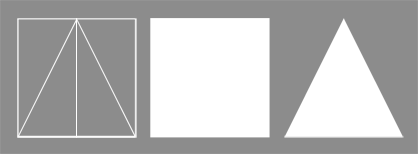
You want to make a triangle, for the ground plane you don't need a picture.
::对于地面平面,你不需要图片.
Noob note
Make sure that the
drawing
of the square is
square
and not just rectangular. Make the triangle the same width and height as the square. Make sure the apex of the triangle is directly above the midpoint of its baseline.
::诺布注意:确保方形的绘图是正方形,而不是矩形.使三角形与方形的宽度和高度相同.确保三角形的顶点直接在基线的中点上方.
Specific instructions for Photoshop
::对于Photoshop的具体说明
Make a square selection of "n by n" size, remember the value of "n". Fill it with white color and save. To create a triangle of needed properties make a rectangular selection of same (n by n) size, on a new layer, click
RMB
on your document, choose "Transform selection" option in the pop-up menu. Once you are in "Transform selection" mode, right-click the blank image again. This time the pop-up menu would be different. Choose "Perspective" from it, and with
LMB
drag one of the two top vertices toward the other. Once the vertices meet (in the top-center of the image), exit the transformation mode, and fill the resulting triangular selection with white.
::选择一个"n×n"大小的正方形,记住"n"的值.用白色填写并保存.要创建所需属性的三角形,选择一个相同 (n×n) 大小的矩形,在新层上,点击RMB,在弹出菜单中选择"转换选择".一旦进入"转换选择"模式,再次右键空白图像.这次弹出菜单将不同.从中选择"视角",并使用LMB将两个顶点中的一个拖向另一个.一旦顶点相遇 (在图像的上中),退出转换模式,并将结果的三角形选择填充白色.
Save the files to a place that is easy to access. Blender only supports the TGA, PNG, and JPG image formats.
::保存文件到一个易于访问的地方. Blender 仅支持 TGA, PNG 和 JPG 图像格式.
Specific instructions for Gimp
::关于Gimp的具体说明
Turn on the grid (View->Show Grid, View->Snap to Grid), use the rectangle select with a fixed aspect ratio of 1:1 (in the tool options panel) to select a square that you can flood fill. For the triangle, use the node tool to draw a triangular path, convert to selection (Select->From Path) and fill it. Or you could just use Inkscape...
::打开网格 (查看->显示网格,查看->快速到网格),使用矩形选择与固定面积比为1:1 (在工具选项面板) 选择一个方形,你可以洪水填充. 三角形,使用节点工具画一个三角形路径,转换为选择 (选择->从路径) 并填充它. 或者你可以使用Inkscape...
Save the files to a place that is easy to access. Blender only supports the TGA, PNG, and JPG image formats.
::保存文件到一个易于访问的地方. Blender 仅支持 TGA, PNG 和 JPG 图像格式.
Background Images
::背景图像
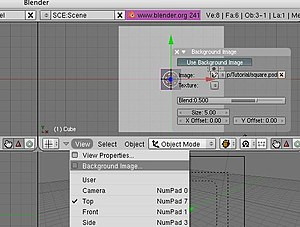
Load the images (as described in the previous module) like this: In the 3D view, make sure the Properties Shelf
(N)
is visible. Look for the Background Images panel; it will most likely be collapsed, so expand it. Initially it will have no background images to view. Check the box at the top. Click the “Add Image” button once, and this will add one entry to the list of background images. Then, with 'Image' selected, use the Open button to navigate to your image file.
::装载图像 (如前一个模块所述):在3D视图中,确保属性架 (N) 可见.寻找背景图像面板;它很可能会被折叠,所以扩展它.最初它将没有背景图像可查看.检查顶部的框.单击"添加图像"按一次,这将添加一个条目到背景图像列表.然后,选择"图像",使用"打开"按导航到您的图像文件.
Load the white triangle (the front elevation view): this places it infinitely far "behind" the model. You can see the image in the front view. Similarly, load the right elevation (coincidentally, you can see the same triangle image in the right view window, to place it infinitely far to the left.
::装载白色三角形 (前方的高度视图):这将它置于无限远的"后面"模型.你可以在前方的视图中看到图像.同样,装载右方的高度 (巧合的是,你可以在右方的视图窗口中看到相同的三角形图像,把它置于无限远的左边.
If necessary, zoom out so that you can see the whole background image in each view.
::如果需要,可以缩小图像,以便在每个视图中看到整个背景图像.
Now you have now placed your guide images for making your pyramid.
::现在你已经把你的指导图像放在了你的金字塔.
Sides
::侧面
Make sure you're in Toggle Quad Mode. The vertex that is left will be the topmost point of the pyramid. Use the
GKEY
to move the vertex around. To get it in the right spot, line it up at the top most point in the
front
and
right
windows. If you look in the
top
window the vertex should appear to be in the center. Make sure to keep the vertex highlighted for the next step.
::确保您处于切换四角模式. 剩下的顶点将是金字塔的顶点. 使用GKEY将顶点移动. 为了使它在正确的位置,将其排在前面和右边窗口的顶点. 如果您在顶端窗口中查看,顶点应该出现在中心. 确保在下一步保持顶点的突出.
Now you can begin to create individual vertices with
CTRL + LMB
. Be sure you don't create vertices in the Top view cause that will confuse you completely.
::现在你可以开始创建单个顶点的CTRL + LMB. 确保你不会创建顶点在顶部视图的原因, 这将完全困惑你.
First line in the pyramid in front view then place a new edge between the last made vertex and the top vertex by selecting them and hit "F". Then do the right side, after selecting the top vertex, exactly the same way. (Don't do the bottom side)
::选择前面的金字塔的第一行,然后在最后的顶点和顶点之间放置一个新的边缘,然后按"F".然后在选择顶点之后,在右侧做完全相同的方式. (不要做底部)
Make Faces
::制作脸
Select the side vertices of the corners were you want a Face and Tick "F" Do this for every Face you want to make.
::选择角的侧顶, 选择要做面的角, 勾选"F"