Blender 3D:零基础到专业级-单元2:基本建模和着色
The
spin
technique is a good choice when you want to model an object that is radially symmetric and you know what the cross section of the object looks like. This the virtual equivalent of using a
lathe
to create an object in the real world. With the spin technique, we draw an outline of one half of the outline of the object, and then spin the outline about an axis to create the object's mesh.
::旋转技术是当你想要模拟一个半径对称的物体,并且你知道物体的截面是什么样子时的好选择. 这与使用旋转机在现实世界中创建一个物体的虚拟等价. 通过旋转技术,我们绘制物体半径的轮,然后旋转轮绕轴创建物体的网格.
Modeling
::建模
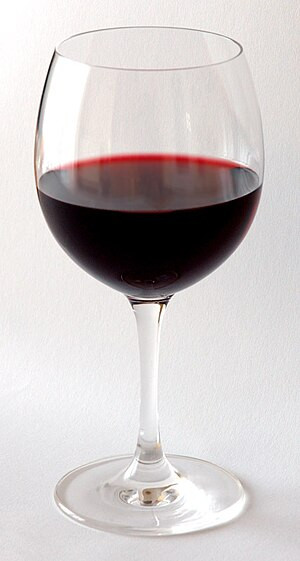
Here is a real-world goblet. The picture is not an orthographic image, so we cannot directly copy the outline, but it is close.
::这里是真实的杯子.图片不是一个拼写图像,所以我们不能直接复制轮,但它很接近.
Setup
::设置
We now model the outline. Let's start with the default model. We want to create an initial object consisting of a two-dimensional outline, so select the cube, go to edit mode, and delete all the vertices. This leaves us with an object that has no vertices as a nice place to start. We want the resulting goblet to sit at the origin with the Z axis as its axis of symmetry so we get a front view (press NUM1 ). Since we will be working directly with mesh vertices, the
manipulator
is a hindrance, so turn it off (press Ctrl + Space ). (With the manipulator on, it is easy to accidentally move a vertex out of the editing plane, but we want a 2D cross-section.) We are now ready to create the two-dimensional outline as a chain of vertices with the first and last vertices on the axis.
::现在我们将模拟轮.让我们从默认模型开始.我们想要创建一个由二维轮组成的初始对象,所以选择立方体,进入编辑模式,删除所有顶点.这让我们有一个没有顶点的对象作为一个很好的开始.我们希望得到的杯子以 Z 轴为对称轴在原点坐下,这样我们就能得到一个前景 (按 NUM1).由于我们将直接使用网状顶点工作,因此操纵器是障碍,所以关闭它 (按 Ctrl + Space). (随着操纵器打开,很容易意外地将顶点移出编辑平面,但我们想要一个 2D 截面.) 我们现在准备好将二维轮创建为一个链接的顶点,其中的第一个和最后一个顶点位于轴上.
First Vertex
::第一个顶点
Now, place the first vertex: this will be the center of the bottom of the goblet, so place it slightly above the origin on the Z axis ( Ctrl + LMB ). Why? Well, for two reasons: in the real world, the bottom of a goblet is not actually flat. Instead, the rim is lower than the center of the bottom, so the bottom is concave and the goblet sits on a flat surface without wobbling. The second reason is that we intend to use the "subsurf" technique, and this technique will make a flat surface slightly convex in our virtual world, so we will preemptively start the bottom of the base with a slightly concave surface.
::现在,把第一顶点放在:这将是杯子底部的中心,所以把它放在Z轴上的原点上方 (Ctrl+LMB).为什么?因为两个原因:在现实世界中,杯子底部实际上不是平的.相反,边缘低于底部的中心,所以底部是的,杯子坐在平面上而不会摇摆.第二个原因是我们打算使用"潜水"技术,这种技术将使平面在我们的虚拟世界中稍微凸,所以我们将先用稍微的表面开始底部.
Finish the outline
::完成大纲
Add the second vertex, which will be on the rim of the goblet's base: move the cursor to the X axis at about -3, and add a vertex (press Ctrl + LMB , or E , Enter ). Add additional vertices to your outline by moving the cursor to the desired location and adding,
[1]
for as many vertices as you need to accurately model the outline. Since you will be using subsurf later, make sure that you place two vertices near each other when you need a sharp curve in your outline. Otherwise, subsurf will convert your sharp curve into a wide smooth curve.
::添加第二个顶点,它将位于杯底边缘:将光标移到X轴大约在-3点,并添加一个顶点 (按Ctrl + LMB或E ,Enter).通过将光标移到所需位置并添加[1] ,为您准确建模轮所需的顶点添加额外的顶点.由于您将在以后使用suburf,因此当您需要在轮中获得一个利的曲线时,请确保将两个顶点放在彼此附近.否则,suburf将将您的利曲线转换为宽的平滑曲线.
Eventually, you will place the last vertex, which will become the point at the bottom of the inside of the goblet. This point should be on the Z axis. Your outline is done!
::最后,你将把最后一个顶点放在杯子的内侧, 这点应该在Z轴上. 你的轮完成了!
Spin
::旋转
Now, to spin it. first, make sure that you are still in edit mode, and that the last vertex is selected. Set the cursor to the selection ( Shift + S , then
cursor→selection
). Now, get a top view ( NUM7 ): you are now looking at your outline from the top, and it should look like a straight line along the X axis with one end at the cursor on the Z axis. (If this is not the case, select and move points to the X axis and check your work by switching back to the front view, then come back to the top view.) Now select the whole outline and then move to the button menu to perform the spin (or use the Spin option under Mesh Tools, Add, in the Toolshelf). Set the rotation to 360 and the steps to 12 (or another number of your choice)." An elaborate circle will appear. Go to the front view ( NUM1 ) to see your un-smooth goblet.
::现在,要旋转它.首先,确保你仍然处于编辑模式,最后的顶点已选定.将光标设置为选择 (Shift + S ,然后光标→选择).现在,获得顶部视图 (NUM7):你现在正在从顶部看你的轮,它应该看起来像一条直线沿着X轴,一个端在光标在Z轴上. (如果不是这样,选择并移动点到X轴并通过切换回前视图来检查你的工作,然后回到顶部视图.现在选择整个轮,然后移动到菜单按执行旋转 (或使用工具下旋转网,在工具架中添加).将旋转设置为360步,并将步骤转到12步 (或您选择的另一个数字)."一个详细的圆形将出现. 前视
Finish up
::完成
Since you are in edit mode and you have the whole mesh selected, this is a good time to remove duplicate vertices. The two vertices on the Z axis (base bottom center and bulb bottom center) were duplicated 12 times, and the entire outline was duplicated once when the circle closed at the end of the spin. Remove the duplicates (press W and select
Remove Doubles
). If you fail to do this, the subsurf operation will create a cusp at the two centers, and a crease at the duplicated outline.
::由于您处于编辑模式,并且您选择了整个网格,因此这是删除重复顶点的好时机.Z轴上的两个顶点 (底部中心和球泡底部中心) 被重复了12次,并且在旋转结束时圆圈关闭时,整个轮被重复了一次.删除重复 (按W,选择删除双重).如果您没有这样做,则下面操作将在两个中心创建一个顶点,并在重复轮上创建一个.
If you placed the two Z-axis vertices by hand, they may not be exactly on the axis, and therefore may still be duplicated, leaving a tiny "hole" at the axis. Fix this by merging each of the two sets separately:
::如果您手工放置Z轴的两个顶点,它们可能不完全在轴上,因此可能仍然重复,在轴上留下一个小的"洞".通过单独合并两个组中的每一个来解决这个问题:
-
select the vertices to merge.
::选择要合并的顶点. -
merge at center (press W ,
Merge → At Center
, Enter ).
::在中心合并 (按W,合并 → 在中心,Enter).
Now start to smooth by using the subsurf in the button window. First add a modifier and select subsurf. Set levels to 2 Then, click on
smooth
in the Tool shelf under "Tools" -> "Shading". You now have a goblet model.
::现在开始使用按窗口中的子表面进行平滑.首先添加修饰器并选择子表面.设置级别为 2 然后,在工具架"工具" -> "遮"下点击平滑.现在您有一个杯子模型.
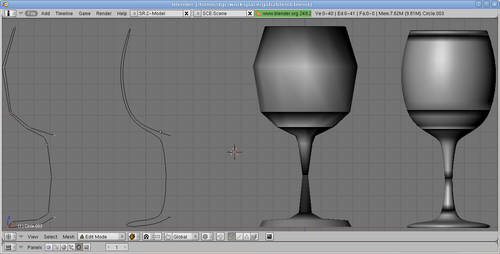
The image shows four objects: the two-dimensional outline, a smoothed version of the two-dimensional outline, the result of spinning the outline, and the result of subsurfing and smoothing. As you follow the procedure above, you will not actually have more than one object at a time as shown here.
::图像显示四个物体:二维轮,二维轮的光滑版,轮旋转的结果,以及潜水和光滑的结果.当你按照上述程序进行时,你实际上不会像图中所示的那样同时拥有多个物体.
Rendering
::渲染
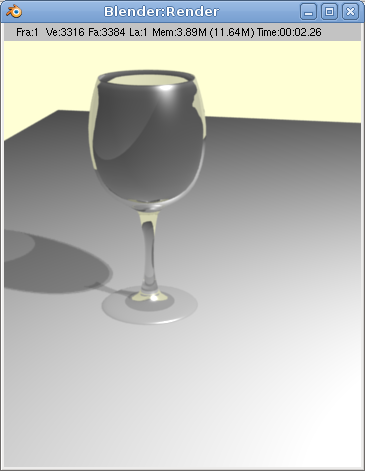
As with the other two goblets, It is difficult to fully evaluate the model unless you render it. However, a "pretty" rendering requires at least minimal materials, lighting, and scenery. This section is a cookbook approach to providing these minimal elements and is not really a useful tutorial, so we won't explain the concepts. These topics are treated at length in later tutorials. If you wish to explore these subjects in more depth, go to the appropriate tutorials.
::像其他两个杯一样,除非你染模型,否则很难完全评估模型.然而,一个"漂亮"的染至少需要最小的材料,照明和风景.本节是提供这些最小元素的书方法,并不是一个有用的教程,所以我们不会解释概念.这些主题在后面的教程中被详细讨论.如果你想更深入地探索这些主题,请访问适当的教程.
-
The Goblet material: plain glass.
::玻璃杯的材料是纯玻璃. -
The tablecloth: A (non-existent) table with a white tablecloth, in a featureless room painted yellow.
::桌布:一个 (不存在的) 桌子,上面有一张白色的桌布,在一个没有特色的房间里,被涂成黄色. -
The lighting: one bright lamp.
::照明:一个明亮的灯.
Material
::材料
-
Go to object mode and select the goblet.
::进入对象模式,选择杯子. -
In the Materials button window,
add a material
to the goblet, and name it "glass".
::在"材料"按窗口中, 加入一个材料, 并命名为"玻璃". -
In the
Material
tab, change the color in
Diffuse
section to black (set R, G, and B all to 0.000). Here, "black" merely means "do not add any color". It does not mean that the goblet looks black.
::在"材料"选项卡中,将"扩散"部分的颜色改为黑色 (将R,G和B全部设置为0.000).在这里",黑色"仅仅意味着"不要添加任何颜色".这并不意味着杯子看起来是黑色的. -
In
Transparency
section, pick Raytrace. Set Alpha to 0.1 (i.e., quite transparent), set IOR to 1.5, and set Depth to 6 (or higher on a very fast computer).
::在透明部分,选择Raytrace.设置Alpha为0.1 (即相当透明),设置IOR为1.5,并设置深度为6 (或更高的速度计算机).
Tablecloth and room
::桌布和房间
-
In the main window, put the cursor at the origin (Center) and switch to top view. In object mode, add a plane and then scale it to quite large. This is your tablecloth
::在主窗口中,把光标放在原点 (中心) 并切换到顶部视图. 在对象模式中,添加一个平面,然后缩放到相当大的. 这是你的桌布 -
Go to object mode and select the tablecloth.
::进入对象模式,选择桌布. -
In the
Material
tab, set the color to white and ensure the Alpha is 1.000 (i.e., opaque.)
::在"材料"选项卡中,将颜色设置为白色,并确保Alpha为1.000 (即不透明). -
In the
Shadow
section, check the Receive Transparent checkbox. (Older versions: in the
Shaders
tab, click on Trashado.) This allows the tablecloth to show the ray traced shadow of your goblet instead of a fake shadow.
::在"影子"部分,勾选"接收透明"选项框. (旧版本:在"影子"选项卡中,点击"垃圾") 这允许桌布显示您的杯子的光线线影子,而不是假影子. -
To paint the room, in the
World
tab check Blend Sky and change Zenith Color to e.g. yellow.
::为了涂上房间,在世界选项卡中,选择混合天空,并将Zenith Color改为例如黄色.
Lighting
::照明
If you started with the default camera and light the scene will be too dark and the shadow effect from the lamp will not be too pretty. To fix this:
::如果您使用默认摄像头开始并点亮,则场景会变得太暗,而灯的影子效果也不太漂亮. 解决这个问题:
-
Move the lamp higher and farther away.
::让灯更高,更远的地方. -
Turn up the Energy.
::增加能量. -
In the lamp's
Shadow
section, pick Ray Shadow.
::在灯的影子部分,选择雷影子.
Camera
::摄像机
Now adjust the camera:
::现在调整相机:
-
Shift to camera view.
::转到摄像头视图. -
Dolly and aim the camera.
::杜莉和目标摄像机. -
Move the camera back some.
::让摄像机稍微退一点. -
Render.
::让我们来看看.