Blender 3D:零基础到专业级-单元2:基本建模和着色
75% of the Earth's surface is covered with water. In homage to this great fact, we will develop your materials skills first by creating basic seawater.
::地球表面有75%是水覆盖的. 为了纪念这一伟大事实,
Create 3 linked planes
::创建3个连接的平面
First we create a new file in Blender and delete the default cube by pressing
XKEY
and confirming the popup dialog. Now switch to top view with
NUM7
and enter
SPACE > Add > Mesh > Plane
to create a plane. Then scale it up to 20 its original size with the
SKEY
the way you've already learned in one of the earlier tutorials. Go to the side view with
NUM3
and duplicate this plane
two more times
using
Alt-D
(not Shift-D), moving the plane down on the Z axis by two grid spaces each duplicate. This will make the transparency of the water more realistic once we set it. Using Alt-D rather than Shift-D makes a linked duplicate, so that the changes we make to one plane effect the other two.
::首先我们在Blender中创建一个新文件,并通过按下XKEY并确认弹出对话框来删除默认立方体.现在通过NUM7切换到顶部视图,然后输入SPACE>Add>Mesh>Plane创建一个平面.然后将其缩放到20个原始大小,使用SKEY,正如你已经在之前的教程中学到的.通过NUM3进入侧面视图,并使用Alt-D (而不是Shift-D) 复制这个平面两次,将平面在Z轴上向下移动两个网格空间,每个复制.这将使我们设置后水的透明度更真实.使用Alt-D而不是Shift-D将产生一个链接的复制,这样我们对一个平面的更改
Create material
::创建内容
Now off to the actual texturing work. Select any one of the planes and press
F5
to bring up the Material Buttons in the Buttons Window. You will probably find two new small windows appearing here: one called Links and Pipelines and the other one Preview.
::现在开始实际的构造工作.选择任何一个平面,按F5将按窗口中的"材料按"显示.您可能会发现两个新的小窗口出现:一个叫做"链接和管道",另一个叫做"预览".
(
Noob note:
A new section has been added for Blender 2.63 users after this section.)
:注意:此节后为Blender 2.63用户添加了一个新节.
Click the 'Add New' button in the 'Links and Pipelines' tab to create a new material named `Material.001' or so. To make life easier we'll rename it to something meaningful like 'Seawater' by simply clicking it and typing in the letters, as shown here (SHIFT+DELETE in field to clear):
::为了让生活更轻松,我们将将其更名为"海水"等有意义的东西,只需单击它并输入字母,如图所示 (SHIFT+DELETE在清除字段):
Now, on the same tab, give the seawater material a color of RGB (0.100, 0.310, 0.435). Find the tab that reads 'Mirror Transp' and click it. Click on 'Ray Mirror' and 'Ray Transp'. For the "Ray Mirror" box, move the 'RayMir' slider to 0.3, the 'Fresnel' slider to 2.5 and the Depth to 5. For the 'Ray Transp' box, move the 'IOR' slider to 1.33, the 'Fresnel' slider to 2.0 and the Depth to 5. This will give the water realistic transparency and reflection. Also click the 'Shaders' tab, change 'CookTorr' to 'Blinn', move 'Spec' to 2.000, 'Hard' to 180 and 'Refr' to 10.000. This will make the water look more glossy.
::现在,在同一个选项卡上,给海水材料一个RGB颜色 (0.100,0.310,0.435).找到标有'镜像转换'的选项卡,然后点击它.点击'光线镜'和'光线转换'.对于"光线镜"框,将'光线镜'滑块移动到0.3,'氏度'滑块移动到2.5和深度移动到5.对于'光线转换'框,将'IOR'滑块移动到1.33,'氏度'滑块移动到2.0和深度移动到5.这将使水具有现实的透明度和反射.还点击'阴影'选项卡,将'CookTorr'更改为'Blinn',将'Spec'移动到2000,'Hard'移动
Now we'll add a procedural texture to our seawater, which will give it a "wavy" look. Click the Texture button (looks like bricks) or press
F6
to view the texture buttons subcontext. Click on the knob to the left of the texture name and select the "Add New" button. This creates a new texture named "Tex.001" or so. Click on the name and change it to "Waves".
::现在我们将在海水中添加一个程序性纹理,使其看起来"波浪".点击纹理按 (看起来像块) 或按F6查看纹理按的副文本.点击纹理名称的左侧按并选择"添加新"按. 这将创建一个名为"Tex.001"的新纹理. 点击名称并将其更改为"Waves".
Go to the Texture Type pull-down (
F6
) and select 'Clouds'. On the Clouds tab change 'NoiseSize' to 0.050. Our Waves texture is ready; next, we will refine how it is applied to our Seawater material.
::进入"纹理类型"下拉窗口 (F6) 并选择"云".在"云"选项卡上,将"噪声大小"更改为0.050.我们的波纹理已经准备好了;接下来,我们将细化如何将其应用于我们的海水材料.
Noise Size increases the size of the noise, in this case, the clouds. Soft Noise blends the intensities and reduces the contrast. Makes a mellow effect, like soft waves. Hard noise creates a high contrast, and brings out individual 'shapes'.
::噪声大小增加噪声的大小,在这种情况下,云. 柔软的噪声混合强度和降低对比度. 产生柔和的效果,像柔软的波. 硬的噪声创造高对比度,并带来个别的"形状". 柔软的噪声可以使噪声变得更大,更清晰,更有趣,更有趣,更有趣,更有趣,更有趣,更有趣,更有趣,更有趣,更有趣,更有趣,更有趣,更有趣,更有趣,更有趣,更有趣,更有趣,更有趣,更有趣,更有趣,更有趣,更有趣,更有趣,更有趣,更有趣,更有趣,更有趣,更有趣,更有趣
If you want to add more detail to your water, add another texture and rename it to "LargeWaves". Make it a cloud texture like the previous one, but make it's 'NoiseSize' 0.300 and use 'Hard noise'.
::如果您想为水添加更多细节,请添加另一种纹理并将其更名为"大波". 让它像前面的那样是云纹理,但让它是"噪声大小"0.300,并使用"硬噪声".

Left click on the Materials button (looks like a red sphere) to return to the material buttons subcontext. Look at the Texture panel, and you'll see that the "Waves" texture has been automatically associated with the Seawater material.
::按左键点击"材料"按 (看起来像一个红色球体) 返回材料按子语境. 看看质地面板,你会看到"波"质地已经自动关联到海水材料.
Select the 'Map To' tab. Click the 'Nor' and 'Spec' buttons so they're selected and have white text (the white text indicates a positive mapping). Click the 'Hard' button twice so it's selected and has yellow text (the yellow text indicates a negative mapping). Click the 'Col' button so it is not selected, this button will show any color in the texture which we do not want. Find the 'Nor' Slider and move its value to about 5.00.
::选择"映射到"选项卡. 点击"Nor"和"Spec"按,使它们被选中并具有白色文本 (白色文本表示正映射). 点击"硬"按两次,使其被选中并具有黄色文本 (黄色文本表示负映射). 点击"颜色"按,使其不被选中,此按将显示我们不想要的纹理中的任何颜色. 找到"Nor"滑块并将其值移动到约5.00
If you created the "LargeWaves" texture, select the "LargeWaves" texture under 'Texture and Input', go to the 'MapTo' tab, deselect 'Col', select 'Nor' and move the 'Nor' slider to 7.00. Do not select 'Hard' or 'Spec' this time.
::如果您创建了"LargeWaves"纹理,请在"纹理和输入"下选择"LargeWaves"纹理,进入"MapTo"选项卡,取消选择"Col",选择"Nor"并将"Nor"滑块移动到7.00. 这次不要选择"Hard"或"Spec".
For lighting press
Space > Add > Lamp > Sun
. You shouldn't need to move the sun or change any of its settings. Finally move the camera to the edge of the plain and move it up towards the sky a bit.
::为了照明,按空间>添加>灯>太阳. 你不需要移动太阳或改变任何设置. 最后将摄像机移到平原边缘,并将其向天空移动.
Go to the Scene tab (
F10
), and look for the six buttons next to the big render button. Deselect all these, leaving only the 'Ray' button selected. This will tell Blender not to render some features in our scene that we really don't need. Go and press
F12
to render the water, it may take a while depending on your system.
::进入"场景"选项卡 (F10),然后在"染"大按旁边找到六个按. 取消所有这些选项,只留下"光线"按. 这将告诉混合器不要染我们真正不需要的场景中的某些功能. 按F12染水,这可能需要一段时间,取决于您的系统.
Admire your water, and maybe drink a tall glass of something refreshing!
::欣赏水, 也许喝一杯高大的清爽的东西!
Create Material / Textures (Blender 2.63)
::创建材料/ 纹理 (混合器 2.63)
Material
::材料
-
Go to the properties window (Bottom right window by default) and click on the Material tab
::进入属性窗口 (默认右下窗口) 并点击"材料"选项卡 -
Click of the + symbol to create a new material and name it Seawater
::单击+符号创建一个新材料,并命名为海水 -
Click on the diffuse color box and give it a seawater blue RGB (0.100, 0.310, 0.435)
::点击扩散色框并给它一个海水蓝色RGB (0.100,0.310,0.435) -
Enable the Mirror checkbox
::启用镜像选项框 -
In the Mirror section, set Reflectivity: 0.3, Fresnel: 2.5 and Depth: 5
::在镜子部分,设置反射率:0.3,度:2.5和深度:5 -
Enable the Transparency checkbox
::启用透明度选项框 -
In the Transparency section, click the Raytrace button
::在透明部分,点击Raytrace按 -
Also in the Transparency section, set IOR: 1.33, Fresnel: 2 and Depth: 5
::在透明部分,设置IOR: 1.33,度:2和深度:5 -
In the Specular section, use the pull-down menu to change CookTorr to Blinn, then set Intensity: 1, Hardness: 180 and IOR: 10
::在"光镜"部分,使用下拉菜单将CookTorr更改为Blinn,然后设置强度:1 ,硬度:180和IOR:10
Textures
::质地
-
Still in the Properties window, click on the Textures tab
::在属性窗口中,点击"纹理"选项卡 -
Click on the “+ New” button to create a new texture and name it Waves
::点击"+新"按创建一个新的纹理并命名为"波" -
Set the Type: Clouds using the pull-down menu
::使用拉下菜单设置"类型:云" -
In the Clouds section, set Size: 0.05 to create soft noise
::在云端部分,设置大小:0.05 创建柔软的噪音 -
In the Influence section, uncheck Color under Diffuse, then under Specular, check the "Specular" box and “Hardness” box then set the value to Hardness: -1. Under Geometry, check the “Normal” box and set the value to Normal: 5
::在影响部分,取消色彩在扩散下,然后在镜面下,勾选"镜面"框和"硬度"框,然后将值设置为硬度: -1. 在几何下,勾选"正常"框,并将值设置为正常: 5
(
Noob Note: V. 2.78
Under Mapping change coordinates to Generated.)
:Noob 注: V. 2.78 在映射下将坐标更改为生成.)
-
Select the second line in the Textures list and create a second Texture using the “+ New” button. Name it LargeWaves
::在"纹理"列表中选择第二行,并使用"+新"按创建第二个纹理. 命名为"LargeWaves" -
Set the Type to clouds again, but this time, set Size: 0.3 in the Clouds section and click on the "Hard" button for hard noise
::设置类型云再次,但这一次,设置大小: 0.3 在云部分,并点击"硬"按的硬噪声 -
Deselect “Color” and under Geometry, select the “Normal” box and set the value to Normal: 7
::在"色彩"选项下,选择"正常"框,并将值设置为正常: 7
(
Noob Note: V. 2.78
Under Mapping change coordinates to Generated.)
:Noob 注: V. 2.78 在映射下将坐标更改为生成.)
Lighting
::照明
-
In object mode, select the default lamp (if present) and delete it
::在对象模式中,选择默认灯 (如果存在) 并删除它 -
Create a new lamp by pressing ALT+A and selecting Lamp --> Sun
::通过按下ALT+A并选择Lamp -> Sun创建一个新灯 -
Place the Sun in the sky by moving it up the Z-axis. Press G, Z, 20 and hit ENTER
::通过将太阳移动到Z轴上方,将太阳放在天空中. 按G,Z,20然后按ENTER -
Go back to the Properties window and click on the World tab
::回到属性窗口,然后点击"世界"选项卡 -
Click on the box under Horizon Color and set the color to RGB (0.242, 0.617, 0.831) for sky blue
::点击地平线颜色下的框,并将颜色设置为RGB (0.242,0.617,0.831) 蓝天 -
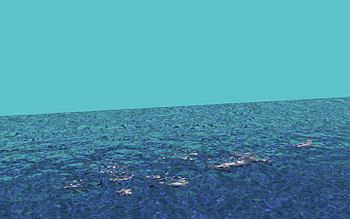
Position the camera to be looking over the water with some sky visible and render your scene.
::设置摄像头以在水面上看到天空, 呈现你的场景. -
How about using what we have learned in previous modules to add some dolphins swimming just below the surface?
::如何使用我们在前面的模块中学到的东西, 添加一些海豚在水面下游泳?