Blender 3D:零基础到专业级-单元2:基本建模和着色
Image Texture Settings
::图像纹理设置
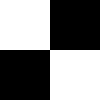
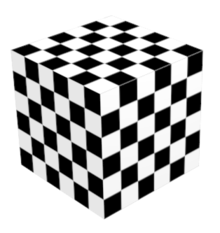
To understand how the texture settings apply to image/movie textures, start with an example texture. A nice simple one is this checkerboard at right—don’t forget to download it in (or convert it to) PNG format, as Blender cannot use an SVG file as a texture.
::要了解如何对图像/电影纹理应用纹理设置,首先使用一个纹理示例.一个很简单的例子是右边的这个棋盘 - - 不要忘记下载 (或转换为) PNG格式,因为Blender不能使用SVG文件作为纹理.

Start a new Blender document. Note the default cube already has a a default grey material, called “Material”, and this already has a single texture, called “Tex”, of type “None”, which means it has no effect.
::启动一个新的Blender文档.请注意默认的立方体已经有一个默认的灰色材料,称为"材料",并且它已经有一个单一的纹理,称为"文本",类型是"无效",这意味着它没有任何影响.
|
|
Before proceeding, go to the World
|

Under the Texture
![]() context of the Properties window, with Material Texture
context of the Properties window, with Material Texture
![]() selected, change the texture type to “Image or Movie”. You will immediately see some new panels pop up in the texture context. Look for the Image panel, as at right. This initially contains a popup menu icon for selecting from any previously-loaded images (this will start out empty), a “New” button for using one of Blender’s predefined test textures, and an “Open” button for loading an image from a file.
selected, change the texture type to “Image or Movie”. You will immediately see some new panels pop up in the texture context. Look for the Image panel, as at right. This initially contains a popup menu icon for selecting from any previously-loaded images (this will start out empty), a “New” button for using one of Blender’s predefined test textures, and an “Open” button for loading an image from a file.
::在属性窗口的 Texture 语境下,选择 Material Texture,将语境类型更改为 Image 或 Movie.您将立即看到一些新的面板在语境中弹出.请查看右边的 Image 面板.它最初包含一个弹出菜单图标,用于从任何先前加载的图像中选择 (这将开始空),一个使用 Blender 预定义的测试纹理中的一个的 New 按,以及一个从文件中加载图像的 Open 按.
Click the “Open” button, and select your previously-downloaded or converted PNG version of the example checkerboard texture.
::点击"打开"按,然后选择您之前下载或转换的PNG版本的示例棋盘纹理.

Now a whole lot more settings will become visible. From the top, the panels are:
::现在会看到更多的设置.从上方看,面板是:
-
Preview — gives you a simple display of how the texture looks.
::预览可以简单地显示图像的纹理. -
Colors — lets you make simple adjustments to the image brightness, contrast etc.
::让你对图像的亮度,对比度等进行简单的调整. -
Image — lets you choose from any already-loaded images, and shows you the pathname of the file the image was loaded from. Note the two arrows in a circle to the right of the pathname display: clicking this will tell Blender to reload the image from the file, which is useful if you make changes to it in an external image editor.
::图像允许您从已加载的图像中选择,并显示图像加载的文件的路径名称.请注意路径名称显示的右侧的圆圈中的两个箭头:点击此将告诉Blender从文件中重新加载图像,如果您在外部图像编辑器中对其进行更改,这将很有用. -
Image Sampling — controls how the image can be interpreted in a different way from straight pixel values.
::图像采样 控制图像如何从直线像素值以不同的方式解释. -
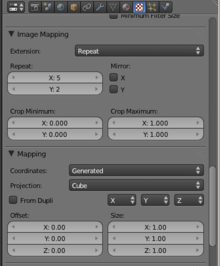
Image Mapping — lets you crop the input image, and apply fixed numbers of repetitions to it along each axis, even before it goes through the usual texture-tiling repetition process.
::图像映射 允许你剪切输入图像, 并沿着每个轴对其进行固定数量的重复, -
Mapping, Influence — these are more general panels that apply to all types of textures. They will be discussed in more detail shortly.
::图谱,影响 这些是适用于所有类型的纹理的更一般的面板.
|
|
Image packing: the icon to the left of the image pathname lets you pack a complete copy of the image into the .blend file, so it no longer keeps reading the original image file. This can be useful if you want your .blend file to be self-contained, particularly if you want to send it to others. On the other hand, if your workflow depends on coordinating with someone else doing the image editing, it may be more convenient to leave it linking to a separate image file.
|
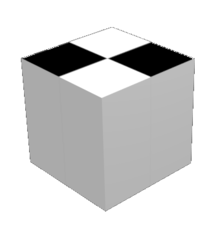
If you render F12 now, you should end up with an image like this. Notice in the Projection menu (
Texture
→
Mapping
) the initial selection is “Flat”: this means that the texture X and Y coordinates go straight to object X and Y coordinates. Thus, the texture only appears on the top (and also bottom) of the cube, not on its sides. See also the three little popup menus just below the Projection menu, each containing the items X, Y and Z. These let you rearrange the object coordinates that the texture coordinates map to. If you change the first two, you can get the texture to appear on other pairs of sides of the cube, other than the top and bottom. The third menu (corresponding to the Z axis of the texture) has no effect (yet), because a flat image texture is only two-dimensional.
::如果现在染F12,最终应该得到这样的图像.请注意在投影菜单 (Texture → Mapping) 中,初始选择是Flat:这意味着纹理X和Y坐标直接进入对象X和Y坐标.因此,纹理只出现在立方体的顶部 (以及底部),而不是它的侧面.也请参阅投影菜单下方的三个小弹出菜单,每个菜单包含X,Y和Z项.这些菜单允许您重新排列纹理坐标映射到的对象坐标.如果您更改前两个,您可以让纹理出现在立方体的其他两侧,除了顶部和底部.第三个菜单 (对应纹理的Z轴) 没有 (然而) 影响,因为一个平面纹理图像只有二维.
Now try changing the three “Size” fields in the Mapping panel: give them all a value of 3. This will uniformly shrink the texture pattern to one-third of its original size. Or alternatively, it will require three times the number of texture repetitions to span the same distance as the original.
::现在尝试在映射面板中更改三个"大小"字段:给它们所有一个值3. 这将使纹理图案均缩小到原来的大小的三分之一. 或者,它将需要三倍的纹理重复数量来覆盖与原来的相同距离.
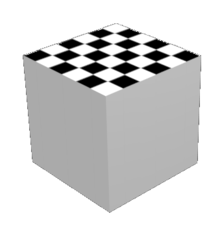
Now let’s try the other Projection types. Here’s what “Sphere” looks like. Imagine the texture pattern as a flat sheet stretched and curved around, and its edges joined to form a sphere surrounding the actual object; then the sphere is shrinkwrapped down onto the object.
::现在让我们尝试其他投影类型. 这里是"球体"的外观. 想象一下纹理图案是拉伸和曲的平面,其边缘连接在一起形成一个围绕实际物体的球体; 然后球体被收缩到物体上.
Note the top and bottom edges of the sheet shrink down to single points at the north and south poles; this is why the squares of the checkerboard pattern turn into triangles next to these points.
::需要注意的是,纸张的上下两边都缩小到北极和南极的单点;这就是为什么棋盘图案的方形在这些点旁边变成三角形的原因.
|
|
Z-axis now works: because these projection types other than “Flat” turn the texture into a 3-dimensional object, you can now use all 3 of the axis-rearrangement menus to reorient the texture in interesting, not to say confusing, ways. What happens when you assign the same texture axis to more than one object axis?
|
Here’s a Tube mapping. Here the texture pattern sheet is rolled round into a cylinder, with only one pair of edges joined together, the top and bottom left open.
::这里是管道映射. 在这里, 纹理图案板被卷成圆柱体, 只有一对边缘连接在一起, 上面和下面是开放的.
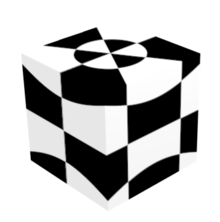
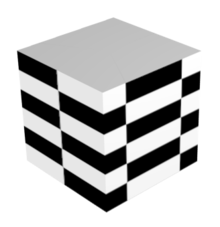
And lastly, here is a Cube mapping. Here 6 copies of the texture pattern are arranged parallel to the faces of a cube, before being shrinkwrapped onto the actual object. Which in this case, happens to be a cube.
::最后,这里是立方体映射. 在这里, 6 个纹理图案的副本被平行地排列在立方体的面部上,然后被缩小到实际的物体上. 在这种情况下,恰好是一个立方体.
Cube mappings are very commonly used in game engines, because they are just about the simplest way to wrap a texture around an entire object.
::立方体映射在游戏引擎中非常常用, 因为它们是包裹整个对象周围的纹理的最简单方法.
Making Your Own Texture
::如何制作自己的纹理
Procedural texturing is very powerful; however, sometimes it is difficult or impossible to generate the desired realism with them. Image texturing is there for you when you need it. To review, the basic idea is to take an outside image and wrap it around your model. You can use any texture, or a seamless one if you want it to repeat to get a tiled effect. The following shows how you create a seamless texture, and then how to apply any texture (seamless or otherwise) to an object.
::程序性纹理非常强大;然而,有时很难或不可能用它们来产生所需的现实主义.图像纹理在您需要时就在那里.为了回顾,基本想法是取一个外部图像并将其包裹在模型周围.如果您希望它重复以获得效果,您可以使用任何纹理或无纹理.以下展示了如何创建无纹理,然后如何将任何纹理 (无或其他) 应用到对象.
The difference between 'tiled' and 'seamless'
::""和"无"之间的区别
In many cases a simple material will just not cut it for an object, and you will want to apply a texture to it. However, depending on the object, you may want to apply either a seamless or tileable texture. A seamless texture is an image that will, when applied to an object, spread evenly across the surface of the object without any visible borders or 'seams' even if the object is many times larger than the resolution of the image (also called 'procedural textures' in Blender). These can be useful in many situations; such as when you want a texture for a carpet to seamlessly repeat itself without having a huge resolution.
::在许多情况下,简单的材料对物体来说是不合适的,你会想要对其施加纹理.然而,根据物体,你可能希望应用无或可纹理.无纹理是一个图像,当应用到一个物体时,即使物体比图像的分辨率大很多倍,也会在物体的表面均地分布,没有任何可见的边界或"" (在Blender中也称为"程序纹理").这些可以在许多情况下有用;例如,当你想要地毯的纹理无地重复自己而没有巨大的分辨率时.
A tileable texture on the other hand, is an image that will repeat itself across an object, but with noticeable seams. Any image can be used as a tileable texture, but often they will only be used in specific instances such as a vinyl floor with a tiled pattern on it.
::另一方面,可纹理是一种图像,它会在物体上重复,但具有明显的接.任何图像都可以用作可纹理,但通常它们只会在特定情况下使用,例如在地板上有纹理的乙烯基地板.
See
Using Textures
for more details on applying images as textures, and using them to affect many other surface attributes such as luminosity, reflectivity, translucency, displacement etc.
::参见使用纹理,以了解更多关于将图像应用为纹理的细节,并使用它们来影响许多其他表面属性,如光度,反射率,半透明度,位移等.
How to make a tileable texture with the GIMP
::如何使用GIMP制作可的纹理
It is easy to create a tiling texture image with
the GIMP
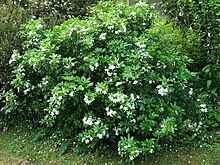
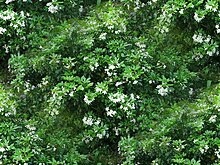
. Start with the photo you want to use. Crop out any part you don’t want. Here’s an example random photo of some plants in my garden:
::很容易用GIMP创建一个纹理图像. 首先要使用你想要的照片. 切出你不想要的任何部分. 以下是我花园中的一些植物的随机照片:
Go to Gimp’s “Filters” menu, and find the “Map” submenu. In here you will find the entry “Make Seamless”. Select it. That’s it:
::进入Gimp的过器菜单,找到地图子菜单. 在这里,你会发现"使无"的条目. 选择它. 完成了:
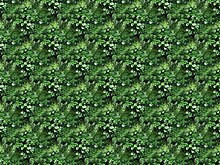
Just to prove it works, here’s a (scaled-down) use of the result as a tiled fill pattern:
::为了证明它有效, 下面是结果作为填充图案的 (缩小) 使用:
Other Image Texture Editors
::其他图像纹理编辑器
-
Wood Workshop
A free utility (Requires Operating System: Windows 2000/XP) that generates surprisingly high quality tiling wood texture images. These textures can be exported as standard image files for use within Blender.
::木工厂 一个免费的实用程序 (需要操作系统:Windows 2000/XP),可以生成出乎意料的高质量的木纹理图像.这些纹理可以作为标准图像文件出口到Blender中使用. -
MapZone
A free utility for Windows (works perfectly in
Wine
) that generates node based procedural texture maps. Mapzone can export diffuse, normal and alpha texture maps as standard image files. It can also import SVG regions created with Blender's UV mapping tools.
::MapZone 是一个免费的Windows工具 (在Wine中完美运行),可以生成基于节点的程序性纹理地图. Mapzone可以将分散,正常和alpha纹理地图作为标准图像文件导出.它还可以导入用Blender的UV映射工具创建的SVG区域.