Blender 3D:零基础到专业级-单元2:基本建模和着色
Procedural Textures
::程序纹理
Texturing objects can be broken down into two categories: procedural and image texturing. Procedural texturing makes use of mathematical formulas to generate textures. This is nice because it can be used to make relatively nice looking textures without external images which are very temperamental where you put them. Procedural Textures are all stored in the .blend file. These textures are obviously generated within Blender itself. Image texturing uses images created or captured outside of Blender, either from an image manipulation program such as the Paint.NET, GIMP or Photoshop, or captured on a camera. We have already learned about image texturing, so let's move on to procedural texturing.
::纹理对象可以分为两个类别:程序和图像纹理.程序纹理使用数学公式来生成纹理.这是很好的,因为它可以用来在没有外部图像的情况下制作相对漂亮的纹理,这些图像在放置的地方非常气.程序纹理都存储在 .blend 文件中.这些纹理显然是在 Blender 内部生成的.图像纹理使用了在 Blender 外创建或捕获的图像,无论是从像画.NET,GIMP 或 Photoshop 等图像处理程序中创建或捕获,还是从相机上捕获.我们已经了解了图像纹理,所以让我们继续讨论程序纹理.
Current Procedural Textures
::现有的程序纹理
Blender currently supports many procedural textures, including: Clouds, Marble, Stucci, Wood, Magic, Blend, Noise, Musgrave, Voronoi and DistortedNoise.
::混合器目前支持许多程序纹理,包括:云,大理石,斯图奇,木,魔术,混合,噪音,马斯格雷夫,沃罗诺伊和扭曲噪音.
A Simple Wood Texture
::一个简单的木质
Let's define a simple wood texture:
::让我们定义一个简单的木质:
-
Start a new Blender document containing the default cube.
::启动一个新的Blender文档, -
Select the cube (and nothing else).
::选择一个立方体 (别无其他). -
In the Properties window, go to the World tab
 and turn on Environment Lighting (you can leave its default energy at 1.0).
::在属性窗口中,进入"世界"选项卡,并打开环境照明 (您可以将其默认能量置于1.0). -
Go to the Materials tab
 , and rename the default "Material" to "Wood Material". Alternatively, delete the default material using the X to the right of the name field and add a new material.
::选择"材料"选项卡,将默认的"材料"更名为"木材材料". 另一个选择是使用名称字段右边的X删除默认材料并添加新材料.
Let's add some color and texture. You can see the results at any time by pressing F12 to re-render the scene.
::通过按F12重新呈现场景, 随时可以看到结果.
Start by painting the cube a base color using the Wood Material's "diffuse" color:
::首先用木材的"分散"颜色涂上立方体的基本颜色:
-
In the “Material” tab,
::在"材料"选项卡中, -
Scroll down to the “Diffuse” properties panel and choose a darker brown color e.g. #A57E3F.
::滚动到"扩散"属性面板,选择深棕色,例如#A57E3F.
See
http://en.wikipedia.org/wiki/HSL_and_HSV
for where brown fits in the color wheel.
::参见http://en.wikipedia.org/wiki/HSL_and_HSV,了解棕色在颜色轮中的位置.
Next, let's add a texture to give the material some highlights.
::接下来,让我们添加一些纹理,
-
Switch to the “Texture” properties tab
 , and again rename the default "Tex" to "Wood Texture" or create a new texture. Notice at the very top of the "Texture" tab "Cube > Wood Material > Wood Texture"
::切换到"纹理"属性标签,然后再次将默认的"Tex"更名为"木质纹理"或创建一个新的纹理. 在"纹理"标签的顶部注意"立方体>木材>木质纹理" -
Change the Type of the material to “Wood” using the pop-up menu.
::使用弹出菜单将材料类型更改为"木材".
The texture sample will show parallel alternating black and white bars that don’t look very woody at all. Never fear! The black regions will be the material's base "diffuse" color. The white regions are like "highlights" that will be painted over the base.
::质地样本将显示平行交替的黑色和白色条纹,看起来并不像木质.不要担心!黑色区域将是材料的基础"分散"颜色.白色区域就像是"亮点",将被涂在底部.
Let's make some improvements to the texture:
::让我们对纹理做一些改进:
-
While still in the “Textures” tab,
::虽然仍在"纹理"选项卡中, -
Scroll to the “Wood” properties panel that appears, change the waveform from “Sine” to “Saw”.
::滚动到出现的"木"属性面板,将波形从"正弦"改为"". -
In the next row of buttons down, change the type from the default “Bands” to “Ring Noise”.
::在下一行按下方,将类型从默认的"Bands"改为"Ring Noise". -
Increase the Noise Size to 1.0.
::增加噪声大小到1.0
Now the texture sample should show something resembling wavy tree-rings. If you hit F12 to render now, you will see these rings covering your cube, except a) the colour is wrong, and b) normal wood patterns aren't so nearly circular.
::现在,纹理样本应该显示类似波形树环的东西. 如果按F12进行染, 您会看到这些环覆盖了您的立方体,
To make the pattern more elongated:
::为了使图案更长:
-
Scroll to the “Mapping” properties panel,
::滚动到"映射"属性面板, -
Change the Size X value to 2.0 and Y to 0.4. This squishes the pattern down along the X-axis, and stretches it out along the Y-axis, giving the elliptical tree-ring shapes you commonly see on wood planks and boards.
::将X尺寸值更改为2.0和Y尺寸更改为0.4. 这将在X轴上压缩图案,并在Y轴上伸展,从而形成平板和木板上常见的圆形状的树环形状.
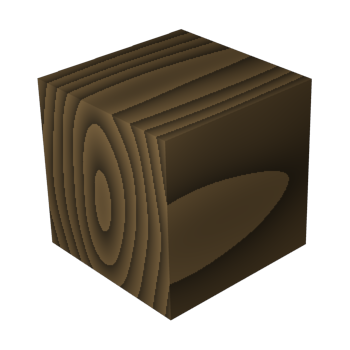
Hit F12 to render again, and the shape of the texture should be looking a lot more woody now.
::现在的纹理应该看起来更木质了.
The final step is to color the highlights in the texture:
::最后一步是对纹理中的亮点进行着色:
-
In the “Textures” tab,
::在"纹理"选项卡中, -
Scroll to the “Influence” properties panel further down,
::滚动到"影响"属性面板, -
Click on the color swatch, and choose a nice brown colour.
::选择一个漂亮的棕色.
For a nicer effect, I chose a very light brown e.g. #DEB887.
::为了更好的效果, 我选择了非常浅的棕色,
The result should look very woody indeed!
::结果应该看起来很木质的确!
-
Remember that you need to Render to see the wood grain on your object.
::记住,你需要染才能看到物体上的木质粒.
