Blender 3D:零基础到专业级-单元2:基本建模和着色
Dice
are objects which are familiar to us all, used in countless games. Here we will model how to make a single
die
(or a single dice, if you prefer).
::子是我们所有人熟悉的物体,在无数游戏中使用.在这里,我们将模拟如何制作单一的子 (或者单一的子,如果你喜欢的话).
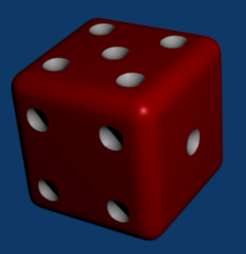
The end result should look something like at right. Notice the following features:
::结果应该看起来像右边的样子.请注意以下特征:
-
different colours for the pips versus the body of the die
::对于模块体的不同颜色 -
rounded edges and corners, while the faces are (mostly) flat
::边缘和角落是圆的,而面部 (大多) 是平的 -
round, recessed pips.
::圆形,深陷的点.
Achieving all these effects will be a good exercise of your mesh-modelling skills.
::实现所有这些效果将是你网状模型技能的良好练习.
Characteristics of the Die
::模具的特点
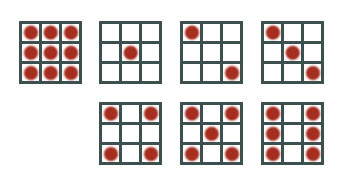
The number of pips on each face of a die ranges from 1 to 6. However, in order to space them correctly, there needs to be 9 positions for a pip on each face, even though not all of them will be filled on any face.
::子每面的点数从1到6不等,但是,为了正确地分离它们,每个面上需要有9个点的位置,即使不是所有的点都会在任何面上被填充.
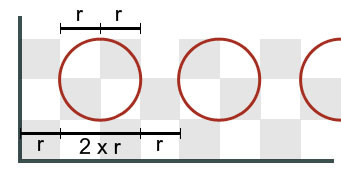
We will also proportion our die so that the diameter of each pip will be twice the horizontal or vertical distance between pips, even though if you look at the illustration the pips on the finished die look smaller because they eventually do not occupy this full diameter. As you will see, this makes it easy to get the proportions uniform with a relatively small number of
loop cuts
.
::我们还要使我们的模块的直径是平行或垂直距离的两倍,即使看图中,完成的模块上的点看起来更小,因为它们最终不会占据整个直径.正如你所看到的,这使得很容易得到比例均的循环切割数量相对较小.
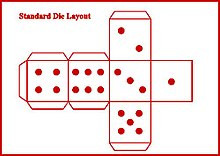
Also note one of the characteristics of real dice is that the number of pips on opposite sides adds up to 7 as depicted in the Standard Die Layout.
::另外,真正的子的一个特点是,对面的点数加起来是7个,正如标准的子布局所示.
The Basic Mesh
::基本的网格
Open a new Blender document. Select RMB the default cube, and TAB into Edit mode.
::打开一个新的Blender文档. 选择RMB作为默认立方体,然后将TAB转换为编辑模式.
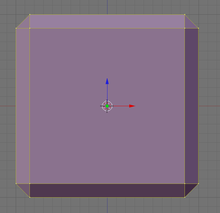
First of all, let’s apply a small amount of bevel to the corners and edges: with
all
the vertices selected, press CTRL + B to start bevelling—not too much, press LMB when you see something like at right.
::首先,让我们在角落和边缘上涂上一点点形:选取了所有的顶点,按Ctrl+B开始形,不要太多,按LMB当你看到右边的东西时.
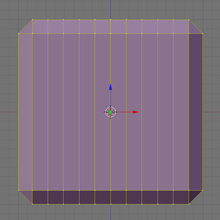
Now, we need to make a bunch of loop cuts to mark out the areas where the pips will go. To simplify things, we will do cuts through the middle of each pip, as well as between pips—a total of 9 loops each way—then go back and remove the unneeded cuts. That way we get the 2:1 proportions correct with a minimum of effort. Who says it doesn’t pay to plan ahead?
::现在,我们需要做一堆循环切割来标记点将要去的地方.为了简化事情,我们将在每个点的中间做切割,以及在点之间 - - 每条路径共9个循环 - - 然后回去删除不需要的切割.这样我们就可以以最少的努力正确地得到2:1的比例.谁说预先计划不值钱?
To make a loop cut, press CTRL + R , then move the cursor over the edge you wish to subdivide: you should see a single magenta loop appear. Now press 9KEY , and you should see this change to 9 loops. Next, click LMB to change the lines to yellow and really start cutting, then immediately press RMB to finish the cut
without
moving the cuts from their initial positions.
::为了切割循环,按Ctrl+R,然后将光标移动到您想要分区的边缘:您应该看到一个单一的红色循环出现.现在按9KEY,您应该看到这个变化为9个循环.接下来,单击LMB将线条变为黄色并真正开始切割,然后立即按RMB完成切割,而不会将切割从初始位置移动.
You will need to do this 3 times, between the 3 pairs of opposing faces.
::在3对对立面之间,
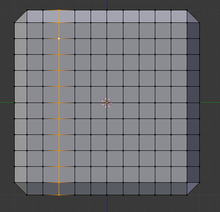
Now look at each face of your cube: you will see an 11×11 grid of vertices, with the corner vertices each adjoining a triangle at the corner. Make sure nothing is initially selected. Count the
third
vertex in from a corner, and move the mouse slightly so it is over the edge leading from this vertex into the interior of the face, just to avoid confusion; now Shift + ALT + RMB , and you should select a loop like at right.
::现在看看你的立方体的每一面:你会看到一个11×11的顶点网格,每个角点的顶点都与角的三角形相邻.确保没有最初的选项.从角点计算第三个顶点,然后轻轻地移动鼠标,使其在从这个顶点到面部内部的边缘上,只是为了避免混;现在Shift + ALT + RMB,你应该选择一个循环,如右图.
If you get the wrong selection, just A to clear it, and try again. Remember to click over an
edge
that is running the right way, rather than a vertex, otherwise Blender is liable to select a loop running the wrong way.
::如果您得到错误的选择,请单击A清除它,然后再试一次.请记住点击正确方向的边缘,而不是顶点,否则Blender可能会选择错误方向的循环.
Press DEL or X , and in the deletion menu that appears, select “Edge Loops”. The selected loop should disappear.
::在显示的删除菜单中,选择"边缘循环". 选择的循环应该消失.

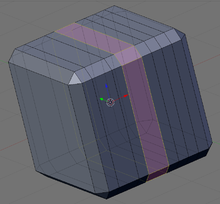
Going in from the edge of the face, skip over one loop, and remove the middle one.
::通过面部边缘进入,跳过一个循环, 取出中间的.
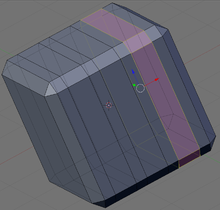

Then finally remove the third one in from the opposite edge.
::然后从相反的边缘移除第三个.

You need to do this deletion of loops on every face that has the original 11 X 11 grid of vertices. When you are finished, the resulting mesh should look like at right.
::需要在每一个有11x11顶点的面上删除循环. 当你完成时, 得到的网格应该看起来像右边.
Making the Pips
::如何获得

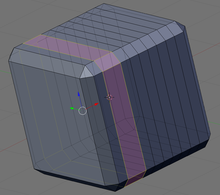
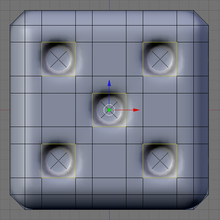
Now we will hollow out the spots or pips. The idea is to
extrude
selected ones of the large squares on each face
inwards
into the cube (“intrude” rather than “extrude”, perhaps?), then split the bottom of each resulting pit into four triangles each by adding an extra vertex in the middle; then pushing in this vertex will give us the hollow for the pip (as at right).
::现在我们将把点或点空化. 想法是将每个面上的大方格中的选定的方格挤出到立方体内 (intrude而不是extrude,也许?),然后将每个结果的坑的底部分成四个三角形,每个增加一个额外的顶点在中间;然后在这个顶点中推进将给我们带来管子的空洞 (如右图).
We will show three methods for doing this.
::我们将展示三种方法.
Do this individually for each face that is to be made into a pip.
::对于每一个要做成小孔的面, 单独做这件事.
Method 1 (Slowest)
::方法1 (最慢的)
Select all the large squares to be made into pips (perhaps do one entire face at a time). Press CTRL + T to triangulate these faces. Now switch to edge-select mode, and select the new diagonal edge that has appeared in the middle of the original squares; bring up CTRL + E for edge Specials and select Subdivide (leave the number of subdivisions at the default 1). Things won’t look any different, but each triangle is now a quad, with an extra vertex added to the middle of each of those diagonals.
::选择所有要变成点的大方块 (可能一次只做一个整面). 按Ctrl+T来三角化这些面. 现在切换到边缘选择模式,并选择原始方块中间出现的新对角边缘;为边缘特点带出Ctrl+E并选择分区 (将分区数置于默认1). 情况不会有所不同,但每个三角形现在是一个四边形,每个对角形的中间增加了一个额外的顶点.
Now switch back to face-select mode, select those subdivided halves of all the squares, and CTRL + T to triangulate again.
::现在重新切换到面部选择模式, 选择所有正方形的分成半部分,
Method 2 (Faster)
::方法2 (更快)
Switch to face-select mode. Select all the large squares to be made into pips (perhaps do one entire face at a time). Do E to extrude, and immediately press ESC to leave the new extruded vertices in the same positions as the old ones; now do ALT + M to merge and select the “Collapse” option.
::切换到面部选择模式.选择所有要变成点的大方格 (可能一次完成一个整面).执行E挤出,然后立即按ESC以使新的挤出顶点处于旧的位置;现在执行ALT+M合并并选择"崩"选项.
Method 3 (Fastest)
::方法3 (最快)
Select the relevant large squares on each side to make the required numbers for each face of a real die. From CTRL + F for face Specials, select “Poke Faces” (or more directly, do ALT + P ). Leave the settings at their defaults (in particular, leave the Poke Offset at 0).
::选择每个侧面的相关大方块,以为每面真实子制造所需的数字.从Ctrl + F为面部特种,选择"Poke Faces" (或更直接地,做ALT + P).将设置置为默认值 (特别是将Poke Offset置于0).
Digging The Holes
::挖掘洞穴
Now that you have crossed the faces of your pips, select the middle vertices one side at a time, and G rab inwards by a distance of 0.17 (make sure you do it at the appropriate axis, pres Z , X , Y ) along the appropriate axis.
::现在,当你已经跨过了你的点的面,选择中间的顶点,一个边一次,并向内拉G拉布0.17 (确保你在适当的轴上做,按Z,X,Y) 沿着适当的轴.
Noob Note:
Do this side after side, otherwise you will translate all your vertices to one side and not all inside.
::没有人知道:做这边后面,否则你将把所有的顶点转换到一边而不是所有的内部.
Rounding Things Off
::完成问题
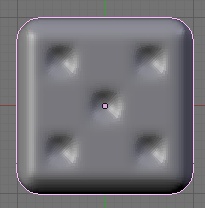
Now apply a subsurf modifier and set the shading to smooth, the result should look something like this.
::现在应用一个下面的修饰器, 并设置阴影光滑, 结果应该看起来像这样.
The trouble is, the pips look too much like dimples rather than proper holes. To fix this, we can apply a
crease
to sharpen up the edges.
::问题是,这些小孔看起来太像是而不是真正的洞.
In edge-select mode, select the four edges around the opening of each pip. Press SHIFT + E , and move the mouse until the edges take on the darkest magenta tint. That should firm up the edges of the holes a bit.
::在边缘选择模式下,选择每个孔的四个边缘.按SHIFT+E,并移动鼠标,直到边缘呈现最深的红色.这应该使孔的边缘稍微固.
Colouring Your Die
::染色你的模
First, go to the Materials Context
![]() and set up the colour for the main part of the die (say, make it red as in the illustration above). This can be done in Object or Edit modes.
and set up the colour for the main part of the die (say, make it red as in the illustration above). This can be done in Object or Edit modes.
::首先,进入"材料"背景,并设置模块主部分的颜色 (比如在上图中将其变为红色).这可以在对象或编辑模式中完成.
Next, click the “+” button to add a second, initially empty, material slot, then click the “+New” button that appears below it to create a new material for this slot. Make this material white, for the pips. Then, select the pips themselves, and use the “Assign” button to colour them with this material as detailed below.
::接下来,点击"+"按添加第二个,最初空的材料槽,然后点击"+"按,以创建这个槽的新材料. 让这个材料为白色,为点子. 然后,选择点子本身,并使用"分配"按以此材料为它们染色,如下所述.
Quickly Selecting The Pips, Method 1
::快速选择的小米,方法1
Go to the Select menu, and select the option “Select Faces by Sides”. A panel will appear at the bottom of the Tool Shelf (use T to toggle the visibility of this), with a field titled “Number of Vertices”, initially showing 4; change this to 3, and it should select all the triangles, which includes the pips as well as the corners of the cube. You can deselect the latter one by one by SHIFT + RMB ing them.
::进入选择菜单,选择选项"选择面部按边".在工具架的底部会出现一个面板 (使用T来切换此的可见性),标题为"顶点数"的字段,最初显示 4;将此更改为 3,它应该选择所有三角形,包括圆柱以及立方体的角.您可以通过SHIFT + RMB将它们单独取消选择.
Quickly Selecting The Pips, Method 2
::快速选择的小米,方法2
Alternatively, you can do just select the faces of each pip.
::选择每个点的面.
Quickly Selecting The Pips, Method 3 (Fastest)
::快速选择点数,方法3 (最快)
(Works in blender 2.6, not sure about earlier versions.) In face select mode select one of the triangular faces of one of the pips. Hit space and type "select similar" then choose "area." If this selects too many faces along the edge of the die, cancel and try again with "perimeter."
::在面部选择模式中选择一个点的三角面.点击空格并键入"选择相似",然后选择"区域".如果这在模块边缘选择了太多面,取消并用"周边"再次尝试.