Blender 3D:零基础到专业级-单元2:基本建模和着色
In this module, you'll create a hat for your simple person. Along the way, you'll learn how to use the Spin tool and use layers.
::在这个模块中,你将为你简单的人创造一个帽子. 在这过程中,你将学习如何使用旋转工具和使用层.
Creating a Generatrix
::创造一个Generatrix
For future convenience, you'll create the hat as a new object in the scene containing the simple person. If you haven't created the simple person, either go back and do it now or else download the pre-made model from Yosun Chang's website at
http://www.nusoy.com/blender
.
::为了方便未来,你将在简单人物的场景中创建帽子作为一个新对象.如果你还没有创建简单人物,要么现在就回去做,要么从Yosun Chang的网站下载预制模型.
Start by changing layers to layer two, then add the basis for your hat:
::首先要换一层,然后再加上帽子的基础:

-
Make sure you're in Object Mode (so that a new object will be created).
::确保您处于对象模式 (这样一个新的对象将被创建). -
Click LMB on the second little square, this will make the viewport display layer two. (The top row is for layers 1 to 10, the bottom for 11 to 20, so layer 2 is immediately to the right of layer 1; layer 6 is across the space from layer 5.)
::点击第二个小方形上的 LMB,这将使视窗显示层二. (顶层是1到10层,底层是11到20层,所以2层位于1层的右边;6层位于5层的空间). -
Go to orthographic front view by pressing Num5 , then Num1 .
::按下Num5 ,然后按Num1进入正写前景. -
Create a mesh circle at the cursor, by activating the 3D View window, pressing shift + A and choosing
Mesh → Circle
.
::在光标上创建一个网格圆, 通过激活3D视图窗口, 按转移+A, 选择网格 → 圆.
|
|
The new circle will probably look more like a line segment than a circle. If so, it's because you're viewing the circle edge-on.
|
The new mesh object doesn't actually have to be a circle. You could use any sort of mesh object here because you're about to reshape it into a custom 2D mesh (called a generatrix) that describes the profile of your hat. More precisely, the generatrix describes one side of a vertical cross-section through the hat. You'll want your generatrix to have a slope; it should be higher on one side (which will become the top of the crown) than on the other (which will become the brim).
::新的网格对象不一定是圆形.你可以在这里使用任何网格对象,因为你将要将其重塑成一个定制的二维网格 (称为生成器),描述你的帽子的配置.更准确地说,生成器描述了通过帽子的垂直截面的一侧.你希望生成器具有斜率;它应该在一侧 (将成为冠状的顶部) 比另一侧 (将成为边缘) 高.
-
The newly-created mesh should be selected. If it isn't, select it by clicking RMB on it.
::新创建的网格应该是已选定的. 如果没有,请点击人民币. -
Press Tab to edit the mesh.
::按下Tab来编辑网格. -
Activate Vertex select mode.
::启动顶部选择模式. -
Press A until all vertices are selected.
::按A直到所有的顶点被选中. -
Press X to erase all vertices.
::按下X以删除所有顶点.
|
|
Some users are confused as to the purpose of creating the mesh only to delete it afterwards. The point of this process is to create a new "blank" object which you can then shape into a hat.
|
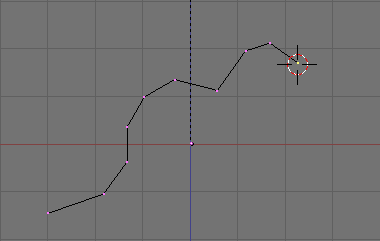
Now draw your generatrix, starting with the brim and sloping upwards toward the top of the crown:
::现在画出你的发电机,从边缘开始,向上倾斜,朝着冠状顶部:
-
Make sure you're still in orthographic front view.
::确保你仍然在正写前景. -
Press Ctrl + LMB to create the first vertex.
::按Ctrl+LMB创建第一个顶点. -
Press Ctrl + LMB to one side of that vertex to extrude another vertex, connected to the first by an edge.
::按Ctrl+LMB到该顶点的一边, 挤出另一顶点, 通过边缘连接到第一个.
(If this doesn't work, make sure you are in vertex select mode.)
::确保您已在顶点选择模式中.
Keep adding vertices until you're satisfied with the shape of your generatrix. You can always undo using Ctrl + Z or go back and adjust the positions of particular vertices using the grab tool.
::继续增加顶点,直到你对生成器的形状感到满意.你可以使用Ctrl+Z来撤消,或者回去使用抓取工具来调整特定顶点的位置.
The mesh is then spun around an axis perpendicular to the viewplane. You want to spin around a vertical axis, so press Num7 to switch to top view.
::网格将旋转在垂直视角的轴上. 想要旋转在垂直轴上,请按Num7转换到顶部视图.
Spinning the Hat
::编织帽子
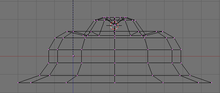
Now, let's actually spin the hat:
::现在,让我们把帽子转换一下:
-
Move the 3D cursor to the vertex you want to spin around by pressing LMB on it. You can also use the snapping tool for positioning the cursor more precisely by pressing Shift+S after selecting that specific vertex.
Cursor to selected
positions the cursor.
::通过按 LMB 将 3D 标针移动到您要旋转的顶点. 您也可以使用快速工具将标针更精确地定位,在选择特定的顶点后按 Shift+S. 标针将选定的位置定位标针. -
Press A to select all the vertices. The Spin control only spins vertices that are selected.
::按A选择所有顶点. 旋转控制只旋转已选中的顶点. -
Press Alt+R to activate the Spin tool.
-
The Spin tool is also available in the Tool Shelf under
Add
If you spin the hat in front view, your hat will be flat. You have to spin the hat in top view.
::旋转工具也可以在工具架上添加. 如果您在前视图中旋转帽子,您的帽子将是平的. 您必须在顶视图中旋转帽子.
::按 Alt+R 激活旋转工具.旋转工具也可在工具架中在添加下面的位置旋转帽子,您的帽子将是平的.您必须在顶部视图旋转帽子. -
The Spin tool is also available in the Tool Shelf under
Add
You should now see 90° of a generatrix! To spin your hat all the way round, press F6 or look in the Operator Panel just below the Tool Shelf. There should be an input slider named
Angle
, change this value from 90 to 360. There should also be a slider called
Steps
, increase the value from 9 to 15.
::现在你应该看到一个90度的发电机! 为了把帽子转成一圈,按F6或在工具架下方的操作板中查看. 应该有一个输入滑块叫做角度,将这个值从90变为360. 还应该有一个滑块叫做步骤,将值从9增加到15.
If your hat has a large hole in the center, you must have accidentally moved the 3D cursor away from the vertex you picked in step 1. Try again.
::如果帽子中间有大洞, 你一定不小心把3D光标移开了第一步中选择的顶点. 再试一次.
Remember that if you spin an object 360° there will be a double row of vertices at the row of vertices you spun. To fix this, press A to select all vertices, press W and select
Remove Doubles
. Note that this will only work in vertex select mode.
::记住,如果旋转一个物体360°,那么旋转的顶点行将会有一个双排的顶点. 要修复这个问题,按A选择所有顶点,按W并选择删除双重点. 请注意,这只能在顶点选择模式中工作.
You may also want to merge the vertices at the top of the hat. Do this by selecting all the vertices at the top with C and pressing Alt + M →
At Center
. You may have to do this twice as some vertices might be beneath each other.
::您也可以将帽子顶部的顶点合并.通过使用C选择顶部的所有顶点并按下Alt + M → At Center.您可能需要两次这样做,因为一些顶点可能彼此下面.
Smoothing Your Hat
::平滑你的帽子
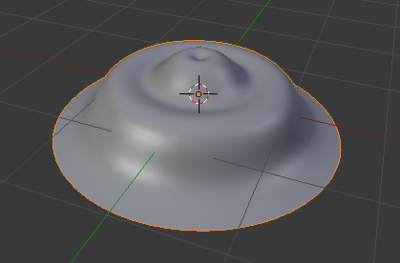
You'll probably have noticed that normal hats aren't usually as faceted as yours! To change this, first press Tab to go back to Object mode then change the shading to
Smooth
(available on the Tool Shelf). If there are unexpected black marks, try recalculating the normals.
::您可能已经注意到,普通帽子通常不像您的帽子那样有面. 要改变这一点,首先按Tab返回对象模式,然后将阴影更改为Smooth (可在工具架上找到). 如果有意想不到的黑色标记,请尝试重新计算正常.
-
Switch to Edit mode and open the Mesh menu in the 3D View Header.
::切换到编辑模式, 打开3D视图标题中的网格菜单. -
Normals → Recalculate Outside
.
::常态 → 计算出外.
Next, add a Subsurf modifier to the hat and set the subdivisions to two, as you did in
the "Detailing Your Simple Person 1" module
.
::接下来,将Subsurf修改器添加到帽子中,并将分区设置为两个, 就像你在"详细说明你的简单人 1"模块中所做的那样.
-
Click on the modifiers tab (wrench icon) in a Properties window.
::在属性窗口中点击修改器选项卡 (钥匙图标). -
Add Modifier → Subdivision Surface
.
::添加修改器 → 分区面.
Save your work. You'll need this scene for the next module.
::节省你的工作.你需要这个场景为下一个模块.