Blender 3D:零基础到专业级-单元2:基本建模和着色
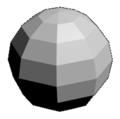
Open a new Blender document. Delete the default cube, and add a “UV Sphere” mesh. In the “Add UV Sphere” panel which appears at the lower left of the Toolshelf (press T to make the Toolshelf visible if it’s not), set both the Segments and Rings to a low number, e.g. 8. The result will be very angular, as shown to the right, not round like you would expect a sphere to be.
::打开一个新的Blender文档.删除默认的立方体,并添加一个"UV Sphere"网格.在"Add UV Sphere"面板中,该面板出现在工具架的左下方 (按T使工具架可见,如果它不是),将分段和环设置为低数,例如8.结果将是非常角的,如右图所示,而不是圆形,就像你期望球一样.
Press F12 to do a quick render. The 3D view will be replaced with the UV/Image Editor
![]() view, showing the rendered image, as at right. Press Esc to return to the 3D view
view, showing the rendered image, as at right. Press Esc to return to the 3D view
![]() .
.
::按F12进行快速染. 3D视图将被UV/图像编辑器视图所取代,显示染图像,如右图. 按Esc返回3D视图.
Select the sphere object ( RMB ). Now look in the Toolshelf for the shading buttons:
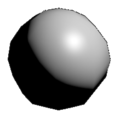
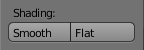 , and click on “Smooth”. Now try a new render with F12 .
::选择球体对象 (RMB). 现在在工具架中查找遮光按: ,然后点击"平滑". 现在使用F12尝试新的染.
As you can see, the
surfaces
of the object look a lot smoother and curved, even though the
outline
or
silhouette
is just as angular as before.
::表面看起来更光滑, 曲线更高,
Return to the 3D view with Esc . Ensure the UV sphere object is selected, and you are in Edit mode. Bring up the Properties shelf at the right side of the 3D view with N if it’s not already visible. Look for the Mesh Display panel, and find the settings for Normals.
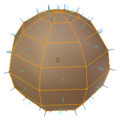
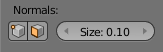 . If you check both icon boxes, the display of the UV sphere should change to look something like the image to the right.
::使用 Esc 回到 3D 视图. 确保选择了 UV 球体,并且您处于编辑模式. 如果尚未显示,请在 3D 视图右侧带来属性架,并使用 N. 查找网格显示面板,并找到正常的设置. 如果您勾选两个图标框,则 UV 球体的显示应该会改变,看起来像右边的图像.
Those spiky little lines are the normals; the green ones in the middle of each face are face normals, the blue ones protruding from each vertex are vertex normals.
::那些尖的小线是正常的; 面部中间的绿色线是面部正常的,
In the physical theory of light, the
normal
is a line perpendicular to the surface of the object the light is hitting. When your eye (or the camera)
C
is positioned on a plane through the normal of a particular surface observing a certain surface point
P
illuminated by a coplanar light source
L
, a specific amount of light will be reflected and hence be registered by the camera depending on the physical characteristics of the surface. The observed intensity of reflected light is at a maximum if the angle
C-P-L
is divided into two equal halves by the normal.
::在光的物理理论中,正常线是垂直于光所击中物体的表面的直线.当你的眼睛 (或相机) C 位于某个特定表面的平面上,通过正常观察某个被共平面光源L照亮的表面点 P,将会反射特定量的光,因此由相机根据表面的物理特征进行记录.如果C-P-L被正常分成两半,则反射光的观察强度处于最大角度.
In the real world, a lot of surfaces are curved or otherwise not flat. But a mesh can only be made up of straight edges and flat faces. So how can it represent an object with a curved surface?
::在现实世界中,很多表面是曲的或不平的.但是网格只能由直边和平面组成.那么它如何能够代表一个有曲表面的物体?
When you added the UV sphere to your scene, you had the option of specifying how many segments and rings it was made from. The more of those present, the closer the geometry approximates a curve. However, the more there are, the longer the render will take, and the more memory the model will consume to hold information about all the extra vertices, edges and faces.
::当你在场景中添加紫外球时,你有选择指定它由多少个段和环组成.当前的部分越多,几何学就越接近曲线.然而,越多,染时间就越长,模型将消耗更多的内存来保存所有额外的顶点,边缘和面部的信息.
Which is where that “Smooth” shading button you clicked comes in. It applies a trick called
Phong shading
. Instead of doing the lighting calculation based on a normal for each face as the physical theory says you should, it starts with a normal assigned to each vertex, and interpolates the normal at each point on a face from the vertex normals at its corners, based on the distance at that point to those corners. The result fools the eye into seeing curved, rounded surfaces where there aren’t any.
::您点击的"平滑"遮阳按就在这里出现了. 它应用了一种叫做"遮阳"的技巧. 它不像物理理论所说的,根据每面的正常进行照明计算,而是从每个顶点的正常开始,并根据角落的顶点正常从面上的每个点插入正常,根据该点到这些角落的距离. 结果欺骗眼睛看到没有曲的圆面.
This completely violates the laws of physics. To start with, how can you define a “normal” which is perpendicular to a
point
? But as you can see, the results look rather good, with relatively little extra computation involved, much less than actually generating all the extra geometry.
::这完全违反了物理定律.首先,你如何定义一个"正常"的直角点?但正如你所看到的,结果看起来相当好,相对来说需要很少的额外计算,远远少于实际生成所有额外的几何.
As you learn more about computer graphics, you will come across more tricks like this. Physically accurate modelling is still very difficult to do, even with modern computers, and the results may not look all that good. But by adopting a bit of lateral thinking that goes completely against physics, we can often, ironically, come up with much more realistic-looking results.
::随着你对计算机图形学得越来越多,你会遇到更多这样的技巧. 物理精确的建模仍然很难做到,即使使用现代计算机,结果也可能看起来不那么好. 但通过采用完全违背物理学的侧面思维,我们可以,具有刺意味地说,经常得到更现实的结果.
Not So Smooth?
不太平滑?
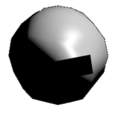
If you have been adding lots of vertices, edges and faces to your mesh, you may end up with discontinuities in smooth shading causing unsightly blotches, as shown to the right.
::网格上可能会出现不连续的光滑阴影,
Assuming your mesh is constructed properly (e.g. no edges and faces cross each other in physically impossible ways), the most likely reason for this is the normals in the newly added vertices and faces are pointing the wrong way. To fix it, select the troublesome part of the mesh (or select the whole thing) in Edit mode, and press CTRL + N to recalculate all the normals. Re-render the scene to confirm the shading discontinuity has disappeared.
::假设你的网格是正确构建的 (例如没有边缘和面相交以物理不可能的方式),最可能的原因是新添加的顶点中的正常值和面向错误的方向.为了修复它,在编辑模式中选择网格的麻烦部分 (或选择整个东西),然后按Ctrl + N重新计算所有正常值.重新呈现场景,以确认遮光不连续性消失了.
|
|
Note the different meaning of CTRL + N in Edit mode. In all other modes, it opens a new default Blender document!
|