Blender 3D:零基础到专业级-单元2:基本建模和着色
Now that we've created our simple person, it's time to give him somewhere to go. In this tutorial we'll create a mountain range using a few simple, and handy tools.
::现在我们已经创造了简单的人, 现在是时候让他去某个地方了. 在这个教程中, 我们将使用一些简单, 实用的工具来创建山脉.
Creating a simple plane
::创建一个简单的飞机

First we need a clean area to work with.
::首先我们需要一个干净的区域来工作.
-
Start off with a new project, using
File → New
, or hit Ctrl + N . If you have a default cube or plane just delete them now (select them with RMB and press X ).
::开始一个新的项目,使用文件 → 新,或按Ctrl + N. 如果您有一个默认的立方体或平面,请现在删除它们 (用人民币选择它们并按X).
Our first step is to create a large grid plane that we'll use for the ground and grow our mountains out of.
::我们的第一步是创建一个大网格平面,
-
Press NUM7 to enter top view. This way our grid plane will be lying flat when we create it.
::这样我们创建时的网格平面将是平的. -
Press Shift + C . This sets the 3D cursor to (0,0,0) which will be the center of the grid we will add (or use - Shift + S →
Cursor to Center
).
::按下Shift + C. 这将3D光标设置为 (0,0,0) ,这将是我们将要添加的网格的中心 (或使用 - Shift + S → 光标到中心). -
Now add the grid with Shift + A →
Mesh
→
Grid
. This will be our canvas.
::现在将网格加上Shift+A → Mesh → Grid. 这将是我们的画布. -
Now add more vertices to the grid. In the bottom of the toolbox window, change the number of X and Y subdivisions somewhere from 15 to 20.
::现在,在网格中添加更多的顶点. 在工具箱窗口的底部, 改变X和Y分区的数量从15到20左右. -
Change to Edit Mode using Tab
::使用Tab切换到编辑模式 -
Scale the grid plane up by about 15
::缩放格子平面大约15
- First put the mouse close to the center of the grid plane and press S and drag the cursor away and watch the numbers in the bottom left of the 3D View. Hold Ctrl while dragging to increment by 0.1 for a more precise measurement. Alternatively, to enter the exact amount yourself, press S , then simply type 15 and hit Enter .
First mountain
::第一个山
Now that we have the ground, it's time to start growing our mountains.
::现在我们有了土地, 现在是时候开始种植我们的山.
-
Make sure you have nothing selected A .
::确保没有选择A. -
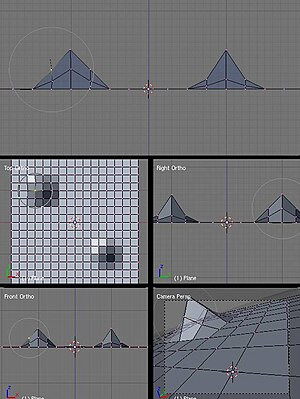
Select a random vertex with RMB . I usually start at the one that is 4 down from the top and 4 in from the left (the 4th vertex if you count the edges).
::随机选择一个与人民币的顶点.我通常从从左边向下4和向内4的顶点开始 (如果计算边缘的话 ,则是第四个顶点). -
Change to the side view with Num3 .
::通过Num3转换到侧面视图.
-
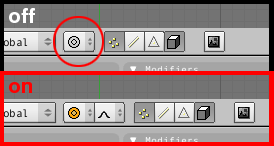
Press O to change to proportional edit mode or use the button which shows a grey ring on the header of the 3D View. The button will change its color to blue. You can also use Space →
Transform→Proportional Edit
(By default this button is located just below the 3D view).
::按 O 转换为比例编辑模式或使用显示3D 视图标题上灰色环的按.按将改变颜色为蓝色.您也可以使用空间 → 转换→比例编辑 (默认情况下,此按位于3D 视图下方). -
Once you've turned proportional edit mode on, another button appears to its right, the falloff button. Select Smooth Falloff here. Alternatively you can use the menu on the header of the 3D View (
Mesh → Proportional Falloff → Smooth
) or, using Shift + O will cycle through all of the different falloff types while using the Proportional editing tool.
::一旦您打开比例编辑模式,另一键会出现在它的右边,即倒闭按.在这里选择平滑倒闭. 另一个选择是您可以使用3D视图标题上的菜单 (网格 → 比例倒闭 → 平滑),或者使用Shift + O在使用比例编辑工具时循环通过所有不同的倒闭类型. -
Press G to grab the vertex. We should now have a circle surrounding the vertex, this is our
radius of influence
. Basically any vertices inside this circle will be affected by any changes to the vertex itself.
::按G抓住顶点. 我们现在应该有一个圆环绕顶点,这是我们的影响半径. 基本上,这个圆圈内的任何顶点都会受到顶点本身的任何变化的影响.
Noob Note:
If you're having trouble seeing or changing the radius of influence, try saving your scene and restarting Blender.
::如果您无法看到或更改影响半径, 请尝试保存您的场景并重新启动混合器.
-
Use SCROLL or PgUp and PgDown to adjust the radius of influence to include just over 2 vertices on each side of our selected vertex. (Depending on your version of Blender, you may need to use LMB + SCROLL to adjust the radius of the influence. On Mac, use Fn + PgUp and Fn + PgDown ).
::使用SCROLL或PgUp和PgDown来调整影响半径,以包括我们选择的顶点的每一边的2个顶点. (根据您的Blender版本,您可能需要使用LMB + SCROLL来调整影响半径.在Mac上,使用Fn + PgUp和Fn + PgDown).
-
Move the vertex up about 8 units on the Z-Axis. Do this by dragging the cursor up a little, and press the MMB ; this should restrain the movements along the Z-axis. Now use Ctrl to move it precisely. Alternatively you can use Z to restrain movements to the Z-Axis, type 8 and hit Enter . In older versions of Blender you may need to hit N before typing 8 .
::在Z轴上将顶点向上移动约8个单位.通过稍微拖动光标,然后按MMB;这应该限制沿Z轴的移动.现在使用Ctrl来精确地移动它.另外,您可以使用Z来限制向Z轴的移动,输入8并按Enter.在旧版本的Blender中,您可能需要在输入8之前按N.
Congratulations, we just created our first mountain. Now it's time to see what other things we can accomplish with the proportional editing tool.
::现在是时候看看我们可以用比例编辑工具实现什么.
Peaks vs. hills
::峰与山
The 2.37 and onward releases offer at least 6 types and 2 modes of proportional editing. The previous release only has 2 of these types: Smooth and Sharp Falloff. We'll take a look at the difference between these two now.
::2.37 版本及以后版本至少提供 6 种类型和 2 种比例编辑模式. 之前的版本只有 2 种类型:光滑和利的 Falloff. 我们现在来看看这两种类型之间的区别.
-
Change to top view again with Num7 . You'll notice that now your "mountain" looks like a few differently shaded squares in the grid; you're looking down on shaded tiles, but in the Z axis, they're all still perfectly aligned with the original grid.
::通过Num7再次转换到顶部视图. 你会注意到你的"山"现在看起来像网格中的几个不同阴影的方块; 你在看着阴影的, 但在Z轴上,它们仍然与原始网格完美对齐. -
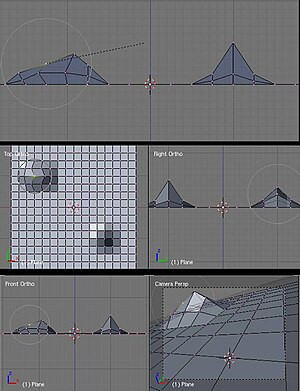
Select another vertex away from the first. Let's say 4 from the bottom 4 from the right (counting the vertices on the edges).
::选择另一个顶点远离第一个. 让我们说从右下方4个4个 (计算边缘的顶点). -
Change back to the side view with Num3
::通过Num3重新切换到侧面视图 -
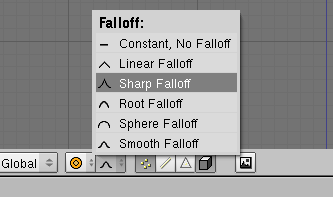
Select Sharp Falloff from the menu on the bar of the 3D View. Alternatively, using Shift + O will switch from one to the next of the 6 proportional editing modes while using the Proportional editing tool.
::在3D视图的菜单中选择"的落差". 另外,使用Shift+O将在使用比例编辑工具时从一个到下一个的6个比例编辑模式中切换. -
As before, move the vertex up 8 units on the Z-Axis (
Note: The radius of influence will still be the same size as when we last used it
).
-
G
::没有 -
Z
::没有 -
Type Num8 and hit Enter
::输入Num8并按下Enter
::像之前一样,将顶点移动到Z轴上的8个单位 (注:影响半径仍然与我们上次使用时相同). G Z 键入Num8并按Enter -
G
Now we can see the differences between the sharp and smooth falloff. The same number of vertices are affected in both cases; only the degree to which they are affected is different.
::现在我们可以看到利和平滑的落差之间的差异. 在这两种情况下,受影响的顶点数量相同; 只是受影响程度不同.
The different proportional editing modes can be selected from the box immediately to the left of the proportional editing type box. The mode box contains four options: Disabled, Enabled, Connected, and Projected (2D). "Disabled" means that proportional editing will not be used. "Connected" means that only vertices linked to the selected vertices will be affected by the radius of influence. "Enabled" means that all vertices will be affected.
::不同比例编辑模式可以从比例编辑类型框的左边方框中选择.模式框包含四个选项:禁用,启用,连接和投影 (2D). "禁用"意味着比例编辑将不被使用. "连接"意味着只有与所选的顶点连接的顶点将受到影响半径的影响. "启用"意味着所有顶点将受到影响.
Shaping the world
::塑造世界
Now that we've created a couple of Mountains, it's time to see how we can use proportional editing to shape them.
::现在我们已经创建了几个山, 现在是时候看看我们如何使用比例编辑来塑造它们了.
-
First make sure we're in side view ( Num3 ).
::首先,确保我们在侧面的视野 (Num3 ). -
Then on the smooth falloff mountain, the first one we created, select the vertex that is immediately down and left from the topmost point.
::然后在光滑的山上, 我们创建的第一个, 选择从最顶点的左下方的顶点. -
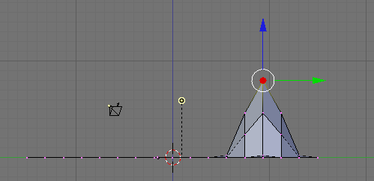
Press R to rotate, scroll the MMB to change effective radius so it includes other points. Your screen should look like the photo to the right.
::按R旋转,滚动MMB改变有效半径,使其包括其他点. 您的屏幕应该看起来像右边的照片.
You can see the size of the proportional editing circle, and that there is only one vertex on the mountainside selected.
::并且只有一个山坡的顶点被选中.
-
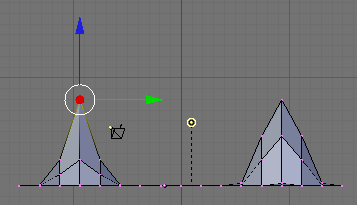
Next hold Ctrl and rotate everything by -90. Alternatively, use R , N , and type
-90
and press Enter . Your mountain should now look like this:
::接下来按住Ctrl键,将所有内容旋转到-90位. 或者使用R,N,输入-90位,然后按Enter. 您的山现在应该看起来像这样:
Noob note:
be careful about the range of affected vertices. If the range is too small, then rotating will affect just the selected vertex. If the range is too large, it will rotate everything together. You can adjust the range by using SCROLL .
:::注意受影响顶点的范围.如果范围太小,那么旋转只会影响所选顶点.如果范围太大,它会将所有东西一起旋转.你可以通过SCROLL调整范围.
Notice that the vertex itself did not move; since it is at the center of the circle it had no effect. The adjoining vertices within the edit circle were rotated around it in decreasing amounts the further from the center they are. Try doing it again with a larger proportional editing circle. Feel free to play around with scaling or rotating from different view points (don't forget that you can also use G to move vertices vertically or horizontally).
::注意顶点本身没有移动;因为它位于圆的中心,因此没有任何影响.编辑圆内的相邻顶点在离中心越远的范围内逐渐旋转.尝试用更大的比例编辑圆重新做.随时随地从不同的视角进行缩放或旋转 (不要忘记,您也可以使用G来垂直或水平移动顶点).
Try viewing your world from top view while rotating with a large effective radius. You will see the nearby vertices move close to the full amount while vertices further away move less.
::试着从顶部观看你的世界,同时用一个大有效半径旋转.你会看到附近的顶点移动接近全额,而远处的顶点移动较少.
Smoothing things out
::让事情变得平坦
Now that we have a couple of budding mountains, you probably think they look kind of choppy. Sure they would be good if we were making an 8-bit console game, but we're working with 3D here, we want things to look sharper (or maybe smoother) than that. There are a couple of approaches to this. The first is to use more vertices when we create our plane. And I won't lie, it works. But it's also a HUGE resource hog. It would take your home computer hours of work just to keep things updated, let alone run it. So instead, we fake it. The easiest way to do this is to turn on
SubSurfaces
(we saw this in
Detailing Your Simple Person 1
.) For our purposes, let's set the subdivision (
Levels
) to 2. Also, ensure our SubSurf algorithm is set to
Catmull-Clark
(this is the default setting).
::现在我们有几个芽的山,你可能认为它们看起来有点.当然,如果我们在制作一个8位游戏机游戏,它们会很好,但我们在这里使用3D,我们希望事情看起来更清晰 (或可能更顺). 这有几个方法. 第一个是使用更多的顶点,当我们创建我们的飞机. 我不会说谎,它工作. 但它也是一个巨大的资源猪. 它会花费你家的电脑工作的时间只是保持事情更新,更不用说运行它. 所以相反,我们假装它. 最简单的方法是打开子表面 (我们在详细说明你的简单人 1.) 为我们的目的,让我们设置分区 (层次) 2. 此外,我们的子冲浪算法设置为Catmull-Clark (这是默认设置).
Now, you'll notice that with SubSurf on, we lose a lot of hard edges that we had, essentially we have no sharp corners any more. I don't know about you, but to me that doesn't make for a very interesting mountain range. So to restore our corners, we are going to use
Weighted Creases for Subsurfs
.
::现在,你会注意到,随着SubSurf的启动,我们失去了很多硬边,我们基本上没有任何尖的角落. 我不知道你,但对我来说这并不是一个非常有趣的山脉. 所以,为了恢复我们的角落,我们将使用加权曲面为Subsurfs.
-
First turn off proportional editing with O , and ensure we're in side view with Num3
::首先关闭比例编辑与O,并确保我们在侧面视图与Num3 -
Next, while still in edit mode, change to
Edge Select
mode with Ctrl + Tab and select
Edges
. Alternatively press
Edge Select Mode
button at the bottom of the object window.
::接下来,在编辑模式下,使用Ctrl+Tab转换为边缘选择模式,然后选择边缘. 另可以按在对象窗口底部的边缘选择模式按. -
In the Tool Shelf at left, select the Options tab, then under Edge Select Mode, choose Tag Crease.
::在左边的工具架中,选择选项选项卡,然后在边缘选择模式下,选择标签. -
On our Sharp Falloff mountain, the second one we did, select the two edges on the right.
(see image below)
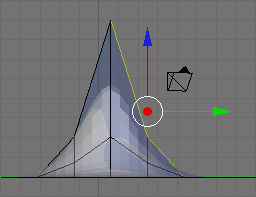
::在我们的第二个山上,选择右边的两边. (见下图) -
Press Shift + E or Space →
Edit → Edges → Crease SubSurf
, then move the mouse away from the edge until the edge
Crease
reads 1.000 in the 3D viewport header. If moving the cursor there seems to be impossible, just hit 1 and enter.
::按下Shift + E或空格 → 编辑 → 边缘 → 纹 SubSurf,然后将鼠标移开边缘,直到边缘纹在3D视图口头读取1.000.如果移动光标似乎是不可能的,只需点击1并输入.
As you move the cursor away from the edge you will notice two things. The first is that the edge becomes thicker as we move from it; this is showing how much of a crease we have (with
Draw Creases
turned on). The second is that you will notice the subsurfed mesh moving closer to the edge as the sharpness increases.
::当你把光标移开边缘时,你会注意到两件事. 一是边缘变得越来越厚,这表明我们有多少 (Draw Creases开启). 第二是你会注意到随着度的增加,地下网格越来越接近边缘.
Naturalness
::自然性
Press Ctrl + Tab to enter Edit Mode and select vertices. Then go into front view Num1 . Select the second vertex from the top in the centre of our Sharp Falloff mountain, then go into side view Num3 . Hold G and drag the vertex inwards, not too far or your mountain will come out of itself on the other side. Just bring it in enough to make a small indent.
::按Ctrl + Tab进入编辑模式并选择顶点.然后进入前视图Num1.从尖落山的中心选择顶点的第二个顶点,然后进入侧视图Num3.按G并将顶点拖向内,不要太远,否则你的山将从另一边自行出来.只要将其带入足以做一个小的缩进.
Then grab the top vertex and pull it down a small amount. You will notice that there is a small "crunch" in your mountain.
::接着抓住顶端,稍微拉下来. 你会注意到山上有一个小"".
Don't forget to select all with A , then W
Shade Smooth
button to smooth everything out.
::别忘了用A选择所有,然后用W调整光滑按来调整所有.
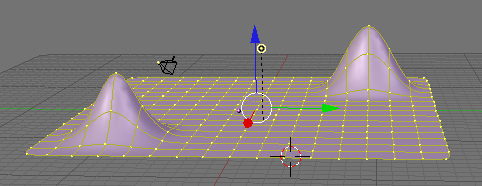
OK, so your mountains are starting to shape up. But they still look a bit too neat. You could spend time moving each individual vertex but the chances are your model will still lack the natural feel. What we need is some chaos. Thankfully this is quite easy to accomplish. Firstly select the vertices that make up your mountains, all of them and a few around the base (box and circle select will make this easier). Select a few vertices between the mountains too. Next we use something called fractals. Fractals are chaotically (i.e. randomly) generated variables. In short you can use these variables to give your mountains a "wobbly" look.
::现在,山峰开始形成. 但是它们看起来仍然有点过于整齐. 你可以花时间移动每个顶点, 但很有可能你的模型仍然缺乏自然的感觉. 我们需要的是一些混乱. 幸运的是, 这很容易实现. 首先选择构成山峰的顶点, 所有的和一些在底部周围 (框和圆圈选择将使这更容易). 选择山峰之间的几个顶点. 接下来我们使用称为分数的东西. 分数是混乱 (即随机) 生成的变量. 简而言之,你可以使用这些变量给你的山峰一个"波动"的外观.
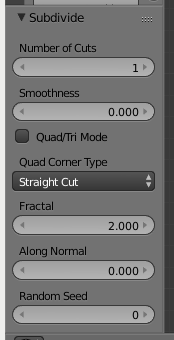
In the Tools tab of the Tool Shelf, press Subdivide (under Mesh Tools), then look at the Subdivide submenu below. The value in the Fractal box is the strength of the fractal. 1 is very low and will barely change your model. 10 is very high and will twist your models into very odd shapes indeed. Have a play with different values until you find one that you like. Around about 4.0 should do it. Hit OK and presto, your mountains have been transformed from clinical neatness, to lumpy chaos.
::在工具架的工具选项卡中,按下分区 (在网格工具下),然后看下面的分区子菜单. 分形框中的值是分形的强度. 1非常低,几乎不会改变你的模型. 10非常高,会把你的模型扭转成非常奇怪的形状. 玩不同的值,直到找到你喜欢的. 大约4.0应该可以. 点击OK,快点,你的山已经从临床整洁性转变为块混乱.
-
If you make too many fractals, your computer will slow down. However, the more you add, the more bumpy and realistic it looks!
::虽然你会发现, 计算机的运行速度会慢,
Repeatedly using the fractal tool seems to rapidly multiply the amount of vertices on your canvas. I suggest using the tool once, and if the result isn't satisfying, undo the result ( Ctrl + Z ) and try it again with a different fractal strength. Helpfully, even after undo, your selected vertices remain selected.
::经常使用分数工具似乎会快速增加画布上的顶点数量.我建议使用该工具一次,如果结果不令人满意,请撤销结果 (Ctrl + Z) 并使用不同的分数强度再次尝试.有帮助的是,即使撤销,您选择的顶点仍然被选择.
Now go back into Object mode and view the result.
::现在回到对象模式, 查看结果.