Blender 3D:零基础到专业级-单元2:基本建模和着色
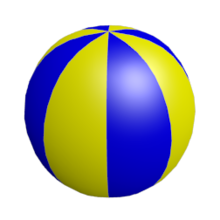
In this module, you'll create a beach ball with two alternating colours. Along the way, you'll learn how to apply multiple materials to a single object.
::在这个模块中,你将创建一个带有两种交替颜色的沙球. 在此过程中,你将学习如何将多种材料应用于单个物体.
Many real-life objects have parts which are different colours, or are even made of different materials. One way to model such objects is to make each part a separate Blender object. However, Blender also allows you to assign different materials to parts of a single object.
::许多现实物体都有不同颜色的部分,甚至由不同的材料制成.模拟这些物体的一种方法是将每个部分构成单独的混合物.然而,混合物还允许您将不同材料分配给单个物体的部分.
Set the Scene
::设置场景
Begin by opening Blender and removing the default cube.
::首先打开混合器并取出默认的立方体.
Now create a mesh for the beach ball:
::现在为沙球创建一个网格:
-
With the 3D View window active, press Shift + A ) and choose
Add → Mesh → UV Sphere
.
::在3D视图窗口激活时,按下Shift+A) 并选择Add → Mesh → UV Sphere. -
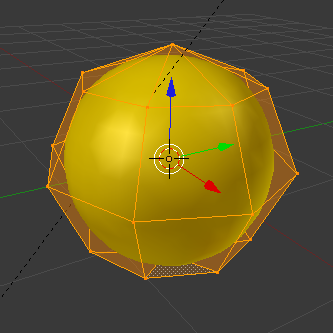
Expand the "Add UV Sphere" panel in the bottom left of the screen, then specify 8 segments and 4 rings.
- The initial result will be crude, but meshes with fewer vertices are easier to edit.
::扩展屏幕左下方的"添加紫外线球"面板,然后指定8个段和4个环.初始结果将是粗的,但具有较少顶点的网格更容易编辑.
Make the mesh rounder and more organic using automatic subdivision:
::通过自动分类,使网格更圆,更有机:
-
In the "Properties" editor, select the "Modifiers" context (wrench icon).
::在"属性"编辑器中,选择"修改器"上下文 (钥匙图标). -
Select "Add Modifier" and click
Generate → Subdivision Surface
.
::选择"添加修改器"并点击生成 → 分区面. -
For the number of subdivisions, set both the 'View' and 'Render' count to
2
.
::对于分区的数量,将"查看"和"染"数量设置为2.
Get rid of that blocky look:
::摆脱那个的表情:
-
Ensure you're in
Object Mode
.
::确保您处于对象模式. -
Click the object button at the top of the viewport.
::按一下视窗顶部的对象按. -
Select "Shade Smooth" from the list of options.
::在选项列表中选择"光滑的阴影".
The ball is now round, but a bit prolate. To make it more spherical, scale it by about 1.1 along the X and Y axes. To select the X-Y plane, you select ′
not
Z
′, by using the key combination Shift + Z . The complete sequence is, then, S , Shift + Z , 1.1 .
::球现在是圆的,但有点长.为了使它更为球形,沿X和Y轴大约缩小1.1个.为了选择X-Y平面,您使用键组合Shift + Z选择"不是Z".完整的序列是S ,Shift + Z ,1.1 .
Colorize Time
::时间的彩色
Now you're ready to begin adding colors to the object:
::现在你准备好开始为对象添加颜色了:
-
Press Tab to put Blender into Edit mode.
::按一下Tab, 将混合器置于编辑模式. -
In the Properties editor, select the "Material" button
 .
.
::在属性编辑器中,选择"材料"按. -
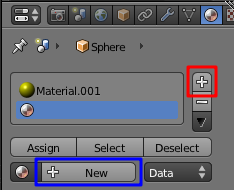
Press "+ New".
- A new material appears in the material slot list, and several additional panels appear below to edit the created material.
::按"+新".新材料出现在材料插槽列表中,下面还会出现几个额外的面板来编辑创建的材料. -
In the "Surface" panel, click on the default white base color and change it to a nice yellow.
- At this point, the entire ball is yellow.
::在"表面"面板中,点击默认的白色底色,并将其更改为漂亮的黄色. 此时,整个球是黄色的.
In the "Materials" panel click the "+" button (indicated by the red box in the picture, below) next to the material slot list to create a new blank slot. The "+ New" button will reappear (indicated by the blue box, in the picture below).
::在"材料"面板中,单击材料空格列表旁的"+"按 (在下图中用红色框表示) 创建一个新的空格. "+新"按将再次出现 (在下图中用蓝色框表示).
Click the "+ New" button and a new material will be created and assigned the empty slot in the materials slot list. Ensure that the new material is selected, then change the base color to blue. Nothing will happen to the beach ball, yet.
::点击"+新"按,将创建一个新的材料,并将其分配到材料插槽列表中的空位.确保选择新材料,然后将基色更改为蓝色.沙球暂时不会发生任何事情.
Now make a single blue stripe on the ball:
::现在在球上做一个蓝色的条纹:
-
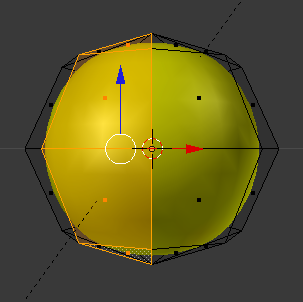
All the vertices should still be selected from before; make sure the 3D view is active, then hit Alt + A to deselect them.
::确保3D视图已启动,然后按 Alt+A 取消选择. -
Switch to front view with NUM1 , and to "Face Select" mode by selecting the face select button. Which is to the left of the "view" button in the top left of the viewport.
::通过选择面部选择按,切换到NUM1的前视图,然后切换到"面部选择"模式.该按位于视图窗口左上方的"视图"按的左侧. -
Select a column of four faces that will make up one stripe of the beach ball (using SHIFT + LMB , or SHIFT + RMB depending on your selection key, on each face):
::选择一个四面列, 组成沙球的条纹 (使用SHIFT + LMB, 或SHIFT + RMB, 根据您的选择键, 在每个面): -
-
In the "Material" property window, select the blue material slot in the list, then click the "
Assign
" button.
::在"材料"属性窗口中, 选择列表中的蓝色材料插槽, 然后点击"分配"按.
Rotate the view (e.g. NUM6 ) so you can skip past a yellow stripe adjacent to the blue stripe, and select the second column that will become a blue stripe. Work your way around the ball to do this three more times. (Remember we made the sphere with 8 segments; four of these are yellow, and four are blue).
::旋转视图 (例如NUM6),这样您就可以跳过与蓝色条纹相邻的黄色条纹,并选择第二个列,它将成为蓝色条纹.绕球工作,再做三次. (记住我们用8个段制造了球体;其中四个是黄色的,四个是蓝色的).
Now you see the benefit of making a sphere with only 4 rings: more rings would have meant more faces in each stripe, and more clicking to select them.
::现在你看到了用4个环制造球的好处:更多的环意味着每条条带上更多的面孔,
For help with rendering your beach ball, see our
Noob to Pro/Render Settings
and
Noob to Pro/Quickie Render
::对于帮助染您的沙球,请参阅我们的无人到专业/染设置和无人到专业/快速染