Blender 3D:零基础到专业级-单元2:基本建模和着色
In this module, you will create a volcano using the proportional edit fall-off tool. You should be comfortable with deleting and adding meshes.
::在这个模块中,你将使用比例编辑掉落工具创建火山.你应该很容易删除和添加网格.
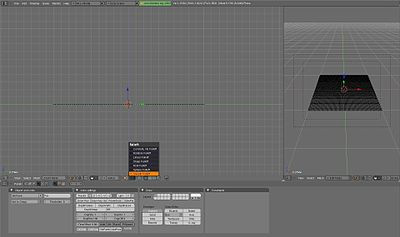
Adding a Plane
::增加一个飞机
Delete the basic cube. Add a plane, and S cale it up by 10. Rotate it so you see it in top-view (make sure it's in Orthographic view too).
::删除基本立方体. 添加一个平面,并将其缩小到10. 旋转它,以便您在顶部视图中看到它 (确保它也在正写视图中).
Enter Edit mode and subdivide (with W ) 5 or 6 times. More subdividing will give you a "smoother" volcano, but it also needs more CPU power.
::进入编辑模式,并将 (W) 分成5或6个部分.更多的分成会给你一个"更光滑"的火山,但它也需要更多的CPU功率.
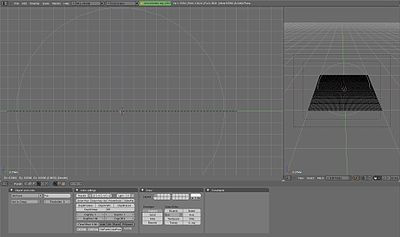
Making the Mountain
::造山的过程
In top view, select one of the points in the middle of the plane. With this point selected change to side view. Press the O , which enables the "Proportional Edit Falloff" tool in the Menu-Panel beneath the 3-D-Window. As seen in the previous tutorial
Blender 3D: Noob to Pro/Mountains Out Of Molehills
when you move a vertex while edit falloff is enabled, all vertices in a defined radius of the selected vertex will align with the selected vertex when its position is altered. How they are adjusted can be chosen in the tab on the right of the yellow dot. I propose using "smooth falloff".
::在顶部视图中,选择平面中间的点之一. 选择了这一点,将其更改为侧面视图. 按下O ,从而在3D窗口下方的菜单面板中启用"比例编辑落差"工具. 正如前面的教程中所看到的,当你在编辑落差时移动顶点时,所选顶点的定义半径中的所有顶点将与所选顶点对齐,当其位置被改变时. 它们的调整方式可以在黄色点右边的选项卡中选择. 我建议使用"平滑落差".
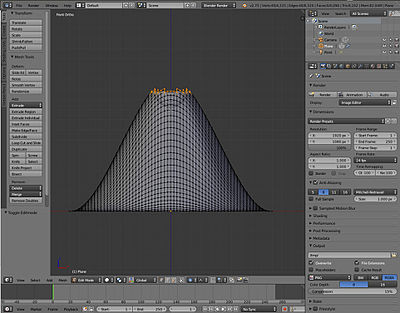
Now grab the vertex with G . You will now see a gray circle. You can change its size with the mouse wheel. Every vertex inside this radius will be affected by the falloff. Change the size of the circle so almost the whole plane is in it.
::现在用G抓取顶点. 你现在会看到一个灰色的圆圈. 你可以用鼠标轮改变它的尺寸. 这个半径内的每个顶点都会受到落差的影响. 改变圆的尺寸,所以几乎整个平面都在其中.
Now move the vertex a bit upwards, as seen in the picture. Optionally you can lock the z-axis to make the volcano go straight up by pressing Z .
::现在把顶点稍微向上移动,如图所示. 选择性地,你可以锁定z轴以使火山直上去,按Z.
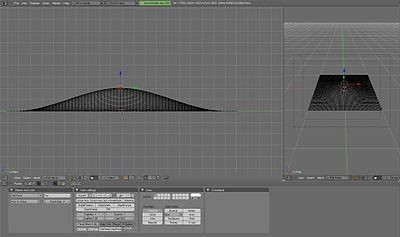
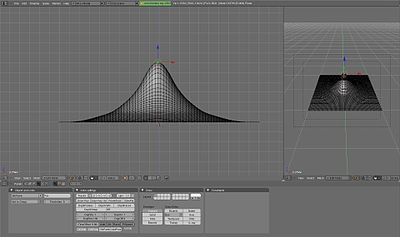
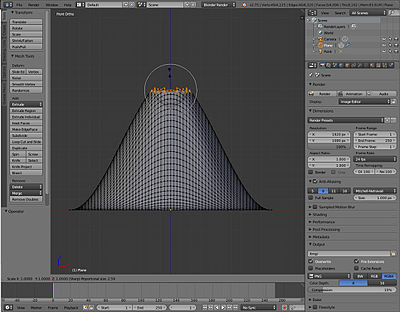
As you can see all the other vertices will shift upward. We could keep moving this vertex at the same rate, but that would cause the plane itself to rise and bend, and that's not very good. So press LMB to apply the changes, grab the same vertex a second time and repeat the previous exercise as before, except now choose a smaller radius for the circle, about half the diameter of the plane ( G → Z → scroll MMB ).
::像你看到的,所有其他顶点都会向上移动.我们可以以同样的速度继续移动这个顶点,但这会导致平面本身上升和曲,这不是很好.所以按 LMB 应用变化,第二次抓住同一个顶点,并重复前面的练习,除了现在选择一个更小的半径为圆,约为平面直径的一半 (G → Z → 滚动 MMB).
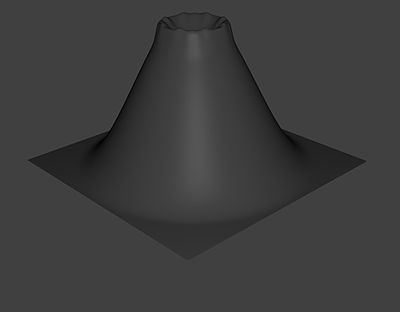
Repeat this two or three more times and you will get something like this:
::两三次重复, 结果就会是这样:
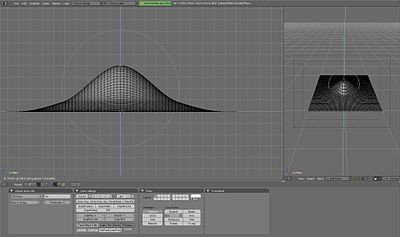
Forming the Crater
::形成了火山口
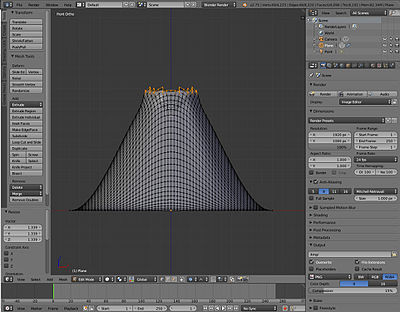
Now we're going to create the "hole" on the volcano. First change the falloff to "root". Grab the vertex one more time, change the size of the circle so it's more or less as seen in the picture.
::现在我们要在火山上创建一个"洞". 首先把落变成"根". 再一次抓住顶点,改变圆的尺寸,使它大致像图中所看到的那样.
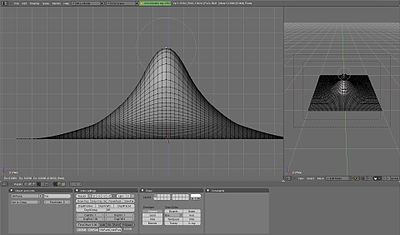
Grab this vertex down a bit, apply, grab it one more time with a smaller circle. You now should have something like this:
::抓住这个顶点,再用一个小圆圈抓住它.
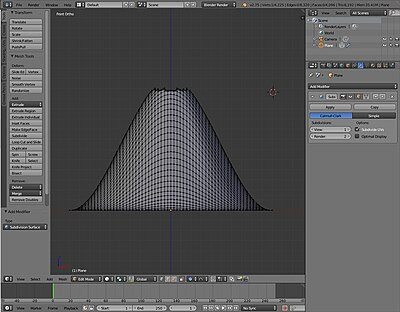
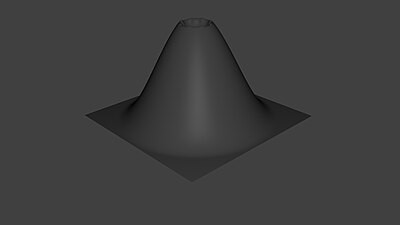
Just leave the border jagged and just smooth (Subdivision Surface) the whole volcano cause it is much more realistic. Go to Object mode, select the volcano, go to the "Modifier" menu in the "Properties" Header and just click on "Add Modifier" -> Subdivision surface (you can leave "view" on 1). Do not apply these settings yet.
::让边界凸,使整个火山更为真实.进入对象模式,选择火山,进入"属性"头部的"修改器"菜单,单击"添加修改器" -> 部分面 (您可以在"视图"上留下1).
First we'll do a test-render. Still in "Object mode" Delete the default Lamp point with "X" or "Delete" and place your 3D cursor behind the camera and press Shift + A -> "Lamp" -> "Point". With the Lamp Point still selected Click on The Lamp point Properties ("Data") in the "Properties" Header then change "Energy" to "10". Press
F12
to enter Render, after adjusting the camera.
::首先我们将做一个测试染. 仍然在"对象模式"中删除默认的灯点用"X"或"删除"并将您的3D光标放在相机后面,然后按Shift + A ->"灯" ->"点". 灯点仍然被选中 点击"属性"头部的灯点属性 ("数据"),然后将"能量"更改为10". 按F12进入染,调整相机后.
Finishing the crater
::完成了火山口
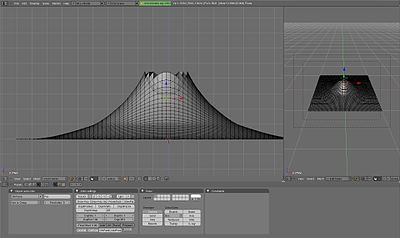
You can very easily make a nice looking crater. Just go into "Edit Mode", touch "Num1". Make sure "limit selection to visible" is off and "proportional editing" is on and set it to "sharp" falloff. Select about the upper vertices with "border select" (Press "B key").
::您可以很容易地制作一个漂亮的石坑.只需进入"编辑模式",点击"Num1".确保"限制选择可见"关闭,并"比例编辑"启动并将其设置为"利"落差.使用"边界选择" (按"B键") 选择上方的顶点.
After that, scale (press "S key") it 'till it's a nice crater with a circle as large as mine.
::之后, 缩小 (按"S键") 它"直到它是一个漂亮的石坑与一个圆大,
And that's it, you just created a nicer looking crater.
::现在你已经创造了一个更漂亮的石坑.
Adding Magma
::添加岩
Let's add some "magma" using lighting.
::让我们用光线添加一些"".
-
Make sure you're in "Object Mode"
::确保您在"对象模式" -
Press Shift + S and choose
Cursor to Center
.
::按下Shift+S,然后选择Cursor to Center. -
Press Shift + A and choose
Lamp → Point
.
::按下Shift+A,然后选择Lamp → Point. -
In the Properties window, click the Data tab.
::在属性窗口中,点击数据选项卡. -
In the colour box (white by default) in the Lamp section, change the color to reddish-orange. (Red: 1, Green: 0.1, Blue: 0)
::在灯区的颜色框 (默认为白色),将颜色更改为红色. (红色: 1,绿色: 0.1,蓝色: 0) -
Set the Energy to around 7.
::设置能量为7左右. -
Raise the light until it's just above the bottom of the crater ( G rab along the Z axis).
::提高光线,直到它只是在坑底 (G沿Z轴. -
If the ground level of your plane is reflecting light from the lava lamp this is because the bottom of your crater is above ground level of the plane you created; you'll need to turn on ray-tracing. in the object data menu for the light, open the Shadow menu and click "Ray Shadow"
::如果你的飞机的地面水平是反射光从岩灯这是因为你的石坑的底部是你创建的飞机的地面水平以上;你需要打开光线追踪. 在对象数据菜单的光,打开影子菜单,并点击"光线影子"
-
Alternate 1: Spot Lamp
::另类 1: 灯光
-
Change the light's type to
Spot
.
::将灯的类型改为"点" -
Raise the light until it's covering most of the crater. If the light is not pointing down, R otate and angle it downwards.You can also scale the radius of the light by press S to fit the rim of the crater.
::升起灯光,直到它覆盖了大部分的石坑.如果灯光不是向下指向,R转向,向下角.你也可以按S调整灯光半径,以适应石坑的边缘.
-
Alternate 2: Area Lamp
::另类:区域灯
-
Change the light's type to
Area
.
::将灯的类型改为区域. -
R otate along the Y axis: 180 degrees.
::在Y轴上旋转180度. -
Set Gamma to 2.
::设置马到2 -
Set Distance to around 5.
::设置距离到5左右.
Experiment with the values and positioning to get something that works with your volcano.
::试试你的火山的位置和值.
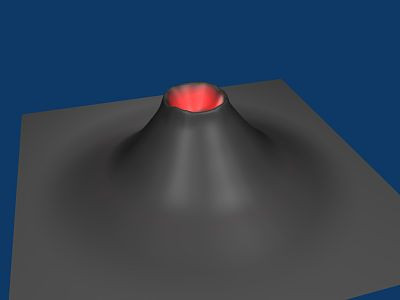
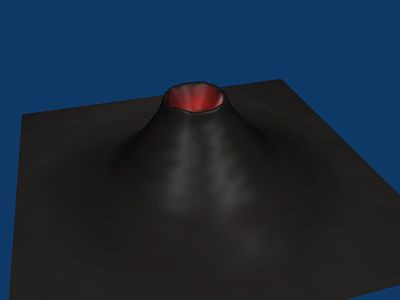
It should now look like this:
::现在应该看起来像这样:
Varying the Terrain
::土地变化
Next, let's set the volcano's material.
::接下来,让我们设置火山的材料.
-
RMB on the volcano plane.
::在火山飞机上. -
Select the "Material" button
 and press New.
::选择"材料"按,然后按新. -
Change the Diffuse color to ashen gray. (Red: 0.260, Green: 0.230, Blue: 0.230)
::将扩散剂的颜色变为灰灰色. (红色:0.260,绿色:0.230,蓝色:0.230) -
Select the "Texture" button and press New.
::选择"文本"按,然后按下"新". -
Change the Type to Stucci.
::换一个Stucci的类型. -
In the Influence panel, uncheck Color, and check Normal. Set the Normal slider to 0.5. This will render the texture as a bump-map.
::在影响面板中,取消选项颜色,并选中正常.将正常滑块设置为0.5.这将使纹理呈现为凸图.
(Note: In version 2.77 you may need to change the texture Mapping -> Coordinates option from UV to Generated before you see bumps appear.)
::在2.77版本中,您可能需要将图谱映射 -> 坐标选项从UV更改为生成,然后才会出现凸起.
(Note: In version 2.78c you may need to change the texture Mapping -> Coordinates option from UV to Global or Object before you see bumps appear.)
::在2.78c版本中,您可能需要将图谱映射 -> 坐标选项从UV更改为全球或对象,然后才会出现凸起.
Older versions:
::旧版本:
Select the volcano and press F5. Keep Pressing F5 until the Materials Buttons (symbolized by a red ball) is highlighted. Then add a new material. You do this by clicking the Add New button in the Links and Pipeline Panel. Once you've done that, set the settings similar to the picture below. Now press F6, then add a new texture to the material. Choose a stucci texture, set the noise size to 0.15. Now switch back to the materials-window (F5) and click on the "map to" tab. Deselect the "col" button and select the "nor" button. This will render the texture as a bump-map on the volcano. Set the "nor slider" to 0.5, which should be the default. Switch to the "map input" tab and choose "tube".
::选择火山并按F5. 保持按F5直到材料按 (象征为红色球) 突出显示. 然后添加新材料. 通过点击链接和管道面板中的添加新按来完成此操作. 一旦完成,将设置类似于下图的设置. 现在按F6,然后将材料添加新的纹理. 选择一个纹理,将噪音大小设置为0.15. 现在返回材料窗口 (F5) 并点击"map to"选项卡. 取消"col"按并选择"nor"按. 这将使纹理作为火山上的撞击图. 将"nor"滑块设置为0.5,这是默认的. 切换到"map"输入并选择"tube"选项卡.

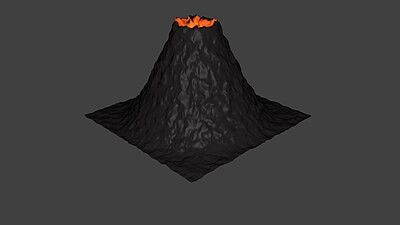
If you now render you should get something like this:
::如果现在染,应该得到这样的结果:
This looks really smooth, like clay pottery. To get a more rough-looking volcano, try out these options:
::为了得到更粗的火山, 尝试以下几种选择:
-
Option 1: Subdivide and increase the fractal. 5 should do the trick.
::选择1:分成小部分并增加分法.
-
Option 2: Decrease the texture's basis size (in the "Stucci" panel when you select the "Texture" button).
::选项2:减少纹理的基础大小 (在"Stucci"面板中,当您选择"纹理"按时).
-
Option 3: Proportional edit tool.
-
Press O to turn on Proportional Editing mode. Select Random fallout.
::按下O键打开比例编辑模式. 选择随机后果. -
G rab the center vertex, and raise it along the Z axis.
::沿着Z轴向上.
::选项3:比例编辑工具.按O打开比例编辑模式.选择随机落差.将中心顶点拉动,并沿Z轴抬高. -
Press O to turn on Proportional Editing mode. Select Random fallout.
Older versions:
::旧版本:
Go into Edit mode, select all Vertices, and use the fractal (set from 15 to 30) to really get things looking rocky and mountainous.
TAB
(Edit mode) →
F9
→
AKEY
to select all → Mesh Tools → Fractal → 15 - 30 (15-low, 30-high) → OK →
TAB
(Object mode) In Blender 2.5 you can use the random proportional edit tool: use
NUM7
to switch into top view, grab the central vertex of your volcano using a large-radius random proportional edit, and pull it slightly into Z-direction.
::进入编辑模式,选择所有顶点,并使用分数 (设置在15到30之间),让东西看起来像岩石和山脉. TAB (编辑模式) → F9 → AKEY选择所有 → 网格工具 → 分数 → 15 - 30 (15-低, 30-高) → OK → TAB (对象模式) 在混器2.5中,您可以使用随机比例编辑工具:使用NUM7切换到顶部视图,使用大半径随机比例编辑抓住火山的中心顶点,并轻轻拉向Z方向.
(A note: Seems there is no need in subsurf at all since fractal tool will dramatically increase vertex quantity.)
::由于分数工具将大大增加顶点数量, 似乎根本不需要在地底进行.