Blender 3D:零基础到专业级-单元2:基本建模和着色
In the properties panel, the World
![]() settings control the background or sky settings for your scene. A scene doesn’t have to have a World, in which case, the background will simply be black. If you save your images with a transparent Sky setting, the background doesn’t matter. But in other situations, you will want to control what appears here.
settings control the background or sky settings for your scene. A scene doesn’t have to have a World, in which case, the background will simply be black. If you save your images with a transparent Sky setting, the background doesn’t matter. But in other situations, you will want to control what appears here.
::在属性面板中,世界设置控制您的场景的背景或天空设置. 场景不需要有一个世界,在这种情况下,背景将是黑色的. 如果您保存图像以透明天空设置,背景无关紧要. 但在其他情况下,您将想要控制这里显示的内容.
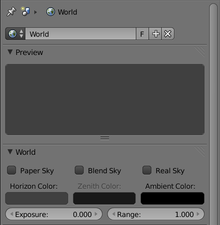
Here is what the top two panels in the World Context look like in a new default document. (Settings further down for Ambient Occlusion, Environment Lighting and Indirect Lighting will be discussed later, when we discuss lighting.)
::在一个新的默认文档中,世界背景的前两个面板是这样的. (我们将在讨论照明时稍后讨论环境遮蔽,环境照明和间接照明的设置).
“Ambient Color” is a sourceless, shadowless light, coming from all directions, applied to all objects. Trouble is, its effect is very “flat”, i.e. it washes out detail. It's probably better to use the Environment Lighting or Ambient Occlusion options (in panels further down) to soften murky shadows.
::环境色是一种无源无影的光,来自各个方向,应用于所有物体. 问题是,它的效果非常平,即它会洗掉细节. 为了减轻阴暗的阴影,最好使用环境照明或环境遮蔽选项 (在更低的面板中).
With none of the boxes checked, “Zenith Color” has no effect, only “Horizon Color” does. The sky will simply be a flat expanse of this colour. Selecting “Paper Sky” and “Real Sky” on their own has no effect, they work only in conjunction with “Blend Sky”.
::没有任何一个框被勾选,Zenith Color没有影响,只有Horizon Color. 天空将只是这个颜色的平面. 单独选择Paper Sky和Real Sky没有影响,它们只与Blend Sky一起工作.
Check “Blend Sky” on its own. Now the sky takes on a gradient from “Zenith Color” at the zenith (straight up) to “Horizon Color”, not at the horizon, but at the nadir (straight down).
::单独检查"混合天空".现在天空从"顶峰色" (直上) 渐变到"地平线色",不是在地平线,而是在点 (直下).
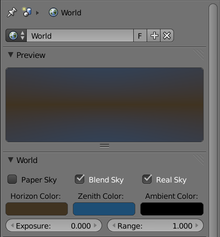
Check both “Blend Sky” and “Real Sky”. Now you get “Horizon Color” at the horizon, with a gradient to “Zenith Color” at both zenith
and
nadir.
::检查"混合天空"和"真实天空".现在你在地平线上得到"地平线颜色",在顶峰和顶点都呈现"顶峰颜色"的梯度.
The effect of “Blend Sky” with “Paper Sky” is a bit more subtle. It means the horizon is always in the middle of the image, regardless of the orientation of the camera. The effect is more noticeable if you check “Real Sky” as well, otherwise it looks little different from “Blend Sky” on its own.
::混合天空与纸天空的效果稍微微妙一些.这意味着地平线始终处于图像的中间,无论相机的方向如何.如果您还检查了"真实天空",效果会更明显,否则它看起来与"混合天空"本身没有什么不同.
Here is an example with contrasting horizon and zenith colours. I also set the camera field of view to 90°.
::我还将相机的视野设置为90度.
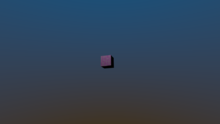
With only “Blend Sky” checked, a render looks like this.
::只有"混合天空"被选中, 染结果看起来像这样.
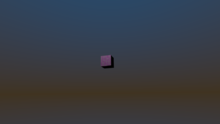
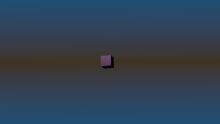
With “Blend Sky” and “Real Sky” checked, this is how the render comes out. Note how the cube is noticeably off-centre relative to the horizon band, because the camera view is at an angle to the horizontal.
::混合天空和真天空被检查,这就是染的结果.请注意立方体与地平线相比明显偏离中心,因为相机视图与水平角度.
With all three of “Blend Sky”, “Real Sky” and “Paper Sky” checked, the result is this. The cube now looks like it is on the horizon, even though the camera angle is the same as the previous image.
::经过检查"混合天空"",真实天空"和"纸天空",结果是这样的:立方体现在看起来像在地平线上,尽管相机角度与上图相同.
You can also add a texture to your sky. That will be discussed
later
.
::您也可以在天空中添加一些纹理.