Blender 3D:零基础到专业级-单元2:基本建模和着色
Techniques
::技术
You should know how to:
::你应该知道如何:
-
Perform actions discussed previously in the tutorial.
::执行之前在教程中讨论的操作.
This section will recap or introduce:
::本节将概述或介绍:
-
Reflective material
::反射材料 -
Positioning camera and light
::定位摄像头和灯 -
Editing the World colors
::编辑世界颜色
Objects in the Scene
::场景中的物体
Create the goblet discussed in
Model a Silver Goblet
or load it if previously made. If you haven't already made the goblet, feel free to try the tutorial using a sphere or something else instead and you will still get a good outcome. In Object Mode with
NUM 7
view, add a plane mesh. Scale the plane to a very large size and make sure the goblet is sitting comfortably on top of it.
::在"模拟银杯"中讨论的杯子创建或加载它,如果以前已经制作了.如果您还没有制作杯子,请随时尝试使用球体或其他东西来完成教程,您仍然会得到良好的结果.在NUM 7视图的对象模式中,添加平面网格.将平面缩小到非常大的尺寸,并确保杯子舒适地坐在上面.
Select the camera and move it so that the goblet, and its reflection in the plane will be seen or else if you want. You can see the numerical location of the camera by bringing up the
Transform Properties
window by pressing
NKEY
in the viewport. In my example where 0,0,0 is the bottom center of the goblet, the camera is located at 27, -21, 19 XYZ with a rotation of 63.5, 0.62, 46.7.
::选择相机并移动它,这样杯子,和它的反射在平面上将被看到或否则如果你想要.你可以看到的数值位置的摄像机通过把转换属性窗口通过按键在视窗.在我的例子中,0,0,0是杯子的底部中心,摄像机位于27, -21, 19XYZ与63.5,0.62,7.46的旋转.
Create a Sun with
Shift+A
→ Lamp → Sun. And (in the lamp properties "Object Data") set "energy" to "0.5", and place it above the goblet. Move it at around 80 points on the Z-axis. It is very important that you place the lamp on the right spot cause it will give your goblet anon 100 times more true to nature when you will give your goblet a silver texture. You can try placing a point or another lamp but it's very difficult to get a realistic image then. If you choose a different lamp click on the World button in the "Properties" header (the section where you can edit the sky). Check the Environmental Lighting box. Set energy to "0.800".
::通过Shift+A → Lamp → Sun创建一个太阳.然后 (在灯的属性"对象数据") 将"能量"设置为"0.5",并将其放置在杯子上方.在Z轴上将其移动到80点左右.非常重要的是,您将灯放在正确的位置,因为它将使您的杯子在给您的杯子银色质感时更加符合自然的100倍.您可以尝试放置点灯或其他灯,但很难获得现实的图像.如果您选择不同的灯,请点击"属性"头部 (您可以编辑天空的部分) 的"世界"按.检查环境照明框.将能量设置为"0.800".
The rendering of this scene yields:
::这场景的演结果是:
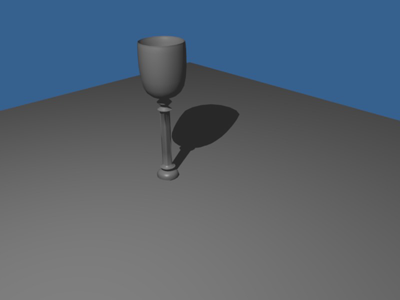 Old Picture.
::旧的照片.
Adding the Atmosphere
::增加气氛
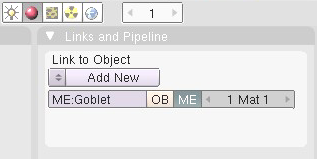
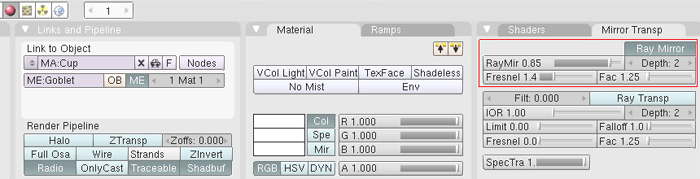
In Object Mode, select the goblet and go to the "Material Properties". If no material is linked to the goblet, add new material. Rename the material 'cup' or something similar. The area of interest is the
Mirror
window. Highlighted below are the mirror options we'll be playing with. Press the Mirror button to make the material act like a mirror and reflect light.
::在对象模式中,选择杯子并进入"材料属性".如果没有材料与杯子连接,添加新材料.重命名材料'杯子'或类似的东西.感兴趣的区域是镜子窗口.以下突出显示的是我们将要玩的镜子选项.按镜子按使材料像镜子一样作用并反射光.
Move the "Reflectivity" slide to 0.85 or type it in after
LMB
on the number. This is how reflective the surface will be. A low number of 0.00 means that it reflects little while a high number of 1.00 reflects everything.
::移动"反射率"幻灯片到0.85或在数字上LMB后输入.这是表面的反射度.0.00的低数表示它反射很少,而1.00的高数则反映一切.
Also change the Fresnel slide from 0.0 to 1.4. This will increase the power of the Fresnel function. What this means is the color of the material will be strong because the light source is taken into consideration. If the Fresnel wasn't used, the object would appear dark because the light source isn't directly calculated in the mirror. Also, change the color of the goblet to white. Using a light color will give your goblet an interesting patina if you so choose.
::另外,将弗雷内尔幻灯片从0.0更改为1.4. 这将增加弗雷内尔函数的功率. 这意味着材料的颜色将会强烈,因为光源被考虑. 如果没有使用弗雷内尔,物体会出现黑暗,因为光源不是直接计算在镜子里. 此外,将杯子的颜色更改为白色. 如果您选择使用浅色,将使您的杯子具有有趣的斑纹.
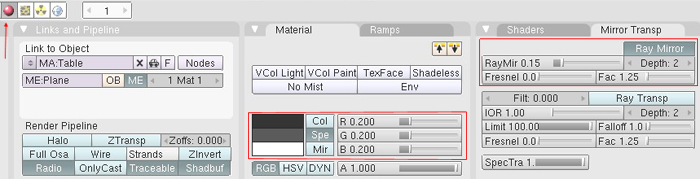
Next, select the plane and modify the material, add if it is not there. We want the plane to be dark and shiny. Set
Diffuse
and
Specular
to near black for the color. For reflectivity, turn on
Mirror
to about 0.15 Reflective and ignore Fresnel this time.
::接下来,选择平面并修改材料,如果没有,添加. 我们希望平面是黑暗和闪亮的. 设置扩散和镜面接近黑色的颜色. 为了反射性,将镜面打开到约0.15反射,这次忽略弗雷尼尔.
There is only one more thing to do before rendering the scene: change the world. Under the "Properties" Header is the "World" panel. Here you have
Paper Sky
,
Blend Sky
, and
Real Sky
buttons. There are also options for changing the color of the horizon (Horizon color), zenith (Zenith color), and ambient (Ambient color). We're interested in these two windows at the moment.
::染场景之前只剩下一个事情:改变世界.在"属性"头部是"世界"面板.这里你有纸天空,混合天空和真天空按.还有改变地平线颜色 (地平线颜色),顶峰 (顶峰颜色) 和环境 (环境颜色) 的选项.我们目前对这两个窗口感兴趣.
Using
Real sky
and
Blend sky
will affect the way the horizon and zenith interact. Experiment with them to see what they do in the preview. In this example,
Real
and
Blend
are turned on.
::使用真空和混合空调将影响地平线和顶点的交互方式. 试验它们以查看它们在预览中所做的. 在这个例子中,真空和混合空调被打开.
The
Paper
button works a little differently in that what you see in the preview will essentially be the background of your render. This effect is most noticeable when your camera is rotated. Despite the camera rotation, the preview would still be 'wallpapered' on the render.
::纸按的工作方式有点不同,即预览中所看到的内容基本上是染的背景.当您的摄像头旋转时,这种效果最为明显.尽管摄像头旋转,预览仍将在染中"壁纸化".
For our world, set the color close to black for the horizon, zenith, and ambient.
::对于我们的世界, 设置接近黑色的地平线,

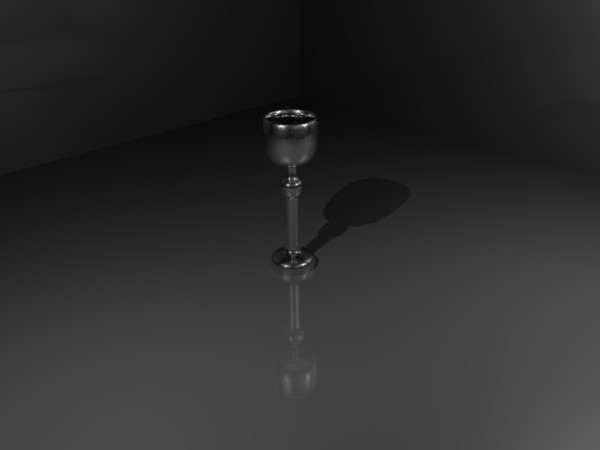
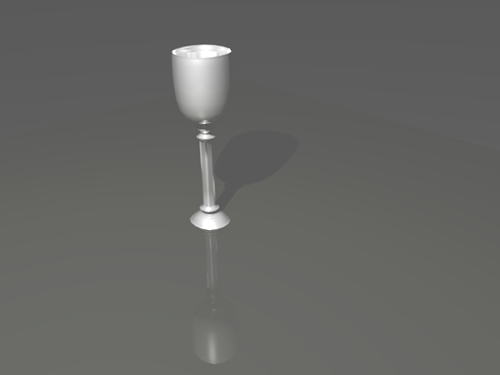
That was the last step! Make sure the camera is in the right spot and render the scene. Here is the output of this example
::让我们来看看这个例子的输出.
Creating a metallic texture for the goblet:
::制造出杯子的金属质地:
The metallic look can be achieved by these steps:
::通过以下步骤可以实现金属外观:
-
Materials
>
Diffuse
. Set color Hex value to:
C7C8CB
or you can set it completely black for dark metal. Set intensity to "0.8".
::材料>扩散. 设置色彩Hex值为:C7C8CB或您可以将其完全设置为黑金属. 设置强度为"0.8". -
Materials
>
Specular
. Set color to white(Hex:
FFFFFF
). Change
Intensity
to "
1.000
", left of the color-swatch, set the
specular shader
to
CookTorr
. Also change the
Hardness
to value around "
16
".
::材料>光镜.将颜色设置为白色 (Hex: FFFFFF).将强度设置为"1.000",在颜色样本的左侧,将光镜遮光器设置为CookTorr.还将硬度设置为"16"左右的值. -
Materials
>
Mirror
. Make sure the Mirror check-box is checked. Set
Reflectivity
to
1.000
and color to white(Hex:
FFFFFF
). Make sure that under "Gloss" the "Amount" is set to "1.000".
::材料 > 镜子. 确保镜子选项框被勾选. 设置反射率为1.000和颜色为白色 ((Hex: FFFFFF). 确保在"光泽度"下"数量"设置为"1.000". -
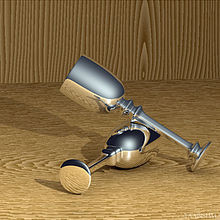
(not compulsory but it may be required) Use the texture from this earlier tutorial:
Procedural Wood Texture
on the planes that are below and behind the goblet as in the picture below. It will give you a much better contrast.
:不强制,但可能需要) 使用本教程中的纹理:在杯子下面和后面的平面上使用程序性木质纹理.它将给你更好的对比.
Notes:
::备注:
Problem:
When I render I see brown where I have used "Shift-E" and "G" and I followed everything.
Answer:
Please remember, the author did say play with the settings a bit, this tutorial should be used as a guide. We are learning how to use all the tools that Blender has to offer, that is the important thing. It is up to us to experiment more with the settings set forth in these tutorials. If the settings in these tutorials do not give us the same results, that is OK, we should be changing them anyway to express ourselves! Also remember, NEVER strive for PERFECTION, but ALWAYS strive for EXCELLENCE. Perfection only leads to frustration, and it is frustrating enough, at times, to learn something new. Have fun learning, I know I am.
::问题:当我染时,我看到我使用"Shift-E"和"G"的地方是棕色的,我遵循了一切. 答案:请记住,作者确实说过玩设置一点,这个教程应该作为指南. 我们正在学习如何使用Blender提供的所有工具,这是最重要的. 我们需要更多地尝试这些教程中列出的设置. 如果这些教程中的设置没有给我们相同的结果,那就好了,我们应该改变它们来表达自己! 还记住,永远不要追求完美,但永远追求卓越. 完美只会导致丧,有时学习新东西就足够令人丧. 快乐学习,我知道我在.
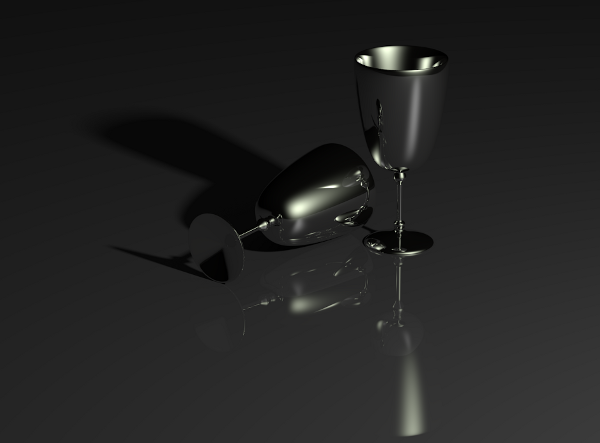
Noob Question:
I managed to get it looking like the first picture above. How do I get it to look like the second?
Pro Answer:
Change the reflection settings. a higher depth and a larger raymir value will make the goblet more "mirror" like as in the 2nd picture. the other settings should be left alone, or you can experiment with them to achieve the effect that you want. lighting is also important. the object that is to be reflected has to be illuminated as well as the object that is doing the illuminating. Different lights (don't use a hemi if you want it to be realistic) at different angles will give you a more realistic effect.
::问题:我设法让它看起来像上面的第一张图片. 我如何让它看起来像第二张图片? 专业答案: 改变反射设置. 较高的深度和更大的raymir值将使杯子更像第二张图片一样"镜像". 其他设置应该不用,或者你可以尝试它们来实现你想要的效果. 照明也很重要. 要反射的物体必须照亮,以及正在照亮的物体. 不同角度的不同灯 (如果你想让它变现实,不要使用半径) 将给你一个更现实的效果.
Noob Note:
On the answer above, I didn't manage to do it with any of the things the pro said in the answer here, I found out that the key is to change the color of the material which is white (or close to white) in the upper picture. In the lower picture the color is set to black (or close to black). This eliminates the "un-metallic" whitish sheen that the goblet in the upper picture has.
::诺布:在上面的答案上,我没有用任何专业人士在答案中说的东西来做,我发现关键是改变材料的颜色,上面的图片是白色 (或接近白色).在下图片中,颜色设置为黑色 (或接近黑色).这消除了上图片中的杯子所具有的"非金属"白色光泽.
Noob Note:
I don't know about those using lower versions but those using v2.5x have a choice of different shaders both for diffuse and specular colours. I strongly suggest that for the same object one should try playing around with the shaders. They can create different effects. for eg. here if you change the diffuse shader type to
oren-nayar
and the specular shader type to
wardiso
, the goblet will have a glossy , finished look.
::诺伯注意:我不知道那些使用较低版本的人,但那些使用v2.5x的人可以选择不同的遮光器,既用于扩散色和镜面色.我强烈建议,对于相同的对象,应该尝试使用遮光器.它们可以创建不同的效果.例如,在这里,如果您将扩散遮光器类型更改为oren-nayar,并将镜面遮光器类型更改为wardiso,那么杯子将具有光泽的,完成的外观.