Blender 3D:零基础到专业级-单元2:基本建模和着色
Basic Shape
::基本形状
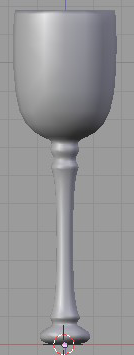
At first glance, the goblet looks like it is composed of cylinders. However, while it is possible to model the goblet with a cylinder mesh, it is easier to make a goblet by using cubes. Cubes make the goblet faster to make and it makes fewer vertices to track. Now, lets start making the basic shape of the goblet.
::一看,这杯看起来像是由圆柱组成的.然而,虽然可以用圆柱网模拟杯子,但使用立方体制造杯子更容易.立方体使杯子制造更快,并且可以更少地追踪顶点.现在,让我们开始制造杯子的基本形状.
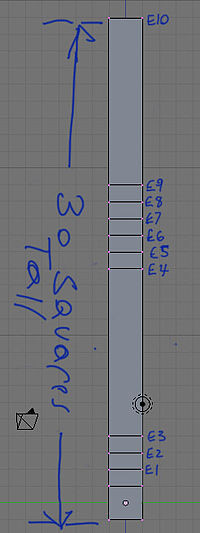
Start with the default cube and go to Edit Mode ( TAB ). Toggle off "limit selection to visible". Move to the side view ( NUM3 ). Toggle to ortho view. Box select ( B ) the top edges of the cube. Extrude ( E ) upward about one grid square. Hold down CTRL while extruding for incremental movement; by default movement should be restricted to the Z-axis (normal to the selection); if necessary, press Z to toggle this effect. This extrusion is called E1. Repeat 2 more times for extrusion 2 and 3 (E2 and E3).
::开始使用默认立方体,然后进入编辑模式 (TAB). 切换"限制选择到可见". 移动到侧面视图 (NUM3). 切换到正视图. 框选择 (B) 立方体的顶端. 挤出 (E) 向上大约一个网格方块. 挤出时按住CTRL,以增加移动;默认移动应限制在Z轴 (正常的选择);如果需要,按Z切换此效果. 这种挤出称为E1. 对于挤出2和3 (E2和E3) 进行2次重复.
Now Extrude a longer piece upwards, for the Goblet's stem, of 10 grid squares (E4). Next we will define the area for the 2 top knobs and the bottom of the glass by Extruding upwards 5 more times at 1 grid square each (E5-E9). Next do another upward Extrusion of about 10 grid squares (E10). This is the actual glass itself.
::现在,在杯子的茎上,向上挤出一个长的10个网格方块 (E4).接下来我们将通过向上挤出5次,每次在1个网格方块 (E5-E9) 上,确定玻璃的2个顶部旋和底部的面积.接下来再进行大约10个网格方块 (E10) 的向上挤出.这是实际的玻璃本身.
Inflate the Glass
::充气玻璃
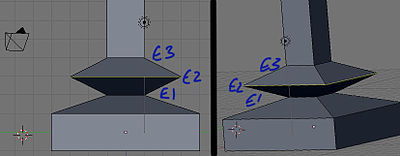
Now, let's begin to inflate the glass. First, clear all selections by hitting the A . Make sure you are still in the side view ( NUM3 ). Box select ( B ) the bottom most cube (all 8 vertices, not just the bottom 4). Then expand it outward by scaling ( S ), then pressing SHIFT + Z to lock/prevent any scaling in height along the Z-axis and finally pressing 4 to quadruple its size. Next, deselect all vertices ( A ), select ( B ) the 4th pair of vertices (E2), scale them ( S ), lock scaling ( SHIFT + Z ) and triple the vertices in size ( S and 3 ).
::现在,让我们开始充气玻璃.首先,通过击中A,清除所有选择.确保你仍然在侧面视图 (NUM3).框选择 (B) 最底部的立方体 (所有8个顶点,不仅仅是底部的4).然后扩展它向外,缩放 (S),然后按SHIFT + Z锁定/防止任何缩放在Z轴的高度,最后按4以增加其大小.接下来,取消所有顶点 (A),选择 (B) 第4对顶点 (E2),缩放它们 (S),锁定SH (IFT + Z) 和缩放三倍的顶点 (S和3).
Do the same for E5 and E7 (the 7th and 9th pairs of vertices, respectively). Then expand ( S and SHIFT + Z ) the top, Goblet rectangle (E9 and E10) to 6 times its current size ( 6 ).
::对于E5和E7 (分别是第7和第9对顶点) 进行相同的操作.然后将顶部的Goblet矩形 (E9和E10) 扩大 (S和SHIFT+Z) 到其当前大小的6倍 (6).
Make the cup's interior
::让杯子的内部
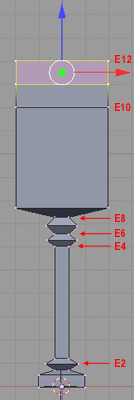
Last is the cup's interior. Once again, you should still be in the side view ( NUM3 ). Box select ( B ) the very top most vertices of the Goblet (E10). Once selected, get a better view by changing to 'Orbit Up' ( NUM8 ). With the top surface selected, initiate an Extrusion ( E ), followed by a termination with the ESCAPE . It will appear as if nothing has happened, but new, overlapping edges have been created and are now selected (this also creates E11). Next Scale ( S ) the selected vertices to 90% of the original size ( .9 ). This creates the inside lip of the cup. Now, Extrude ( E ) the interior lip, along the Z-axis downward ( -10 ) to create the bottom interior of the Goblet (E12). Finish off by selecting all, and then a 'Remove Doubles' ( W →
Remove Doubles
), for good measure. It should look something like this.
::最后是杯子的内部. 再一次,你应该仍然在侧面视图 (NUM3). 框选择 (B) 杯子的最顶端 (E10). 一旦选择,通过更改为"轨道上" (NUM8) 获得更好的视图. 选择了顶部表面,启动一个挤出 (E),然后用ESCAPE结束. 它将出现,好像什么都没有发生,但新的重叠边缘已经被创建,现在被选择 (这也创建了E11). 下一步缩放 (S) 选择的顶端到原始尺寸的90% ( .9). 这创建了杯子的内部唇. 现在,挤出 (E) 内唇,沿着向下Z轴 (-10),创建杯子的内部 (E12). 选择所有,然后删除"移除双重" (R
Smoothing and Defining
::调整和定义
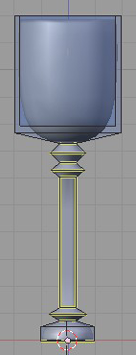
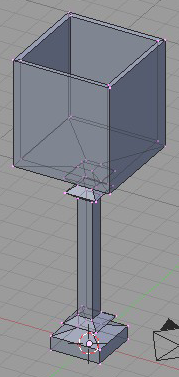
Time to take the mesh and turn it into a proper goblet. Add a subsurf modifier with 3 view subdivisions to the mesh. Change to Object Mode ( TAB ) and select smooth shading. The cube-looking mesh will now look like an object that was created from a cylinder. This has removed all our crisp edges, but our globlet is looking very unstable! Let's rectify things by flattening the bottom.
::现在是时候把网格变成一个正确的杯子了. 给网格添加一个带有3个视图分区的底面修饰器. 切换到对象模式 (TAB) 并选择光滑的遮. 立方体的网格现在看起来像一个从圆柱中创建的对象. 这已经删除了我们所有的脆脆的边缘,但我们的球体看起来非常不稳定! 让我们通过平平底来纠正问题.
Noob Note:
If your goblet has a bulge in it after applying the subsurf, go to
Edit mode
( Tab ), select all ( A ), press W , and select "Remove doubles". (If a menu for boolean operations appears when you hit the W , then you're not in
Edit mode
; change immediately to Edit mode and try the W again.)
::笔记:如果你的杯子在应用子表面后出现了凸起,请进入编辑模式 (Tab),选择所有 (A),按W,并选择"删除双重". (如果按W时显示布尔运算的菜单,那么你不在编辑模式;立即切换到编辑模式并再次尝试W.)
Select the four edges that surround the small circle at the very bottom (the very lowest set of edges) and press SHIFT + E to enable creasing. Now drag the mouse up and down to select the level of the crease. When you're satisfied, hit LMB . Repeat the process for other edges you want to be sharp. I've turned on Draw Creases under
Mesh Tools 1
to illustrate which edges have been creased (highlighted yellow) in this example.
::选择四个边缘,围绕着最底部的小圆圈 (最低的一组边缘),然后按 SHIFT + E 启用纹.现在,将鼠标拖动上下,选择纹的水平.当你满意时,点击 LMB . 对于其他边缘重复这个过程,你想是尖的.我已经在网格工具 1 中打开了绘制纹,以说明哪些边缘已经纹 (亮出黄色).
That concludes the creation of the goblet. Save the scene for use in the lighting tutorial.
::现在我们可以把这场景保存起来,