Blender 3D:零基础到专业级-单元2:基本建模和着色
Halos are a neat effect. Instead of giving a colour/texture to the faces of a mesh, like normal Surface materials do, the Halo material ignores the faces and renders representations of the vertices instead. This can produce all kinds of ethereal, even ghostly, fantasy effects, of objects that look like they’re made out of light rather than ordinary solid matter.
::光是一种整洁的效果.而不是像普通表面材料一样给网状面带来颜色/纹理,光材料忽略了面,而是呈现了顶点的表现.这可以产生各种类型的空气,甚至幽灵,幻想效果,看起来像是用光而不是普通固体物质制成的物体.
A halo material can also produce a
flare
effect. This is the “lens flare” that happens when a physical camera is aimed at a very bright light source; the spillage of light bouncing around inside the optics produces coloured rings and other interesting artifacts on top of the image. This has become such an accepted part of photography that computer graphics programs like Blender, which do not suffer the imperfections of physical lenses, go to a great deal of trouble to offer a realistic flare effect.
::光材料也可以产生耀斑效应.这是当物理相机针对非常明亮的光源时发生的"镜头耀斑";光学器件内部反弹的光散射会在图像顶部产生彩色环和其他有趣的物件.这已经成为摄影中被接受的一部分,像Blender这样的计算机图形程序,不遭受物理镜头的缺陷,为提供现实化的耀斑效应付出了巨大的努力.
Flare effects can also be achieved using compositing node and a material with an "emit" value, such flares may in some circumstances render faster and be simpler to control. This works for the Blender internal render engine, as do flares generated with halos. This is done by opening the node editor (switching the 3d viewer tab to one of these for example) then clicking "compositing nodes" and "use nodes", "filters" can then be added to produce these effects.
::通过使用构成节点和具有"emit"值的材料,也可以实现闪光效应,在某些情况下,这种闪光效应可能会更快,更容易控制.这适用于Blender内部染引擎,以及用光环生成的闪光效应.这可以通过打开节点编辑器 (例如将3d观看选项卡切换到其中一个) 然后点击"构成节点"和"使用节点",然后可以添加"过器"来产生这些效果.
This tutorial will show you how to create an image representing a flare effect in a picture of the Sun.
::如何在太阳图片中创建一个代表耀斑效应的图像.
Setting The Scene
::设置场景
Open a new default Blender document. Get rid of the default cube. Insert a new UV Sphere mesh in its place, and set the number of segments and rings to 24 each. Also set Smooth shading. This will be your Sun. Create a new material for it, set the Diffuse colour to a suitable yellow. Under the Shading panel in the material settings, look for the “Emit:” slider and give it a value of 1.0 to make it look bright. Since the Sun emits its own light, you don’t need the separate default light, so get rid of that.
::打开一个新的默认的混合器文档. 摆脱默认的立方体. 插入一个新的紫外线球网,并将段数和环数设置为24个. 还设置光滑的阴影. 这将是你的太阳. 为它创建一个新的材料,将扩散色调为合适的黄色. 在材料设置中的阴影面板下,寻找"发射:"滑块并给它1.0的值以使它看起来明亮. 因为太阳发射自己的光,你不需要单独的默认光,所以摆脱它.
Go to the World properties tab
![]() . In the “World” sub-header, click on the colour swatch labelled “Horizon Color” and assign a nice deep blue colour for your sky.
. In the “World” sub-header, click on the colour swatch labelled “Horizon Color” and assign a nice deep blue colour for your sky.
::进入"世界属性"选项卡. 在"世界"子标题中,点击标有"地平线颜色"的颜色样本,并为您的天空指定一个漂亮的深蓝色.
If you do a render now, you should see your bright yellow orb, but without any flare effect.
::现在可以看到明亮的黄色球体, 但没有任何耀斑效应.
Adding The Flare
::增加"闪光灯"
Now add a new Circle mesh; the default 32 vertices should be enough. By default it lies in the X-Y plane, which again is fine. Move it along the Y-axis a little closer to the camera (negative-Y direction), until it lies outside your Sun sphere, but still close to it. Scale its size down by 0.5. (It will probably be invisible when first created, because it is initially inside your Sun sphere, but it will be initially selected, so you can immediately press G Y and start moving the mouse without pressing any buttons, and make it appear from inside the Sun). Create a new material for it, and set the type to Halo.
::现在添加一个新的圆网格;默认的32个顶点应该足够.默认情况下,它位于X-Y平面,这也很好.沿Y轴移动它,离摄像机更近一点 (负Y方向),直到它位于太阳球之外,但仍然接近它.将其尺寸缩小0.5. (它可能在第一次创建时是不可见的,因为它最初位于太阳球内,但它将最初被选择,所以你可以立即按GY,开始移动鼠标而不按任何按,并使它从太阳内部出现).为它创建一个新的材料,并将类型设置为Halo.
In the Halo panel in the Material settings, increase the size to 3.0—this is the size of the fuzzy image that is rendered around each vertex, and this value is sufficient for them all to run together into a continuous ring. Reduce the Alpha to 0.05 to avoid overpowering the image with the halo effect.
::在Halo面板中,在"材料"设置中,将尺寸增加到3.0这是每个顶点周围呈现的模糊图像的大小,这个值足以让它们一起运行成连续的环.将Alpha降低到0.05,以避免用光环效应压倒图像.
Go further down the halo Material settings, and find the Flare panel (in Blender 2.75 you can check "Flare" but what settings you do, nothing will work). Check the title box to enable this. Set the number of Subflares to, say, 8 (this controls the number of separate halo reflections that will be generated, though you probably won’t be able to distinguish that many). Set the Boost to 10 to make the subhalos brighter than the original parent halo.
::进一步下一步,在光环材料设置中,找到Flare面板 (在Blender 2.75中,您可以检查"Flare",但您所做的设置,没有什么会工作). 检查标题框以启用此功能.设置子光环的数量为,比如,8 (这控制了将生成的单独光环反射的数量,尽管您可能无法区分这么多). 设置Boost为10以使子光环比原始母光环更亮.
The Seed value in the Flare panel controls the particular flare pattern that you see; each number produces a different effect. I chose the value 3 for this example.
::闪光灯面板中的种子值控制着你看到的特定闪光灯模式;每个数字产生不同的效果. 我选择了这个例子中的值3.
Where did the circle go?
Like any object with a halo material, the circle object can be quite hard to see when it’s not selected. If you lose track of it, there are a couple of ways to find it again:
::圆形去哪儿了? 像任何带有光环的物体一样,如果没有选择,圆形物体很难看到. 如果你失去了它,有几种方法可以再次找到它:
-
Select everything with A . Now you can look for the ring of dots and RMB on it to select it exclusively.
::选择所有与A. 现在你可以寻找圆的点和人民币在它选择它独家. -
Use the outliner window at the upper right. You should see it listed here under its default name of “Circle”; click with LMB to select it, and you should see the ring of dots appear in the 3D view.
::使用右上方的轮窗口.您应该看到它在默认名称"圆"下列在这里;点击LMB选择它,您应该看到点环出现在3D视图中.
If the circle object is still inside the Sun, then wireframe Z or bounding-box view modes may be helpful to find it again.
::如果圆形物体仍在太阳内部,那么Z线框或边界框视图模式可能有助于再次找到它.
The Final Result
::最终的结果
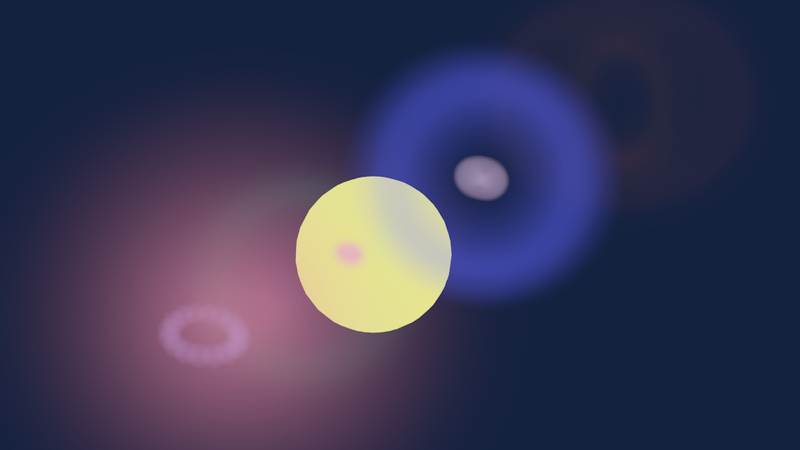
Now hit F12 to render, and you should see something like this (the flare effect may not appear immediately with the rest of the image, give it a few more seconds to appear):
::现在按F12进行染, 您应该看到这样的效果 (闪光效应可能不会立即与图像的其余部分一起出现,
Exercises:
Try different positions for the circle mesh; move it near to the Sun (even partly in it), far from it, move it around to different sides. How does this affect the flare pattern? Also try changing the size of the circle mesh.
::练习:尝试不同的圆网状物;将其移动到太阳附近 (甚至部分进入太阳),远离太阳,将其移动到不同的侧面.这如何影响耀斑模式?还尝试改变圆网状物的大小.