Blender 3D:零基础到专业级-单元2:基本建模和着色
To understand the collaboration of textures and material we will use the opacity of a material - the alpha value - as an example. We will show how to set the opacity/transparency of a material with different types of textures.
::为了理解纹理和材料的协作,我们将使用材料的不透明度 - - 字母值 - - 为例.我们将展示如何设置不同类型的纹理材料的不透明度/透明度.
The Alpha value of the material is set with the
A
(lpha) slider in the Material panel. This is the basic Alpha value. If
Alpha
is 1, the material is fully opaque, if
Alpha
is 0, the material is fully transparent.
::材料的Alpha值是通过材料面板中的A(lpha) 滑块设置的.这是基本的Alpha值.如果Alpha为1,材料是完全不透明的,如果Alpha为0,材料是完全透明的.
Now you change that basic Alpha value with a texture.
::现在你用一个纹理来替换基本的阿尔法值.
-
If the basic Alpha value is 1 you can only lower it with a texture, because 1 is the maximum value anyway.
::如果基本的阿尔法值是1,你只能用纹理降低它,因为1是最大值. -
If the basic Alpha value is 0 you can only increase it with a texture.
::如果基本的阿尔法值为0,你只能通过纹理来增加它.
The target value of Alpha that can be achieved with the texture is set with the
DVar
button in the
Map To
panel. If
Alpha
is 0 and
DVar
is 0 than nothing will happen. You can set either:
::通过Map To面板中的DVar按设置可实现的Alpha目标值.如果Alpha为0而DVar为0则不会发生任何事情.您可以设置:
-
Alpha
to 1 and
DVar
to 0, then the texture will lower the Alpha value, or you can set
::然后纹理将降低阿尔法值,或者你可以设置 -
Alpha
to 0 and
DVar
to 1, then the texture will increase the Alpha value.
::则该结构将增加阿尔法值.
Both methods are possible and equal in the result, but for clarity we will always use method number 1. There are more combinations possible, so it may be that you find tutorials with different settings.
::这两种方法都是可能的,结果也是一样的,但为了明确,我们将始终使用方法1的方法. 组合的可能性更多,所以你可能会发现不同的设置的教程.
Using a greyscale texture - white for opaque
::使用灰度纹理 - 白色为不透明

In
Img. 1a
the black areas shall become transparent, the white areas shall become opaque.
::在图1a中,黑色区域变得透明,白色区域变得不透明.
-
Load the image as
Image
texture, turn off
Use Alpha
.
::装载图像作为图像纹理,关闭使用Alpha. -
Set the
Alpha
value in the material buttons to 1. This is the default value anyway.
::设置Alpha值在材料按为1. 这也是默认值. -
Activate
ZTransp
(or
RayTransp
if you need refraction)
::激活ZTransp (或RayTransp如果需要折射) -
The
Map To
panel:
-
Turn off
Col
(or else the texture would also affect the color of the material)
::关闭Col (否则质地也会影响材料的颜色) -
Turn on
Alpha
inverse, you have to click it twice. We need inverse here, because the texture shall affect the material from its black parts. (
Noob Note
:
On blender 2.63 you need to set a specific 'Alpha' value (the one located under 'influence->diffuse) to -1, as the alpha button referenced in this step no longer exists in 2.63.
)
::打开Alpha反向,您必须点击两次.我们需要反向,因为纹理将从黑色部分影响材料. (Noob注意:在混合器2.63上,您需要将特定的"Alpha"值 (位于"影响->扩散"下的一个) 设置为-1 ,因为此步骤中引用的alpha按不再存在于2.63.) -
Turn on
Spec
inverse (you don't want your transparent sections to show specular highlights) (
Noob Note
:
As far as I could tell, the equivalent to doing this on blender 2.63 is to set a specific 'Intensity' value (located under Influence->Specular) to -1.
)
::打开Spec反向 (你不希望你的透明部分显示镜像亮点) (Noob注意:据我所知,在混合器2.63上做这件事的相当于设置一个特定的'强度'值 (位于影响>镜像) 到-1). -
Set the
DVar
value to 0. The default value is 1.
::设置DVar值为0. 默认值为1.
::映射到面板:关闭Col (否则纹理也会影响材料的颜色) 打开Alpha反向,您必须点击两次.我们需要反向在这里,因为纹理将影响材料从它的黑色部分. (Noob 注意:在混合器2.63上,您需要设置一个特定的"Alpha"值 (位于"影响->扩散"下的一个) 到-1,因为此步骤中引用的alpha按不再存在于2.63.) 打开Spec反向 (您不希望您的透明部分显示光谱亮点) (Noob 注意:据我所知,在混合器2.63上这样做相当于设置一个特定的"强度"值 (位于"影响->光谱") 到-1.设置DVar值为0.默认值为1. -
Turn off
Col
(or else the texture would also affect the color of the material)

Now let's take a look at the texture.
::现在让我们看看它的质地.
-
Where the texture has a value of 0 (e.g. black) it will affect the Map To values fully (because we have used inverse).
::图形的值为0 (例如黑色),它将完全影响图形对值 (因为我们使用了反向). -
Where the texture has a value of 1 (e.g. white) it will do nothing.
::如果质感值为1 (例如白色),它将无效. -
Where the texture has a value in between 0 and 1 it will affect the Map To values partially.
::如果纹理的值在0和1之间,它将部分影响Map To值.

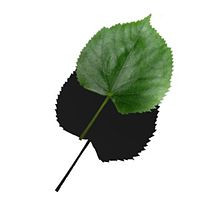
The result is shown in
Img. 1c
, the texture applied to a plane rendered against a white world background.
::结果显示在图1c,图中用图形呈现在白色世界背景的平面上.
If your texture is inverted, i.e. black shall become opaque and white transparent, simply use the normal
Alpha
and
Spec
setting in the
Map To
panel. (
Noob Note
If you don't see the white 'shine' on the maple leaf, move the default point lamp (lighting source) closer to the plane mesh to which the texture and material are assigned.
)
::如果你的纹理是倒置的,即黑色将变得不透明,白色透明,只需使用Map To面板中的正常Alpha和Spec设置. (Noob注意:如果您在叶上没有看到白色的"闪光",请将默认点灯 (照明源) 移动到与纹理和材料分配的平面网格更近.
That's it. It's basically the same for all settings, the only problem that remains is sometimes to know which value a texture will give if you use transparent textures or colored textures.
::基本上所有设置都是相同的, 唯一的问题是有时要知道一个纹理会给出什么值,
For 2.7 blenderers out there:
To obtain the results I had a hard time and finally came across (almost accidentally) to uncheck the 'use alpha' button in the image sub panel of the texture menu. Then, you can get the results as above.
::对于有售的2.7混合机:为了获得结果,我很难,最后 (几乎是偶然) 在纹理菜单的图像子面板中取消'使用alpha'按. 然后,您可以得到如上所述的结果.
Using a partially transparent texture to make the material transparent
::使用部分透明的质地使材料透明
Often we have a partially transparent texture, and want to directly use that transparency of the texture to make the material transparent too. We have now to think a bit about the values that are generated by the texture itself: If we load the image texture with
Use Alpha
, the Alpha value of the image is used as input value for
Alpha
and
Spec
in the
Map To
panel. So a fully transparent pixel in the image has an Alpha value of 0, a fully opaque pixel has an Alpha value of 1. This is exactly the same situation as above, simply turning on
Use Alpha
and
Premul
(tiply Alpha in Advance) will give use the same result as with the greyscale image.
::通常我们有部分透明的纹理,并且希望直接使用该纹理的透明度使材料也透明.现在我们必须考虑一下纹理本身产生的值:如果我们用Use Alpha加载图像纹理,图像的Alpha值将被用作Map To面板中的Alpha和Spec的输入值.因此图像中的完全透明的像素的Alpha值为0,完全不透明的像素的Alpha值为1.这与上述情况完全相同,只要打开Use Alpha和Premully in Advance (Alpha预先使用) 就会得到与灰度图像相同的结果.

So:
::所以:
-
Turn on
Use Alpha
in the
Map Image
panel of the texture buttons.
::在图像面板中打开使用Alpha的图形按. -
Turn on
Premul
in the
Image
panel. This is necessary to get real partial transparent borders.
::打开图像面板中的Premul. 这对于获得真正的部分透明边界是必要的. -
Turn on
Col
in the
Map To
panel additionally.
::在地图中, 另一个功能是打开"col"
The rendering result is pretty similar to
Img. 2a
, only that it is affected by lighting (and casts shadows).
::染结果与图2a相似,只是受到照明的影响 (并投射阴影).
Don't forget to turn on
TraShadow
in the
Shaders
panel for the object that is
receiving
the shadow. (
Noob Note:
In Blender 2.6x you also need to check the "Receive Transparent" box in the shadow section of the material for the object receiving shadows or you will get a black square shadow.)
::不要忘记在收到影子的对象的影子板中打开TraShadow. (Noob注意:在Blender 2.6x中,你还需要在收到影子的对象的影子部分中勾选"收到透明"框,否则你将得到一个黑色的方形影子.
(
Noob Note:
In this case add a plane colored white just below the "leaf." This is the object the you should turn on
TraShadow
with as this is the object that will receive the shadow. This is also providing that you have a light source properly positioned.
)
:Noob 注意:在这种情况下,在"叶子"下方添加一个平面白色的颜色.这是你应该打开TraShadow的对象,因为这是接收阴影的对象.这也提供了你有正确的光源位置.