Blender 3D:零基础到专业级-单元2:基本建模和着色
Note: This tutorial uses the same modelling and texturing technique described in the well-known MAX tutorial by Adam Baroody (
http://www.3dluvr.com/rogueldr/tutorials/eye/eyes.html
). The sole purpose of my tutorial is to make this technique more popular among the Blender users by explaining how to achieve the same result with Blender.
::注意:本教程使用了亚当·巴罗迪 (Adam Baroody) 著名的MAX教程中描述的相同的建模和纹理技术 (http://www.3dluvr.com/rogueldr/tutorials/eye/eyes.html).本教程的唯一目的是通过解释如何在Blender用户中实现相同的结果来使该技术更受欢迎.
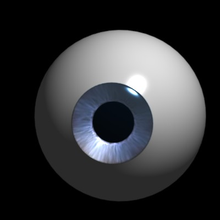
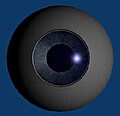
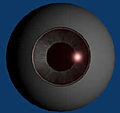
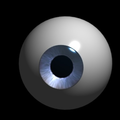
The goal of this tutorial is to make a Pixar-looking eye. One of the main reasons that Pixar's characters really convey life is in their eyes. They have depth, you can see how the eye not only shines but it "collects" light. You may think that you can't achieve this effect without raytracing but you're wrong. The secret of this depth is in the modelling of the eye. Let's see how it works!
::这教程的目标是制作一个像皮克斯的眼睛. 皮克斯的角色真正传达生命的主要原因之一在于他们的眼睛. 他们有深度,你可以看到眼睛不仅发光,而且"收集"光. 你可能认为你不能在没有光线追踪的情况下实现这种效果,但你错了. 这种深度的秘密在于眼睛的建模. 让我们看看它是如何工作的!
Parts of the Eye
::眼睛的部分
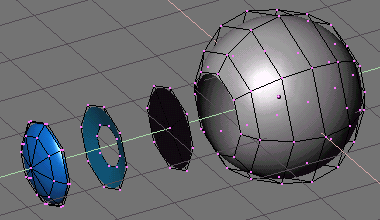
In this picture you can see the "ingredients" of the eye model. The blue mesh at the left is the cornea. Its shape allows for a small spot of specular light to appear on it even if the light is in a far side position. The mesh next to it is the iris. Now notice how it's a bit concave. That's the tricky part - the shape of the iris allows for a wide soft specular light to appear at the opposite side of the lamp direction. This fakes refracted light from the cornea and makes the illusion of "collecting" light and creates depth. The next mesh is the eye pupil - a simple circle.The pupil size is the same size as the iris hole. You can position it close to the inner side of the iris. And finally - the eyeball. It's a simple sphere with a hole in it.
::在这张图片中,你可以看到眼睛模型的"成分".左边的蓝色网格是角膜.它的形状允许一个小点的镜面光出现在它上,即使光在远侧位置.它旁边的网格是虹膜.现在注意它是如何有点的.这是棘手的部分 - 虹膜的形状允许一个宽的柔软的镜面光出现在灯光方向的对面.这假装从角膜折射光,并使"收集"光的幻觉和创建深度.下一个网格是眼睛的瞳孔 - 一个简单的圆.瞳孔的大小与虹膜孔的大小相同.你可以将它放在虹膜的内侧.最后 - 眼球.它是一个简单的球体,里面有一个洞.
I won't go deep into modelling of each element - it uses Blender's subdivision surfaces and it's quite simple as you can see.
::没有深入到每个元素的建模 - 它使用了Blender的分区面,
Materials
::材料
Now let's look at the materials.
::现在让我们看看材料.
Sclera
::巩膜
To make the eye white, press NUM3 to go into side view and add a UVsphere with 8 segments and 8 rings. To create the hole at the front of the eyeball, delete the 8 triangular faces that make up one end of the eyeball. Ctrl+Tab+3 to go into face select mode, B for border mode and select the middle 8 triangles as shown below, press Delete or the X button and LMB on Faces.
::为了使眼睛白,按NUM3进入侧视图并添加8段和8环的UV球. 为了在眼球前面创建洞,删除构成眼球的一端的8个三角形面. Ctrl+Tab+3进入面部选择模式,B为边框模式并选择下面显示的中间8个三角形,按Delete或X按和LMB在Faces上.
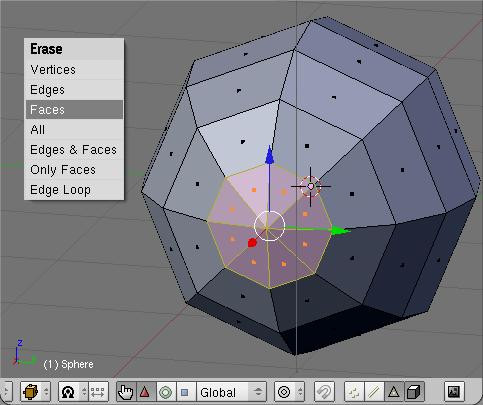
The resulting hole will be ringed by 8 vertices (which you could subsequently extrude and use to help you model the sections below - just a suggestion for those who feel capable)
::结果的孔将由8个顶点环绕 (您可以随后挤出并使用它来帮助您模拟下面的部分 - 只是对那些认为有能力的人的建议)
The
eye white
has white color and high values for Spec and Hard (depends on the lighting), as well as a moderately high Ref value (0.700 - 0.800). Optionally you can use a reflection map to make it look more wet but I usually don't do this.
::眼睛白色具有白色和高的Spec和Hard值 (取决于照明),以及中等高的Ref值 (0.700 - 0.800).可选地,您可以使用反射图使它看起来更湿,但我通常不这样做.
(Noob note: Using a Phong specular shader turned to work quite well.)
::现在, 的影子已经很好.
(User: Make sure shadow buttons are off or it will black out the iris. Spec and Hard are located in the Shaders tab.)
::标签和硬件位于"影子"选项卡中.
Iris
::红虹
-
Loop select the opening of the eye (ALT+RMB click edge of opening).
::选择眼睛的开口 (点击开口边缘的ALT+RMB).
-
Duplicate the loop (SHIFT+DKEY). Move the new loop away from the eye a bit perpendicular to the opening.
::重复循环 (SHIFT+DKEY).将新循环从眼睛稍远处垂直于开口.
-
With the loop still selected, extrude (EKEY). Without moving the extrusion, press ENTER.
::仍然选择循环,挤出 (EKEY). 没有移动挤出,按 ENTER.
-
Resize by half (SKEY then .KEY then NUM5 then ENTER).
::调整大小为一半 (SKEY 然后.KEY 然后NUM5然后ENTER).
-
Move the inner loop back toward the eye a bit to form the concave shape.
::让内环向眼睛转移一点, 形成形.
-
Create a
new material
and create a
new texture
called iris. Then hit F6 or click the spotty square icon
 to open the texture panel, choose Image as the texture type and then press Load Image button and use the image below.
::创建一个新的材料,并创建一个新的纹理叫做虹膜. 然后按F6或点击斑点方形图标打开纹理面板,选择图像作为纹理类型,然后按下载图像按并使用下面的图像.

Here is the eye texture taken from the picture above:
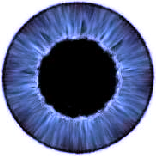
::这里是上面的图片所拍摄的眼睛质感:
Alternatively
, you can create an image like this procedurally, using the technique described
here
.
::另外,你可以使用这里描述的技术,
All that is required now is a bit of tweaking of the texture size using the Xsize and Ysize values in the Map Input tab, and scaling the pupil hole size in Edit mode. Also please remember to change 'Projection' in the map input settings from 'flat' to 'cube'. You can tweak the RGB values and brightness/contrast of the image to achieve the appearance you want. Use a smaller value for Hard (about 50) otherwise you'll have a too shiny look instead of soft specular that fakes refracted light. The Spec value depends on the energy and distance of the light that illuminates it. Generally you'll need to take care that the refracted light on the iris should be no more than half as bright as the small specular spot on the cornea - otherwise you'll achieve the bad effect of two specular spots. Oh, another important thing - join the four meshes before tweaking the texture coordinates. Otherwise you'll have to do the job twice after you join them, because the texture space is changed. And activate shadeless button.
::现在只需要在"地图输入"选项卡中使用Xsize和Ysize值调整纹理大小,并在"编辑"模式中调整瞳孔大小. 请记住在"地图输入"设置中从"平"更改为"立方体".您可以调整图像的RGB值和亮度/对比度以达到您想要的外观. 使用较小的Hard值 (约50),否则您将会有太光亮的外观,而不是假装折射光的软光镜. 镜面值取决于照射光的能量和距离. 一般情况下,您需要注意虹膜上的折射光线不应超过角膜上的光镜小的半个亮度 - 否则您将达到两个光镜的差异. ,另一个重要的事情是 - 在您改变
Pupil
::学生
The material for the pupil is a simple black color with the "shadeless" button on.
::学生的材料是简单的黑色, 带有"无阴影"按.
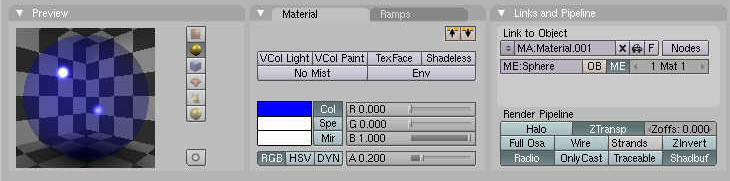
Cornea
::视角膜
The cornea uses a transparent material (
alpha = 0.1
) with
Spec = .6
,
Hard = 255
and
SpecTra = 1
. "
Ztransp
" should also be turned on (found under Links and Pipelines tab). The cornea is simply a piece that fits exactly in the middle of the hole in the eye white. Make sure that the 'Traceable' button, under Render Pipeline, in the Links and Pipelines tab, is switched off.
Noob note: It may be helpful to turn off Shadebuff since you don't generally want the cornea to cast a shadow.
::角膜使用透明材料 (alpha = 0.1),Spec = .6,Hard = 255和SpecTra = 1. "Ztransp"也应该打开 (在链接和管道选项卡下).角膜只是一个恰到眼睛白色中孔的部分.请确保在链接和管道选项卡下的"可追踪"按关闭. 笔记:关闭Shadebuff可能有帮助,因为你通常不希望角膜投射阴影.
Lighting
::照明
The lighting is simple - move the eye to a new layer, create a new lamp and make the lamp affect only this layer. Position the lamp at a good angle so you have a small shiny spot of specular light on one side of the iris and a soft spot of "refracted" light on the other side. You can use a backlight to prevent the eyeball from being too dark at the non-illuminated part.
::照明很简单 - 将眼睛移到一个新的层,创建一个新的灯,使灯只影响这个层. 将灯放置在一个良好的角度,这样你就会在虹膜的一侧有一个小的闪光光点和另一侧有一个"折射"光的软点. 你可以使用背光来防止眼球在非照明部分太黑暗.
To move the newly created lamp to a new layer, press SHIFT+M and select the second blue button and press OK.
Note though that it is not mandatory to create a new layer; it's just meant to prevent cluttering in your main workspace. It's completely optional.
::要将新创建的灯移到新层,请按 SHIFT+M,选择第二个蓝色按,然后按 OK.请注意,创建新层并不强制;它只是为了防止您的主工作空间的杂乱.这是完全可选的.
That's it! Now you're (almost) ready to start with character animation. You have a nice eye, now you only need a character for it!
::现在你 (几乎) 准备开始动画角色了. 你有个好眼睛,现在你只需要一个角色!
Changing the Eye Color
::改变眼睛的颜色
You can change the color of the eye by either changing the cornea color, or by changing the iris color itself. Changing the cornea color might be like putting on colored contacts.
::改变眼睛的颜色可以通过改变角膜的颜色,也可以通过改变虹膜的颜色.
Changing the Cornea Color
::改变角膜颜色
To change the cornea color, do the following:
::为了改变角膜的颜色,请做以下操作:
-
In the mesh which is used to create Cornea set the value of the alpha slider to 0.2 (or more if you desire)
::在网格,用于创建角膜设置的值的阿尔法滑块为0.2 (或更多,如果你希望) -
Change the color of the mesh to whatever color you like
::改变网格的颜色到任何你喜欢的颜色 -
Turn off traceble
::关闭可追踪 -
Render!
::让我们!
(and remember to smooth out everything by selecting the particular mesh going to edit buttons and clicking on set smooth)
::通过选择特定的网格将编辑按,并点击设置光滑)
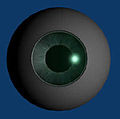
Changing the Iris Color
::改变虹膜的颜色
To change the iris color you can either edit the iris image external from blender or you can modify the RGB values of the image when imported into Blender.
::为了更改虹膜颜色,您可以从混合器编辑虹膜图像,也可以在导入到混合器时修改图像的RGB值.

Troubleshooting
::解决问题
I don't know where is the "SpecTra" Value. I'm working on 2.46.
::我不知道"SpecTra"值在哪里. 我正在工作2.46
You can find "SpecTra" under "Mirror Transp"
::您可以在"镜像转换"下找到"SpecTra"
My cornea isn't transparent. I don't know where Traceable is since I'm using 2.6x
::我不知道可追踪的位置, 因为我使用2.6x
This applies to 2.6. Something that doesn't seem to be mentioned in this tutorial (sorry if it is and I missed it) is the cornea's shadow settings. If it casts a shadow, it will block out everything inside the eye. So under the cornea's Material->Shadow settings uncheck the cast box. Another option is to leave the cast box in your cornea on, and change to shadow setting in your iris. Check the Receive Transparent, and that works just as well.
::“这适用于2.6版本。本教程中似乎没有提到的(如果提到了但我错过了,请原谅)是角膜的阴影设置。如果它投射阴影,它会遮挡眼睛内部的所有东西。因此,在角膜的 ‘材质->阴影’ 设置下,取消勾选 ‘投射’ 框。另一个选项是保留角膜的 ‘投射’ 框勾选,然后更改虹膜的阴影设置。勾选 ‘接收透明’,这样效果也一样好。”