Blender 3D:零基础到专业级-单元2:基本建模和着色
What Blender calls
surfaces
are more commonly referred to in computer graphics as
patches
. It makes sense to stick to the commonly-accepted terminology, particularly when talking with users of other software.
::混器所称的表面在计算机图形中更常见的是补丁. 坚持普遍接受的术语是有意义的,特别是在与其他软件的用户交谈时.
You previously saw how a NURBS curve consisted of a single row of any number of control points. A NURBS patch consists of an
n
-by-
m
grid of points, where
n
and
m
can be any positive integer (and not necessarily equal). The grid has a rectangular topology, but of course the points may be positioned anywhere in space, to shape the curve accordingly. The resulting object can look a bit like a mesh in edit mode, but it behaves very differently.
::你之前看到的 NURBS 曲线是由任意数量的控制点组成的单行. NURBS 补丁由一个 n×m 的点网格组成,其中 n 和 m 可以是任意正整数 (不一定等于). 网格具有矩形拓,但当然点可以在空间中的任何位置定位,以相应地塑造曲线. 结果的对象在编辑模式下看起来有点像网格,但它的行为非常不同.
Your First NURBS Patch
::您的第一个NURBS补丁
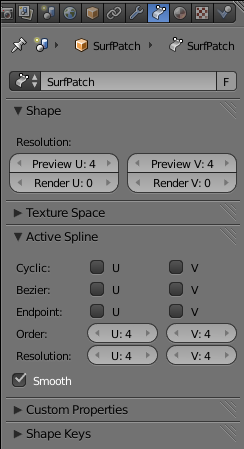
Start a new document, delete the default cube, bla-bla-bla, but stay in Object mode. Add a new NURBS surface: SHIFT + A →Surface→NURBS Surface. Switch to Edit mode, and find the Surface Context
![]() in the Properties window.
in the Properties window.
::启动一个新文档,删除默认的立方体,但保持对象模式. 添加一个新的NURBS表面: SHIFT + A →Surface→NURBS Surface. 切换到编辑模式,并在属性窗口中找到表面上下文.
For NURBS curves, you previously had the “Cyclic: U” and “Endpoint: U” options for making the curve open or closed, and extending all the way to the endpoints or not. Now you also have “Cyclic: V” and “Endpoint: V”, because the surface has two dimensions, and you can control these settings independently along each dimension. Try checking just one Cyclic box at a time, and the patch turns into a closed ribbon shape along the corresponding dimension; check both, and it forms a solid object, shaped perhaps reminiscent of a pillow or an unusual loaf of bread.
::对于NURBS曲线,以前有Cyclic:U和Endpoint:U选项,可以使曲线开放或关闭,并延伸到终点或不.现在你也有Cyclic:V和Endpoint:V,因为表面有两个维度,你可以在每个维度上独立控制这些设置.试着一次只检查一个Cyclic框,补丁沿着相应的维度变成一个闭带形状;检查两者,它形成了一个固体物体,形状可能让人想起枕头或一个不寻常的面包.
As with the curve case, you can move selected points around to alter the shape of the curve, and adjust the “W” value of each point to control how strongly it attracts the curve. Radius-scaling and tilt settings are still adjustable, but don’t seem to achieve anything, since you can’t apply a bevel to a surface.
::与曲线的情况一样,您可以移动选定的点来改变曲线的形状,并调整每个点的W值以控制它吸引曲线的强度.半径缩放和倾斜设置仍然可调节,但似乎没有什么效果,因为您不能将形应用于表面.
Adding and Removing Control Points
::增加和删除控制点
Adding and deleting points in a NURBS surface need to follow some rules. The irritating thing is, if you try to do things not in accordance with these rules, Blender will simply ignore you, with no error message.
::在NURBS表面中添加和删除点需要遵循一些规则.令人火的是,如果你试图做一些不符合这些规则的事情,Blender将简单地忽略你,没有错误信息.
Remember how I said that the control points form a
n
-by-
m
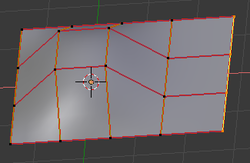
rectangular grid? Any addition or deletion of points must preserve this characteristic. Thus, you can only add or remove points an entire row or column at a time. For example, to extend the patch, you select all the points along one outermost edge of it, and press E to add the same number of new points.
::记得我说过控制点形成一个n×m的矩形网格吗?任何添加或删除点必须保留这个特征.因此,您只能一次添加或删除一整行或列的点.例如,为了扩展补丁,您选择沿着一个最外边的点选取所有点,然后按E添加相同数量的新点.

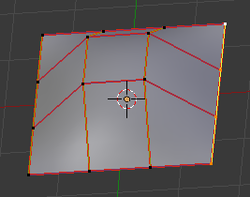
Or you can select all the points in two adjacent rows or columns, and use W →Subdivide to add a new row/column of points in-between. Similarly, you can only delete points by selecting an entire row or column of them at a time.
::您也可以选择两个相邻的行或列中的所有点,并使用W →Subdivide添加一个新的行/列之间的点.同样,您只能通过一次选择整个行或列删除点.
NURBS Curve, NURBS Circle?
::没有任何的形,没有任何的圆形?
The first two options in the SHIFT + A →Surface menu are “NURBS Curve” and “NURBS Circle”. Try adding these objects; at first glance, they look exactly like the “Nurbs Curve” and “Nurbs Circle” entries in the SHIFT + A →Curve menu. However, regardless of appearances, these really are surfaces, not curves.
::转换+A →表面菜单中的前两个选项是NURBS 曲线和NURBS 圆.尝试添加这些对象;一看,它们看起来完全像转换+A →曲线菜单中的Nurbs 曲线和Nurbs 圆条目.然而,无论外观如何,这些实际上是表面,而不是曲线.
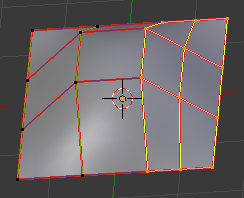
To observe the difference, ensure all points are selected, and now use E to extend the curve: this will create a
whole row
of new control points, instead of just one! As with the different options in the SHIFT + A →Curve menu, the ones in SHIFT + A →Surface offer premade objects for you to choose whichever is the most convenient starting point for the shape you actually want to create.
::为了观察差异,请确保选中了所有点,然后使用E扩展曲线:这将创建一个全新的控制点的行,而不是一个!正如在SHIFT + A →Curve菜单中的不同选项一样,SHIFT + A →Surface中的选项提供预制对象,让您选择哪一个是最方便的开始点,以实现您实际想要创建的形状.