Blender 3D:零基础到专业级-单元2:基本建模和着色
Once you're satisfied with the shapes of individual objects, you'll want to combine them into a coherent scene. You do this in Object Mode.
::一旦你对个体的形状感到满意, 你就想将它们组合成一个连贯的场景.
In this module, you'll learn how to move objects to and from layers. You'll also learn how to rename and parent objects, and you'll get an introduction to Outliner Windows.
::在这个模块中,你将学习如何将对象移动到层和从层移动. 你还将学习如何重命名和父对象,
You'll need the person-and-hat scene from the previous module. If you haven't done it, either go back and do it now or else download the pre-made model from Yosun Chang's website at
http://www.nusoy.com/blender
.
::您需要从前一个模块中使用人与帽子的场景.如果您还没有使用过,请现在重新使用,或者从Yosun Chang的网站下载预制模型.
Adjusting an Object's Median Point
::调整一个物体的中点
-
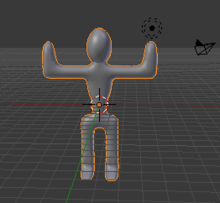
Load the person-and-hat scene.
::装上一个人和帽子的场景. -
Make sure Blender is in Object Mode.
::确保混合器在对象模式. -
Switch to Layer 2, select the hat and press M . A dialog box will pop up for you to choose which layer to move it to. Either press
1
(the number on top of the keyboard,
not
the numberpad) or select the first box in the popup.
::切换到2层,选择帽子并按M. 会弹出一个对话框,您可以选择移动到哪个层. 要么按1 (键盘顶部的数字,而不是数字板),要么选择弹出窗口中的第一个框. -
Select the person you made earlier.
::选择你之前创建的人.
Just as you did in Edit Mode, you can specify the pivot for rotating and scaling objects in Object Mode. If you just finished the previous module, the pivot is probably set to "3D Cursor". If so, change it back to "Median Point".
::像在编辑模式中一样,你可以在对象模式中指定旋转和缩放对象的转点.如果你刚刚完成上一个模块,则转点可能设置为"3D 标签".如果是这样,请将其更改为"中位点".
In Edit Mode, the "Median Point" for pivoting is the geometric center of all selected vertices, edges, or faces. In Object Mode, however, it's the origin of the selected object's local coordinates, indicated by an orange dot. In other words, the origin might lie far from the object's geometric center.
::在编辑模式中,旋转的"中点"是所有选定的顶点,边缘或面的几何中心.然而,在对象模式中,它是选定的对象的局部坐标的起源,用色点表示.换句话说,起源可能远离对象的几何中心.
You can use buttons in the Tools Shelf to reunify an object's origin with its geometric center:
::你可以使用工具架上的按将一个对象的起源与它的几何中心重新连接起来:
-
With Blender in Object Mode, click LMB on
Set Origin
in the Tool Shelf (under the "Edit" sub menu of
Tools
) and select
Origin To Geometry
(Blender 2.70: "Object" -> "Transform" -> "Origin to Geometry") to move the selected object's origin to its geometric center (without changing the object's appearance).
::在Blender在对象模式下,单击工具架中的Set Origin (在工具子菜单"编辑"下) 的LMB,然后选择Origin To Geometry (Blender 2.70:"对象" -> "转换" -> "Origin to Geometry") 将所选对象的起源移动到其几何中心 (而不改变对象的外观).
|
|
When more than one object is selected, Blender uses the average of their median points as the median point for pivoting.
|
This can be useful when you want a better picture of your object. With the origin set to the person's geometric center, you can now snap the object with Shift+S to the 3D cursor. This will let you view more of the model at one time and make for a faster editing workflow.
::这可以在想要更好的图像时有用. 设置原点为人体的几何中心,现在可以将对象用Shift+S快速移到3D光标. 这将让您一次查看更多模型,并使编辑工作流更快.
Positioning the Hat
::帽子的位置
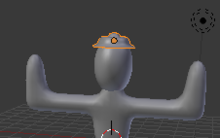
Once you have the hat properly oriented, move it into position on the person's head. The grab tool enables you to position objects in Object Mode in the same way you positioned vertices, edges, and faces in Edit Mode.
::一旦你把帽子正确定位,将它移动到人头上的位置.抓取工具使您能够在对象模式中将对象定位,就像在编辑模式中定位顶点,边缘和面部一样.
-
Make sure Blender is in Object Mode.
::确保混合器在对象模式. -
Click RMB on the hat object to select it.
::在帽子对象上点击人民币来选择它. -
Activate the grab tool by pressing G .
::通过按G激活抓取工具.
As you move the mouse pointer, the hat will move around in the viewport. By default, the movement plane is perpendicular to the view axis, so the hat will move differently depending on which viewpoint you're working in.
::随着鼠标指针移动,帽子会在视窗中移动. 默认情况下,移动平面是垂直于视轴,因此帽子会根据您正在工作的视角移动.
Just as in the Edit Mode grab tool, you can:
::您可以使用"编辑模式"抓取工具:
-
Restrict the direction of motion by pressing X , Y , or Z . Press once to move parallel to a global axis, twice to use a local axis. (Press the same key a third time to return to view-plane motion.)
::通过按 X , Y 或 Z 键限制运动方向.按一次以平行移动到全球轴,按两次以使用本地轴. (按同一个键第三次返回视图平面运动). -
To restrict motion to the global X-Y plane, lock the global Z by pressing Shift + Z .
::通过按住Shift+Z, 锁定全球Z. -
Hold down Ctrl to restrict motion to discrete steps (typically one Blender unit).
::按住Ctrl以限制动作到离散步骤 (通常是一个混合器单元). -
Hold down Shift to get finer control over the motion.
::按住Shift以更好地控制运动. -
Click LMB or press Enter to finalize the position and exit the tool.
::点击LMB或按Enter以完成位置并退出工具. -
Click RMB or press Esc to return the object to its previous position and exit.
::点击人民币或按 Esc 将物体返回原位置并退出.
Use two different orthographic views to position the hat on the person's head. You will probably want to scale the hat to make it fit the person's head better. When you are doing this along the X or Y axis, make the changes symmetrical by specifying the axes you want scaling to be constrained to. This option is available in the Operator panel (just below the Tool Shelf) and also by pressing F6.
::使用两个不同的拼写视图将帽子放在人的头上.您可能会想要缩小帽子,使其更好地适合人的头.当您沿X或Y轴进行此操作时,通过指定您想要缩小的轴来使变化对称.此选项可在操作员面板 (在工具架下方) 和按F6中使用.
Parenting the Hat to the Person
::让孩子成为父母

Once you have the hat properly sized and positioned on the person's head, you'll want it to stay there. In order to maintain such a cozy relationship between two objects, you'd have to remember to select them both before rotating, moving, or scaling. A drastic solution might be to join them into a single object using Ctrl + J .
::一旦你把帽子正确大小和位置放在人头上,你就希望它留在那里.为了保持两个对象之间的这种舒适关系,你必须记住在旋转,移动或缩放之前选择它们.一个激烈的解决方案可能是使用Ctrl + J将它们合并为一个单一的对象.
A better compromise is to Parent the hat to the person. Parenting creates a relationship between two objects, such that certain changes to one object (called the Parent object) automatically affect the other (called the Child object). Changes to the child, however, do not affect the parent.
::更好的妥协是把帽子交给父母.父母创造了两个对象之间的关系,使一个对象 (称为父母对象) 的某些变化自动影响另一个 (称为子女对象).对孩子的变化,然而,不会影响父母.
Note that an object can have many children, but only one parent.
::需要注意的是,一个物体可以有很多子,但只有一个父.
Since the person is bigger than the hat, it's logical to parent the hat to the person (meaning: parent = person, child = hat) instead of vice versa.
::既然人比帽子大,所以把帽子归于人 (意思是:父母=人,孩子=帽子) 而不是反之.
-
Make sure Blender is in Object Mode.
::确保混合器在对象模式. -
Click RMB on the hat object to select it.
::在帽子对象上点击人民币来选择它. -
Click Shift + RMB on the person object.
- Both the person and the hat should now be selected. The order of selection is important here.
::按一下"Shift + RMB"的"人"对象.现在应该选择人和帽子.选择顺序在这里很重要. -
Press Ctrl + P to parent the hat to the person.
::按Ctrl+P将帽子与人进行亲属关系. -
Select
Object
. The most recently selected object becomes the parent of all other selected objects.
::选择对象.最近选择的对象成为所有其他选择的对象的父.
|
|
Pressing P in the object mode instead of Ctrl + P will start the Blender game engine. To stop the game engine, press Esc .
|
Now when you move the hat you will see a line from the hat to the person, indicating that the person is the hat's parent. And if you move the person, the hat will move with it.
::现在,当你移动帽子时,你会看到一条从帽子到人的线, 表明这个人是帽子的父母. 如果你移动这个人, 帽子也会随之移动.
You may get an error saying something like
Loop to Parents
, fix this by clearing all previous parents with Alt + P .
::通过 Alt+P 清除所有之前的家长来解决这个问题.
Renaming Objects
::改名对象
When you have multiple objects in a scene, it helps to give each one a name.
::给每一个物体一个名字有助于你在场景中找到多个物体.
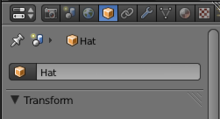
Click on the
Objects
tab in the Properties panel (the one with a box icon).
::在属性面板的Objects选项卡上 (带有框图标的选项卡).
-
Now select the hat by clicking RMB on it.
::现在选择帽子点击人民币. -
At the very top of the tab you should see a dialog box with the name of your object
-
The hat's name might be something like "Circle" depending on which mesh primitive you first built the hat from.
::帽子的名字可能是"圆"之类的, 取决于你最初使用的原始网格.
::帽子的名字可能是"Circle"之类的, 这取决于你最初使用的网格原始化. -
The hat's name might be something like "Circle" depending on which mesh primitive you first built the hat from.
-
Click LMB on the dialog box and type in a more descriptive name like "Hat".
::在对话框中点击LMB,然后输入一个比较描述性的名称,比如"帽子".
You have now changed the name of the hat's object datablock. This name change will be reflected in the Outliner, which we will look at shortly.
::现在您已经改变了帽子对象数据块的名称. 这个名称的更改将反映在Outliner中, 我们将在不久后看看.
Now select your person by clicking RMB on it and repeat the process, changing the name to something like "Person".
::现在选择一个人, 单击人民币, 再重复这个过程,
Outliner Windows
::大纲窗口
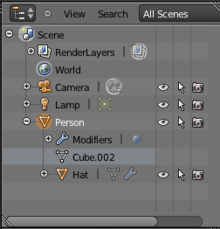
Once you give objects names, it helps to have a way to find objects by their name and parent. This is exactly what the Outliner is for and it comes in very handy when you are working with a large scene. The Outliner is usually just above the Properties panel. You may want to pull it down a bit to see it more clearly.
::一旦你给对象命名,它有助于有办法找到对象的名称和父. 这正是Outliner的目的,当你在处理一个大场景时,它非常实用. Outliner通常位于属性面板的上方. 你可能想把它拉下来看得更清楚.
You'll notice that all the objects in your scene (Person, camera etc) are listed and that you can select these objects by clicking LMB on them. And if you click RMB on an object, a menu will pop up with options like
Select
,
Deselect
,
Delete
etc. If you select the Person and then click the "+" sign to its left, you will see that the Hat is listed below the person. This is because Blender lists all children objects beneath their parents.
::你会注意到,你场景中的所有对象 (人,摄像头等) 都被列出,你可以通过点击LMB来选择这些对象.如果你点击对象上的RMB,会弹出一个菜单,选择,取消选择,删除等选项.如果你选择人,然后点击左边的"+"符号,你会看到帽子在人下面列出.这是因为Blender列出了所有子对象在他们的父母下面.
On the right of each object there are a series of icons which represent the state of the object. For example, the eye icon means that your object is visible in the 3D viewport. You can turn off its visibility by clicking LMB on the eye, which will turn grey; click again on the eye to make it visible. If you hover the mouse over the icons a text box will pop up with a description of what that particular icon does.
::每个对象的右侧都有一系列的图标,代表对象的状态.例如,眼睛图标意味着你的对象在3D视窗中可见.你可以通过点击眼睛上的LMB来关闭它的可见性,它将变成灰色;再次点击眼睛使它可见.如果你将鼠标移动到图标上,一个文本框将弹出,描述该特定图标的功能.
Good on ya' mate!
::很好,你的朋友!
Congratulations!! You have now finished your simple character. Pat yourself on the back, and have a celebratory coffee! (Or pop!)
::恭喜你!你现在完成了你简单的角色.