Blender 3D:零基础到专业级-单元2:基本建模和着色
Setup
::设置
Start with the
default scene
: it should contain a selected cube. Delete this cube by pressing X →
Delete
.
::首先是默认场景:它应该包含一个已选的立方体.通过按 X → Delete 删除这个立方体.

Put the 3D cursor at the scene center by pressing Shift + C .
::将3D光标放在场景中心,按下Shift+C.
- Note: after deleting the cube you must be in Object Mode . If not, Press CTRL-Z and switch with TAB and redo the operation.
Creating the body
::创造身体
Noob note:
to ensure that you don't become confused, make sure that your viewport is set up in the same direction you see in these pictures. The colored arrows are red, green, and blue and they control the
x
,
y
, and
z
axes, respectively.)
::为了确保您不会感到困惑,请确保您的视窗设置在与图片相同的方向.彩色箭头分别是红色,绿色和蓝色,它们控制x,y和z轴.
-
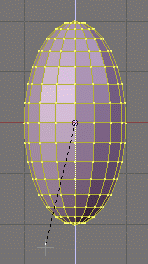
We start by creating our main body from a sphere. Press SHIFT + A
→ Mesh → UVSphere
, then choose 16 segments and 16 rings.
::我们首先从球体中创建主体. 按 SHIFT + A → Mesh → UVSphere,然后选择 16 个段和 16 个环.
We're going to make it look like a penguin body:
::我们将使它看起来像是企的身体:
-
Press TAB to enter Edit mode
::按TAB进入编辑模式 -
press NUM1 to switch to the front view,
::按 NUM1 切换到前视图, -
with all the vertices selected (if not, A ), choose the scale tool ( S ),
::选中所有顶点 (如果没有,则选择A),选择尺度工具 (S), -
restrict scaling to the Z-axis ( Z ),
::限制缩放到Z轴 (Z), -
and move the mouse away from the 3D cursor while holding down the CTRL key (this snaps the scale values to whole numbers),
-
Note:
Make sure the mouse cursor is not too far away from the sphere when hitting the S or else you may not be able to reach a 2.000 scale value. The scaling steps are proportional to the distance from the 3D cursor when calling the scale tool.
::注意:请确保鼠标标 cursor 在击中 S 时与球体距离不远,否则您可能无法达到 2.000 个尺度值.调用尺度工具时,缩放步骤与 3D 标 cursor 距离成比例.
::按住CTRL键 (这将尺度值转换为整数),并将鼠标移开3D光标. 注意:请确保鼠标光标在按下S时与球体距离不太远,否则您可能无法达到2.000光标值. 调整尺度的步骤与调用尺度工具时与3D光标距离成比例. -
Note:
Make sure the mouse cursor is not too far away from the sphere when hitting the S or else you may not be able to reach a 2.000 scale value. The scaling steps are proportional to the distance from the 3D cursor when calling the scale tool.
-
the current scale shows in the lower left corner of the viewport, click when you've reached 2.000 LMB ).
-
Note:
You can also do this by typing in 2 after starting the scale and restricting movement to the Z-axis
: S -> Z -> 2
::注意:您也可以通过打入2开始后的规模和限制运动到Z轴:S -> Z -> 2
::标尺显示在视窗的左下角,点击当你达到2000 LMB). 注意:你也可以通过打入2开始标尺后,限制运动到Z轴:S -> Z -> 2 -
Note:
You can also do this by typing in 2 after starting the scale and restricting movement to the Z-axis
: S -> Z -> 2
This is our main body!
::这是我们的主体!
Shaping the head
::塑造头部
We’re going to shape the penguin head from the top of the sphere.
::我们将从球顶开始塑造企头.
Start by selecting the top-most single vertex as well as the top two smallest circle segments.
::首先选择最顶的单个顶点以及最顶的两个最小的圆段.
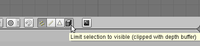
- Note: Selection has been explained in a previous tutorial . Here, the easiest methods are either box selection B ) in the front view NUM1 ) and Limit selection to visible off, or lasso selection ( CTRL + LMB ) in the top view ( NUM7 ) and Limit selection to visible on. You can also switch to top view, center your mouse on the topmost vertex and use the circle tool. Don't forget to deselect all first ( A )
- Noob note: You can also select the top vertex and press CTRL + NUM+ twice to select the circle segments.
- Noob note: Make sure the Limit selection to visible/Occlude background geometry button is in the right state each time you select vertices, edges or faces. When it's off, selection affects any item, visible or not.
Building the neck with the 3D transform manipulators
::使用3D转换操纵器构建子
To turn on the 3D transform manipulator, either push down its button
![]() or use CTRL + SPACE and choose
Enable/Disable
.
or use CTRL + SPACE and choose
Enable/Disable
.
::要打开3D转换操作器,要么按下它的按,要么使用CTRL+SPACE,然后选择启用/禁用.
Moving the two selected circles up
::移动两个选定的圆圈
Go to the front view ( NUM1 ). Drag the blue arrow while holding the CTRL key down to move the selected vertices 0.3 units up.
::移动到前视图 (NUM1). 拖动蓝色箭头,同时按住CTRL键,将所选的顶点向上移动0.3个单位.
- Noob note: you may not be able to snap the extrusion lengths to tenths of units. CTRL snaps to the grid size by default: if you can only translate by one unit (1.0), zoom in until the grid divides itself into tenths ( SCROLL ). Some Blender versions allow to snap to one tenth of the current step by holding both the SHIFT and CTRL keys while moving the mouse.
- Noob note: instead of the Transform manipulator, you can use the G and constraint the movement to the Z axis ( Z ).
Rotating the neck
::子的旋转
Now switch to the side view ( NUM3 ) and make sure that the rotation/pivot point is set to "median point" either by selecting it from the third drop down menu right of the "Mesh" menu, or by pressing CTRL + , . Choose the
Rotate
tool ( R ). Move the mouse with the CTRL key down to rotate the selection 30 degrees counter-clockwise. Use LMB to validate the rotation.
::现在切换到侧面视图 (NUM3) 并确保旋转/转点设置为"中点",要么通过在"网格"菜单右侧的第三个下拉菜单中选择它,要么通过按下CTRL + .选择旋转工具 (R). 将鼠标移动到CTRL键下方,以逆时针方向旋转30度. 使用LMB验证旋转.
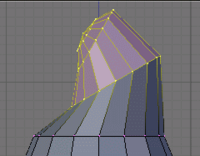
Select an additional ring of vertices by expanding the selection ( CTRL + NUM+ (
Note:
NUM+
Refers to the addition symbol on the NUM Pad,
KEY+
will not do.
). You can contract the selection by pressing CTRL + NUM− . Move these vertices an additional 0.3 units up, then rotate them as previously 30 degrees counter-clockwise in the side view.
::通过扩展选择 (CTRL + NUM+ (注意:NUM+ 引用NUM Pad上的加法符号,KEY+ 不适用). 通过按CTRL + NUM− 缩小选择. 将这些顶点移动到额外的0.3个单位,然后像以前一样在侧面视图中反时针方向旋转30度.

Repeat those steps (selection expansion, translation and rotation) two more times and you'll end up with the body seen in the below.
::通过重复这些步骤 (选择扩展,转换和旋转) 两次,
That doesn’t really look like a penguin, yet!
::这看起来不像是企,还!
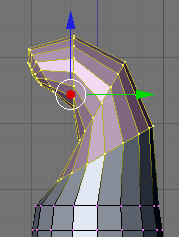
Now move all of the selected vertices to the left 0.4 units by pulling the manipulator's green arrow (and of course holding the CTRL key down). This straightens out the neck as seen in the next picture.
::现在将所有选定的顶点移向左边0.4个单位,通过拉动操纵器的绿色箭头 (当然还要按住CTRL键). 这样可以将子伸直,如下图所示.
- Noob note: you can also use the G and translate the selection by -0.4 as displayed in the bottom left corner of the viewport. Still do this in the side view ( NUM3 ).
- Noob note if you had to pull the red arrow, not the green one, then you probably didn't switch to side view, and modeled the neck in front view. If you realize here that you have this done from another view then press AKEY twice, then NUM7, then Space -> Transform -> Rotate and type 90 or 270
Creating the beak
::创造嘴
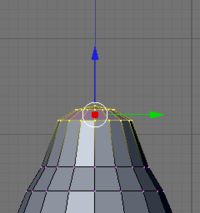
Switch to the front view ( NUM1 ), and select the frontmost vertex (the one that originally was the top vertex of the sphere) with the RMB . Then switch to the side view ( NUM3 ) and translate this vertex to the left by 1.2 units using the manipulator's green arrow or the translate tool.
::切换到前视图 (NUM1) 并选择前顶点 (原本是球的顶顶点) 与人民币. 然后切换到侧视图 (NUM3) 并使用操纵器的绿色箭头或翻译工具将该顶点向左移动1.2个单位.
-
Note:
some Blender versions allow moving the vertices from the keyboard with the following sequence: G , Y , -1.2, ENTER .
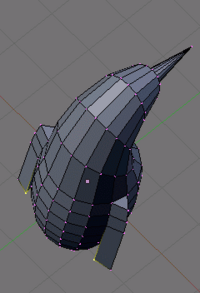
The main body of the penguin is now finished. The next step is to create some flappers for the poor little guy.
::企的身体已经完成了. 下一步是为可怜的小人制作一些.
Extruding the wings
::挤出机翼
We are going to create the wings by extruding faces on each side of the penguin.
::我们将通过挤出企两侧面孔来制造翅膀.
- Noob Note: You can rotate the whole object by pressing A to select all of its vertex and then rotate it pressing R or using the Rotate Manipulator until the axis on your screen matches the axis on the example image. That way, also, you can practice a little more.

Choose the side view ( NUM3 ) and switch to the
Face select mode
( CTRL + TAB →
Faces
, or click on the orange-sided cube icon in the toolbar).
::选择侧面视图 (NUM3) 并切换到面部选择模式 (CTRL + TAB → 面部,或点击工具中的色面立方图标).
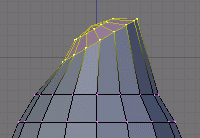
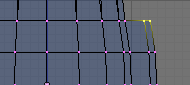
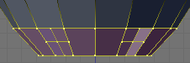
Now, select two faces that will make up the penguin’s shoulder as shown on the right (either select the first one with RMB and the second one holding SHIFT , or use box selection ( B ) to select them both in a single operation).
::现在,选择两个将构成企肩膀的面孔,如右图所示 (要么选择第一个带有人民币的面孔,第二个持有SHIFT,要么使用框选择 (B) 在单个操作中选择它们).
Then switch to front view ( NUM1 ) and extrude the selection:
::然后切换到前视图 (NUM1 ) 并挤出选择:
-
choose E →
Region
,
::选择E → 地区, -
constrain to the X axis ( X ),
::限制在X轴 (X), -
hold CTRL to snap,
::按住CTRL进行快速移动, -
and move the mouse to extrude the shoulder by 0.2 to 0.3 units.
::移动鼠标以使肩部挤出0. 2到0. 3单位.
We'll now extrude the bottom face of this new extrusion. Rotate the view to show it with:
::现在我们将挤出这个新的挤出的底面. 旋转视图以显示它:
-
a MMB drag,
::一个MMB阻力, -
or several presses on NUM2 ,
::或在NUM2上进行几次压力, -
or CTRL + NUM7 (bottom view).
::或CTRL+NUM7 (下方的视图)
Press the A to deselect all, and select the bottom face ( RMB ), switch to front view ( NUM1 ), extrude by 1.4 units down ( E and CTRL ).
::按A取消选项,选择底面 (人民币),切换到前视图 (NUM1),向下挤出1.4单位 (E和CTRL).
Now do the same on the penguin's other side: use CTRL + NUM3 to view the left side (you can also rotate with MMB , or press NUM4 several times).
::现在在企的另一边做同样的事情:使用CTRL+NUM3查看左侧 (您也可以用MMB旋转,或按NUM4几次).
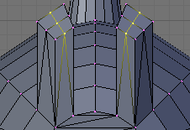
Smoothing the wings
::平滑翅膀
We’re going to smooth out the shoulders and improve the wings. Though this can be done in many ways, we'll only use the merge tool.
::我们将把肩膀整平,并改进翅膀. 虽然这可以用多种方式,
Rotate your penguin so that you can see one shoulder from above. Then switch to
Vertex select mode
( CTRL + TAB →
Vertices
). Press A to deselect all, then select the two shoulder vertices with RMB and SHIFT .
::旋转你的企,这样你就可以从上面看到一个肩膀. 然后切换到顶点选择模式 (CTRL + TAB → 顶点). 按A取消选择所有,然后选择两个肩膀顶点与RMB和SHIFT.
Press ALT + M , choose
At Center
from the popup in order to merge the two vertices at their center. Finally dismiss the message saying
Removed 1 Vertices
.
::按下ALT+M,从弹出窗口中选择"在中心"以合并两个顶点. 最后,删除"删除1个顶点"的消息.
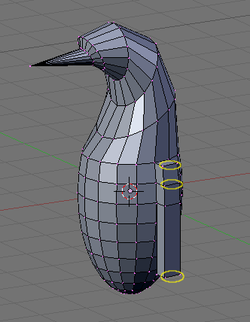
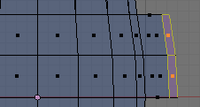
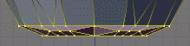
Repeat the steps with the two other vertex pairs shown on the right picture, and smooth the other wing. I’m leaving the middle segments for now, else the wing tips will be too pointy.
::复制右图中的两对顶点,然后平滑另一侧. 我暂时留下中间部分,否则翼尖会太尖.
- Note: if you have troubles merging vertices, it comes from vertex duplicates in your mesh. You probably chose Individual Faces instead of Region when extruding the wings, which creates duplicate vertices and neighbouring faces. To clean up your model: select all vertices ( A ) and choose W → Remove Doubles .
You must do them one by one!
::你必须一个接一个地做!
Or, Alternatively, change into
Edge select mode
( CTRL + TAB →
Edge
), select the edges to smooth ( CTRL + LMB ), press ALT + M , choose
Collapse
::选择边缘选择模式 (CTRL+TAB → 边缘),选择边缘以平滑 (CTRL+LMB),按ALT+M,选择
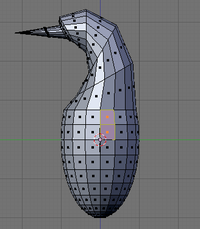
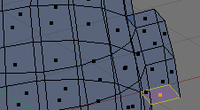
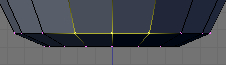
Finish off the wings by selecting the two backmost vertices of the wings, and moving them up using the blue arrow by 0.1 unit.
::选择两个最后端的翅膀,并使用蓝色箭头将它们向上移动0.1单位.
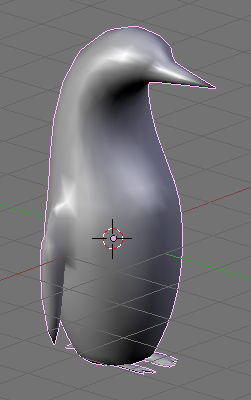
You should now have something like this:
::现在应该有这样的东西:
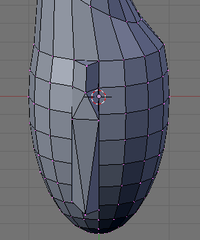
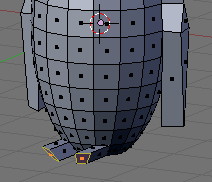
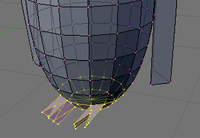
Cutting the underside
::切割下面的部分
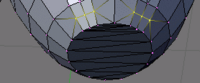

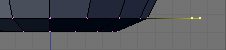
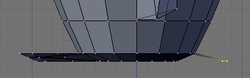
We're going to cut the penguin's lower end, for it to stand up! Select the bottom vertices (bottom vertex and the first ring above it) as shown in the picture. There are many ways, this is left as an exercise.
::我们将切断企的下端,使它站起来!选择底部的顶点 (底部的顶点和上面的第一个环) 如图所示. 有很多方法,这是一个练习.
Once they're selected, delete them ( X →
Vertices
). Now our penguin is hollow: select all the vertices around the hole, and fill it using ALT + F .
::选择了这些点,删除它们 (X → 顶点). 现在我们的企是空洞的:选择洞周围的所有顶点,并使用ALT+F填充.
- Noob note: To quickly select all the vertices around the hole, you can enter edge mode CTRL + TAB -> "Edges", and then select one edge that goes around the hole. Now press CTRL+E -> "Edge Loop Select", which should select all edges around the hole. Now go back to Vertex select mode and continue with ALT + F .
- Noob note: For Blender 2.56 In vertex select mode and occlude on hold down ALT and select one of the vertices all the vertices in the ring will be selected.
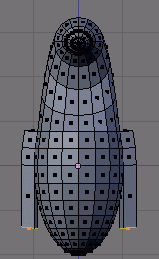
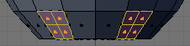
Adding the feet
::添加脚
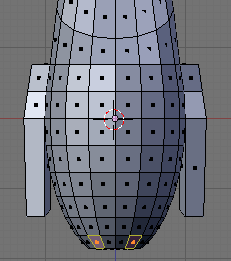
The next step is to provide the little guy with feet. To do this, we’re going to extrude two of the front faces:
::下一步是为小人提供脚.为了做到这一点,我们将挤出两个前面:
-
choose the front view ( NUM1 ),
::选择前视图 (NUM1), -
switch to
Face select mode
,
::切换到面部选择模式, -
turn on
Limit selection to visible
,
::将限制选项设置为可见, -
and select the face to the left and right of the middle two faces of the penguin.
::选择企中两面的左边和右边的面孔.
Then switch to the side view ( NUM3 ) and extrude the selection by -0.6 units ( E →
Region
, restrict to the Y axis: Y ).
::然后切换到侧面视图 (NUM3) 并将选择挤出 -0.6 单位 (E → 区域,限制在 Y 轴:Y).
Keep the selection and look for the
Mesh Tools
in the Tool Shelf. If you can’t see it, press T to make the Tool Shelf visible. Then click on the
Subdivide
button (under Add in the Tools tab). Or press W and choose Subdivide.
::保持选择并查找工具架中的网格工具.如果您看不到它,请按T使工具架可见.然后单击分区按 (在"工具"选项卡中添加).或者按W并选择分区.
Switch to "Vertex Select Mode", Now select the three middle vertices (or two edges) vertically at the tip of each foot, and drag them along the Y axis by 0.3 units towards the penguin
::现在选择三个中间的顶点 (或两个边缘) 在每个脚的尖端垂直,并沿Y轴拖动它们0.3单位向企
- Note: if something goes wrong here, you may need to remove double first. As always, to move the vertices, either use the manipulator or G and Y sequence.
You should end up with what's shown in the right picture (minus the selection).
::应该得到右图所示的 (减去选项).
The feet look too thick, let's flatten them a bit. Switch to the front view ( NUM1 ) and select the two bottom vertex rows (
Limit selection to visible
off, use either the lasso or box selection).
::脚看起来太厚了,让我们稍微平整一下.切换到前视图 (NUM1) 并选择底部的两个顶点行 (限制选择到可见,使用拉索或盒子选择).
Then choose the scale tool ( S ), limit its action to the Z axis ( Z ) and scale down by a factor of 0.4.
::然后选择尺度工具 (S),将其作用限制在Z轴 (Z) 上,并缩小0.4的倍数.
The feet still look rather peculiar, so please go ahead and move the vertices around on your own as you like.
::脚仍然看起来很奇怪,所以请继续,
Reminder:
you can use the G and restrict movements to the X or Y axis using the X or Y . Try not to move vertices along the Z axis to keep the penguin's bottom flat.
::提醒:你可以使用G,并使用X或Y轴限制运动. 试着不要沿着Z轴移动顶部,以保持企的底部平坦.
Extruding a tail
::挤出尾巴
To complete the penguin, we have to add a tail (the end of the tuxedo):
::为了完成企, 我们必须添加尾巴 (尾服的末端):
-
go to the back view ( CTRL + NUM1 ),
::进入后视图 (CTRL + NUM1), -
make sure you're still in
Vertex select mode
,
::确保您仍处于顶部选择模式, -
and that
Limit selection to visible
/
Occlude background geometry
is on.
::并且将限制选择为可见/隐藏背景几何设置.
Select the three middle vertices in the second row up from the bottom. Then, switch to the side view ( NUM3 ) and extrude the edges 0.3 units away from the penguin and 0.08 units down ( E →
Edges
), so that the end of the tail is at the same level as the bottom of the penguin.
::从下面开始,选择第二行中的三个中间顶点.然后切换到侧面视图 (NUM3) 并将边缘从企远出0.3个单位,向下挤出0.08个单位 (E → 边缘),使尾巴的末端与企的底部处于相同的水平.
Noob Note:
Or you can extrude the edges 0.3 units away from the penguin, then G Z -0.08, LMB or ENTER .
::需要在鱼的边缘处出0.3个单位,然后用GZ-0.08,LMB或ENTER.
Press CTRL + S to save your work!
::按Ctrl+S可以保存您的工作!
Subsurfing
::潜水冲浪
Go to
Object Mode
( TAB ), and make sure the penguin is selected. Then check for the
Modifiers
toolkit in the
Buttons
panel. Press
Add Modifier → Subsurf
(or Press SHIFT + O ).
::进入对象模式 (TAB),并确保选择企. 然后在按面板中检查修改器工具包. 按添加修改器 → 潜水 (或按 SHIFT + O).
Look at the penguin now, he’s much smoother. You can alter the levels of the subsurfing if you like, but I’ll settle for level one. Under the
Links and Materials
toolkit, you can press the
Set Smooth
button as well, which makes the penguin really slick.
::现在看一下企,它更滑. 如果你喜欢,你可以改变潜水的水平,但我会满足于一级. 在链接和材料工具包下,你可以按下设置滑动按,这使得企非常滑.
- Note: you may see some weird effects at the bottom and the tail after subsurfing the penguin. If so, there is an issue with normals: they have to be all pointing outwards. This can be achieved by selecting all vertices in Edit Mode and recalculating the normals outside ( CTRL + N ). Click on the message to confirm. Note that CTRL + SHIFT + N will turn the normals inwards and that W → Flip Normals flips them.
- Question: The finished penguin looks fine in Object Mode, but when I render it, it looks odd. Quite patchy.
- Answer: Make sure you adjust the "Render Levels" parameter (directly under "Levels") to be greater-or-equal than "Levels".
Extra
::额外的
The penguin can be colored or textured, but that will be part of later tutorials!
::企可以有颜色或纹理, 但这将是以后教程的一部分!
-
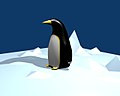 This is what the penguin (sans tail) looks like, textured and ready. Orbisonitrum
::这就是企 (没有尾巴) 的样子, 已经成形完毕. -
 The eyes are there, just not easily visible in the thumb. At the top of the white part, two faces on the chest were subdivided to give the white more of a curve at the top. The faces were selected that were going to be white, and the I used separate ( P ) to make them a different mesh. I used a white material for the chest, black for the body, and grey uvspheres for the eyes. Apparently, an easier way to colour the chest can be found at Multiple Materials please feel free to replace this with your own image of the penguin you made, with comments on how you put your own style into it
::眼睛在那里,只是不容易在指中看到. 在白色部分的顶部,胸部上的两个面部被分为两个部分,使白色在顶部有更多的曲线. 选择了将要白色的面部,我使用分开 (P) 来使它们具有不同的网格. 我使用了胸部的白色材料,身体的黑色,眼睛的灰色紫外线. 显然,在多种材料中可以找到更容易染色胸部的方法. 请随时用您自己制作的企图像替换,并评论您如何将自己的风格放入其中 -
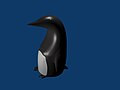
 A pretty basic picture of a penguin. I subdivided the stomach and eyes, but then I also added some eyeballs by making a UVSphere, cutting the top of it off, and then placing it inside of my penguin's head. All the colors have specular colors, giving the penguin a slight blue glow under the black.
::企的基本形象. 我分了胃和眼睛,然后又添加了一些眼球, 制作了一个紫外线球, 剪掉它的顶部, 然后把它放在企的头上. 所有颜色都有镜面色, 给企在黑色下稍微的蓝色发光.