Blender 3D:零基础到专业级-单元2:基本建模和着色
If you haven't completed
the "Quickie Model" module
, do so now. You will need the resulting model for this module.
::如果您还没有完成"快速模型"模块,请现在完成.您将需要这个模块的结果模型.
Now that you've created your first model, you'll probably want to try rendering it. Your first render, with a single light source and only nine faces, should finish quickly. However, as your 3D scenes become more complex, you'll find that rendering can take a long time.
::现在你已经创建了你的第一个模型,你可能想尝试染它.你的第一个染,只有一个光源和九个面孔,应该很快完成.然而,随着你的3D场景变得更加复杂,你会发现染可能需要很长时间.
In this module, you'll render your quickie model and save the result in various file formats. You'll also learn how to aim cameras and create lamps.
::在这个模块中,你将会染你的快照模型,并以各种文件格式保存结果. 你还将学习如何定位摄像头和创建灯.
Rendering the Quickie Model
::快速模型的染
-
Launch Blender and load factory settings.
::启动混合器并加载工厂设置. -
To load the house model from the previous module, select
File → Open Recent
, and select the file you saved. Alternatively, press F1 or select
File → Open
, find the file, and open it. As soon as the operation is complete, the window will load the quickie model that you created in the previous exercise.
::要从前一个模块加载房子模型,请选择文件 → 打开最近,并选择您保存的文件. 另一个选择是按F1或选择文件 → 打开,找到文件,然后打开它. 操作完成后,窗口将加载您在前一个练习中创建的快速模型. -
Press F12 or select
Render → Render Image
. This opens the Image Editor so you can watch the render progress.
::按F12或选择染 → 染图像. 这将打开图像编辑器,以便您可以查看染的进展.

|
You can stop a render in progress by pressing Esc any time the render window has the focus. Bear in mind this will stop the rendering of the current frame and abandon any partial results. Pressing F12 will start rendering the image from the beginning again.
|
Seeing Your Render
::看到你的回报
By default, pressing F12 will switch to the UV/Image Editor window, and show your render there. You can switch back to the 3D view with F11 . Pressing F11 in the 3D view will switch you to the UV/Image Editor window without redoing the render, i.e. you will see the same image as last time.
::默认情况下,按F12将切换到UV/图像编辑器窗口,并显示你的染.你可以用F11重新切换到3D视图.在3D视图中按F11将切换到UV/图像编辑器窗口,而无需重复染,即你将看到与上次相同的图像.
Aiming the Camera
::摄像机的定位
If you don't get a picture of the house, or if the picture is not framed well, try moving or re-aiming the camera:
::如果您无法拍摄房子的照片,或者如果照片的框架不好,请尝试移动或重新定位相机:
-
Press Esc to get back to Edit Mode, if needed.
::如果需要,按 Esc 返回编辑模式. -
Press Num0 to take the camera's viewpoint.
::按下Num0以获得相机的视角. -
Press Shift + F to put the 3D View window into camera fly mode.
::按下Shift+F将3D视图窗口置于摄像机飞行模式.
In camera fly mode, you can:
::在摄像机飞行模式下,您可以:
-
Pan and tilt by moving the mouse pointer up, down, left, or right.
::通过将鼠标指针向上,向下,向左或向右移动, 滑动和倾斜. -
Accelerate by SCROLL forwards.
::通过向前滚动加速. -
Decelerate by SCROLL backwards.
::通过向后滚动减速. -
Press any key or button to exit fly mode.
::按下任何键或按退出飞行模式.
(It works differently in version 2.70 and later, more like a FPS game with possibility to slide and so on, buttons are regular FPS controls)
:在2.70版本和更高版本的游戏中,它的工作方式不同,更像是一款FPS游戏,可以滑动等,按是普通的FPS控制器)
When you're done positioning the camera, try rendering again.
::完成摄像头定位后, 再试染.
Lighting
::照明
If your cube is completely black, you may not have a lamp in the scene. Either the default lamp got deleted, or you're using a version of Blender that doesn't provide a default lamp.
::如果你的立方体是完全黑色的,你可能没有灯在场景.要么是默认灯被删除,或者你使用的是没有默认灯的混合器版本.
To add a lamp:
::添加一个灯:
-
Make sure Blender is in Object Mode.
::确保混合器在对象模式. -
Place the 3D cursor where you want the lamp to go; or add the lamp then immediately grab it, and move it somewhere else.
::放到你想要灯去的地方; 或者添加灯然后立即抓住它, -
Press Shift + A .
::按下Shift+A. 按下Shift+A. -
In the popup menu, select
Lamp → Point
.
::在弹出菜单中,选择Lamp → Point.
Saving the Render
::拯救了染
This is old information and is no longer valid. Saving the scene (with F2 , for instance) does not save any renders. Saving renders is a separate step.
::这是一个旧的信息,不再有效.保存场景 (例如,使用F2) 不会保存任何染.保存染是一个单独的步骤.
To save your current render :
::保存当前染方式:
-
Make sure you are in the Image Editor. If not press F12 to render
::确保您在图像编辑器. 如果没有按F12来染 -
Press F6 . This temporarily changes the active window into a File Browser window. (in the older versions you use F3 but in the newer versions the button can be FN + S or SHIFT + S
::按F6 . 这会暂时将活动窗口转换为文件浏览器窗口. (在旧版本中使用F3 ,但在新版本中按可以是FN + S或SHIFT + S -
Navigate to the directory (folder) where you want to write the file.
::导航到您想要写入文件的目录 (文件). -
Type a filename in the text box (to the left of the "Cancel" button).
::在文本框中输入文件名 (在"取消"按的左边). -
To the left of the window, choose your preferred file type.
::在窗口的左边,选择您喜欢的文件类型. -
Click LMB on the "Save as Image" button. As soon as the save operation is complete, the window will return to the Image Editor.
::在"保存为图像"按上点击 LMB. 保存操作完成后, 窗口将返回图像编辑器.
Renderer Selection
::染器的选择

Blender offers a choice of different rendering engines for producing images. The menu for selecting from these appears in the Info window (the thin one that contains the menu bar at the top of the default layout). In most of these tutorials, you will leave this choice set at Blender Render. But it is worth knowing what other choices are available:
::混合剂提供了不同的染引擎来制作图像.从这些中选择的菜单出现在信息窗口 (含有默认布局顶部菜单的薄型窗口).在大多数这些教程中,您将把这个选择设置在混合剂染器中.但值得知道还有哪些其他选择:
-
Blender Render—the oldest renderer, commonly known as the Blender Internal renderer. Built into Blender right from its early days. Can still produce good results with the right tricks, but considered by the Blender developers to be antiquated and not worthy of continuing development.
::混合器最古老的染器,通常被称为混合器内部染器.自早期就被内置在混合器中.仍然可以通过正确的技巧产生良好的结果,但被混合器开发人员认为是过时的,不值得继续开发. -
Blender Game—this is the renderer used by the Blender Game Engine. Designed to be fast enough for interactive use in a game, which means there are limitations in the quality of renders it produces. You also use this renderer to create rigid-body physics simulations.
::混合游戏这是混合游戏引擎使用的染器.它设计的速度足以在游戏中交互使用,这意味着它产生的染器的质量有局限性.您还可以使用这个染器来创建刚体物理模拟. -
Cycles Render—for this and other choices, see
Advanced Rendering
.
::染周期 对于此和其他选择,请参阅高级染.
Render Control
::染控制
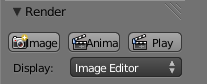
The top panel under the Render tab
![]() in the Properties window shows 3 buttons and a menu. The first button renders a single frame, equivalent to F12 . The other two buttons are more relevant to
animations
.
in the Properties window shows 3 buttons and a menu. The first button renders a single frame, equivalent to F12 . The other two buttons are more relevant to
animations
.
::属性窗口中的染选项卡下的顶面板显示3个按和一个菜单.第一个按染成一个单一,相当于F12.另外两个按更适合动画.
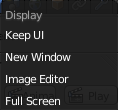
The “Display:” menu controls what happens when you press F12 : the default “Image Editor” causes the 3D view to be switched to the UV/Image Editor showing the rendered image. “Full Screen” causes the UV/Image Editor display to take over the entire screen, while “New Window” makes it appear in a separate OS/GUI window (similar to how older versions of Blender used to work). Finally, “Keep UI” causes no changes to your window layout at all; you have to explicitly bring up the Image Editor with F11 to see the rendered image.
::显示:菜单控制按F12时发生的事情:默认的图像编辑器导致3D视图切换到显示染图像的UV/图像编辑器.全屏幕导致UV/图像编辑器显示占据整个屏幕,而新窗口使其显示在一个单独的OS/GUI窗口 (类似于旧版本的混合器).最后,保持UI不会改变您的窗口布局;您必须明确地将图像编辑器带到F11以查看染图像.
Render Image Dimensions
::提供图像尺寸
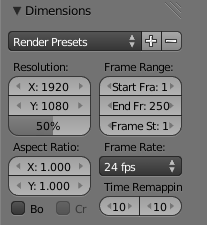
You can control the size of the image that Blender creates when rendering. This is specified in the “Dimensions” panel under Render
![]() properties. Apart from the menu at the top, the settings in this panel are grouped into two columns:
properties. Apart from the menu at the top, the settings in this panel are grouped into two columns:
::您可以控制Blender在染时创建的图像的大小.这是在染属性下的"维度"面板中指定.除了顶部的菜单外,这个面板中的设置被分为两个列:
-
The column on the left controls settings for a single image.
::控制单个图像的设置. -
The column on the right specifies additional settings for rendering a whole sequence of images as part of an
animation
. These settings will be discussed
later
.
::右侧的列指定了作为动画的一部分染整个图像序列的额外设置.这些设置将在稍后讨论.
At the upper left, under “Resolution:”, we have the dimensions in pixels of the image (the default settings are 1920×1080 as shown in the screenshot), plus an additional scale factor slider below (showing 50% by default). With these settings, the image will actually be rendered at (1920×50%)×(1080×50%) = 960×540. Having the scale factor is a convenience. Rendering smaller, lower-quality images is faster, which speeds up initial work on your model, but you'll want full quality for the final result. Instead of mentally having to work out numbers for render quality, you can simply set the resolution to full quality, and use the scale factor to reduce this to, say, 50% or 25% for interim work, then set it to 100% for the final output.
::在左上方,在"解析度:"下,我们有图像的像素尺寸 (默认设置为 1920×1080 如截图所示),以及下面的额外的缩放因子滑块 (默认显示 50%).使用这些设置,图像实际上将呈现为 (1920×50%) × 1080×50%) = 960×540.具有缩放因子是一种方便.染较小,质量较低的图像更快,这加快了模型的初始工作,但您将希望最终的结果具有完整的质量.而不是在脑中计算数字来获得染质量,您可以将分辨率设置为完整的质量,并使用缩放因子来减少这一点,例如,50%或25%的临时工作,然后将其设置为100%的最终输出.
Image File Formats
::图像文件格式
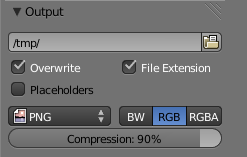
You set the format and location for saving rendered images in the “Output” panel under the Render
![]() properties.
properties.
::在"出"面板中设置染属性下保存染图像的格式和位置.
In current versions of Blender, the default format for saving rendered images is
PNG
. This is a
lossless
format which has the option for
alpha transparency
(which means the sky background is replaced by transparent pixels—enabled by clicking the “RGBA” button). This is a good format if you intend to do further work with the image (e.g. in an image editor like Gimp or Photoshop), but the files can be large.
::在目前的版本中,保存染图像的默认格式是 PNG.这是一个无损格式,具有阿尔法透明度的选项 (这意味着天空背景被透明像素所取代,通过点击"RGBA"按).如果您打算与图像进行进一步工作 (例如在Gimp或Photoshop等图像编辑器中),这是一个很好的格式,但文件可能很大.
JPEG
is a
lossy
image format, which means it throws away information that the human eye doesn’t see. This produces much smaller files than PNG, and is adequate if you just want to upload the render directly for use in a Web page or other such document, but is not the best choice if you intend to do further processing of the image. It also doesn’t support alpha transparency.
::JPEG是一种损失图像格式,这意味着它丢弃了人类眼睛看不到的信息. 这产生了比 PNG 小得多的文件,如果您只想直接在网页或其他类似文档中上传染器,则足够,但如果您打算进一步处理图像,则不是最佳选择. 它也不支持alpha透明度.
To change the render file format:
::为了更改染文件格式:
-
Switch to the Render tab in the Properties window.
::在属性窗口中切换到染选项卡. -
Look for the “Output” panel.
::查找"输出"面板. -
Click LMB on the popout menu with the current file format.
::在当前文件格式的输出菜单中, 单击 LMB. -
Select your preferred format.
::选择您喜欢的格式.