Blender 3D:零基础到专业级-单元2:基本建模和着色
Few real-life objects have perfectly sharp edges. People, in particular, consist of mainly smooth surfaces. How does one model a smooth object using flat faces and sharp edges?
::很少有现实生活中的物体有完美的尖边.特别是人,主要由光滑的表面组成.一个人如何使用平面和尖边形来模拟光滑的物体?
In this module, you'll learn how to smooth a mesh by using subsurfaces and smooth shading.
::在这个模块中, 你将学习如何使用底层和光滑的遮来平滑网格.
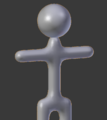
You'll need the simple person model from the previous module. If you haven't done it, either go back and do it now or download the pre-made model from Yosun Chang's website at
http://www.nusoy.com/blender
.
::您需要从前一个模块中获得简单的人模型. 如果您还没有做过,请现在回去做,或者从Yosun Chang的网站下载预制模型.
If the model doesn't look solid, your Viewport Shading setting may be set to Wireframe. To switch to Solid shading:
::如果模型看起来不像是固体,则您的视窗影像设置可能会设置为Wireframe. 切换到固体影像:
-
Activate the 3D View window.
::启动3D视图窗口. -
Press Z .
::按下Z.
Subsurfaces
::表面下部
So far, all the meshes you've created have had sharp edges, giving them a faceted appearance like that of a cut diamond. To model a smooth object (like a human body) you might think you need a huge number of vertices and faces. Subsurfaces partly solves this problem by automatically subdividing a mesh into a finer mesh suitable for smooth rendering.
::现在,你创建的所有网格都有利的边缘,使它们看起来像切割钻石一样. 为了模拟光滑的物体 (如人体),你可能会认为你需要大量的顶点和面. 亚表面部分解决了这个问题,通过自动将网格分为更细的网格,适合光滑染.
You subsurface in Blender by adding a subsurf modifier to an existing mesh object. A modifier is simply an algorithm (automatic process) which can be added to an object. (Blender modifiers are analogous to Photoshop adjustment layers.)
::在Blender中,您可以通过向现有网格对象添加一个底层修改器来进行底层修改.修改器只是一个可以添加到对象的算法 (自动过程). (Blender修改器类似于Photoshop调整层).
To get started, make sure Blender is in Object Mode, with only the simple person object selected:
::首先,请确保Blender处于对象模式, 只有简单的人物对象被选择:
-
If Blender is in Edit Mode, press Tab .
::如果Blender处于编辑模式,请按TAB. -
To select the simple person, RMB on it.
::选择一个简单的人,人民币.
To add a subsurf modifier to the selected object:
::添加一个子表面修改器到所选对象:
-
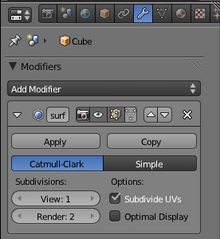
Click on the modifiers tab (wrench icon) in the Properties window.
::在属性窗口中点击修改器选项卡 (钥匙图标). -
Add Modifier → Subdivision Surface
.
::添加修改器 → 分区面.
You could also add subsurf modifier by pressing Ctrl + 1Key .
::您也可以通过按住Ctrl + 1Key添加下面的修改器.
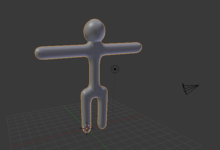
The object's appearance should immediately become more faceted and more rounded. In addition, several subsurface controls will appear in the Modifiers tab.
::目标的外观应该立即变得更加面积和圆形. 此外,在修改器选项卡中会出现几个地下控制.
|
|
The modifier has been added, but it hasn't actually been "applied" yet. (Applying a Blender modifier is analogous to flattening a Photoshop adjustment layer.)
|
What just happened? The default subsurf modifier (one level of Catmull-Clark) subdivided each face of the object into four smaller faces that are progressively angled. This softened the sharp edges of the original model where faces met at 90-degree angles.
::刚才发生了什么?默认的底面修饰器 (卡特穆尔-克拉克的一个级别) 将物体的每一面分为四个渐进的角的小面. 这使得原始模型的尖边缘变得柔软,面部以90度的角度相遇.
Controls
::控制方式
For this model, one level of subsurf isn't quite enough. To increase the number of levels to two, just increase the number in the text box directly underneath
Subdivisions
. The
View
setting controls the number of subdivision levels visible in the viewport. This is very useful when you have a high-poly scene, just decrease the number of visible subdivisions to speed up viewport action.
::对于这个模型,一个层次的下面层面是不够的. 要增加层次的数量到两个,只需增加字段框直接在分区下面的数量. 视图设置控制在视图窗口可见的分区层次的数量. 这非常有用,当你有一个高多元场景,只需减少可见的分区数量以加快视图窗口的操作.
You can specify additional levels of subsurfing to be used during renders. For extra smooth renders, you might want three levels of subsurfing. Set this with the
Render
control immediately below the
View
control.
::您可以指定在染过程中使用的额外的潜水级别. 为了更顺的染,您可能需要三级潜水. 通过在视图控制项下方的染控制项设置此.
The
Apply
button applies the modifier to the mesh. Do not click it yet. We'll be playing with the model a bit longer before we apply the changes. While useful with some modifiers, applying a subsurf modifier produces a very complex mesh, and there's no need to do so here.
::应用按将修改器应用到网格. 现在不要点击它. 我们将在应用更改之前再玩一下模型. 虽然对一些修改器有用,但应用一个下面的修改器会产生一个非常复杂的网格,在这里不需要这样做.
Remember that you can undo any accidental modifications with Ctrl + Z .
::请记住 , 您可以用Ctrl+Z来撤销任何意外修改 .
Blender can combine a series of modifiers by stacking them. For this reason, the Modifier tab includes buttons for arranging and removing modifiers.
::混合器可以通过堆叠组合一系列的修改器.因此,修改器选项卡包含用于排列和删除修改器的按.
You can hide edges created by the modifier by activating the
Optimal Display
toggle button. The effect is especially clear with the Wireframe draw type.
::通过激活最佳显示切换按,您可以隐藏修改器创建的边缘.这种效果在线图画类型中尤其明显.
You can edit the mesh in modified form (without actually applying the modifier) by activating the
Adjust edit cage to modifier
toggle button, a small button with a triangle and vertices, to the left of the Up/Down arrows (the arrows are for changing the position of the modifier in the stack) in the Modifier panel.
![]()
::您可以通过激活调整编辑到修改器切换按 (一个小按,三角形和顶点),在修改器面板的上/下箭头的左边 (箭头用于改变修改器在堆中的位置) 来修改修改形式的网格 (而不实际应用修改器).
Try this out:
::试试这个:
-
Press Tab to enter Edit mode.
::按下"Tab"进入编辑模式. -
Make sure Blender is in Vertex select mode.
- Note that the vertices no longer lie on the surface of the object.
::确保Blender处于顶点选择模式. 注意顶点不再位于对象的表面. -
Activate the
Adjust edit cage to modifier
button.
- Now all vertices lie on the surface of the object, and you can adjust the (modified) vertices directly. However, any additional vertices created by the modifier cannot be directly edited without applying the modifier.
::激活调整编辑到修改器按.现在所有的顶点都位于对象的表面,您可以直接调整 (修改) 的顶点.但是,修改器创建的任何额外的顶点都不能在不应用修改器的情况下直接编辑.
You will be editing the boxy version of the simple person awhile longer, so before continuing, deactivate the
Apply modifier to editing cage during Editmode
button.
::在编辑模式按中, 关闭"应用修改器到编辑"功能.
Smooth Shading
::顺的遮阳
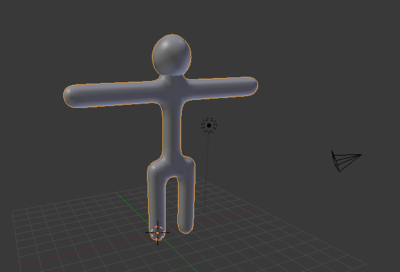
Subsurfaces do a good job of smoothing out corners in meshes. Even with two levels of subsurfaces, however, the simple person does not look completely smooth; when viewed close up, it has a scaly appearance. This is because each face is flat shaded—shaded to resemble a flat surface—resulting in sudden changes in brightness at most edges. For a smooth object, you want smooth shading, which smooths out the changes in brightness.
::表面表面的角落在网格上是很好的.即使有两层的表面,但是,普通人看起来并不完全光滑;当近距离观察时,它会有状的外观.这是因为每个面部都是平面的色色,类似于平面面,导致大多数边缘的亮度突然变化.对于光滑的物体,你想要光滑的遮阳,这会平滑出亮度的变化.
-
Go to Object Mode.
::进入对象模式. -
Set the draw type of a 3D View window to "Solid".
::将3D视图窗口的绘图类型设置为"固体". -
Select your subsurfed object.
::选择您的潜水对象. -
In the Toolshelf on the left, look for a caption called
Shading
. Under it should be a button called
Smooth
.
- All the mesh edges will be smoothed out, leaving no sudden changes in brightness. The faces blend smoothly into one another, making the edges nearly invisible. If the icosphere has not smoothed properly and is dimpled, enter Edit Mode by pressing Tab , select all vertices (A) and recalculate the normal direction (CTRL+N). This is also available in the Toolshelf under Normals .
::在左侧的工具架上,寻找一个名为"遮光"的标题.在它下面应该有一个名为"光滑"的按.所有网状边缘都会被光滑,不会突然改变亮度.面部将顺利融入彼此,使边缘几乎看不见.如果生态圈没有正确地光滑,并且有隙,请按下Tab进入编辑模式,选择所有顶点 (A) 并重新计算正常方向 (CTRL+N).这也可在工具架下正常. -
Click the other button under
Shading
in the Toolshelf, named 'Flat'.
- The edges will reappear. Now you know the difference between Flat and Smooth.
::按下"工具架中的遮"的另一键,名为"平面".边缘将重新出现.现在你知道平面和光滑之间的区别. -
Since the model looks better with smooth shading, click LMB on the "Smooth" button again.
::由于模特看起来更好,所以请再次点击"光滑"按上的LMB.
Note that if you didn't have subsurf enabled, then the mesh wouldn't look much different. This is because smooth shading doesn't affect the mesh shape, it just changes how the computer draws the triangles.
::由于光滑的遮光不会影响网状, 只是改变了计算机绘制三角形的方式.
Smooth shading also removes a lot of definition. A good way to get rid of this is simply to add a subsurf modifier like you just did. The modifier will not only require fewer vertices, but add definition.
::顺的遮也会去除很多定义. 解决这个问题的好方法就是简单地添加一个下面的修改器. 修改器不仅需要更少的顶点,而且还需要添加定义.
-
 Flat Shading
::平的阴影 -
 Smooth Shading
::顺的遮阳
Save your work. You will continue refining this model in the next module.
::节省你的工作. 你将继续在下一个模块中完善这个模型.