Blender 3D:零基础到专业级-单元2:基本建模和着色
In this module, you'll edit a subsurfed mesh using the scale and grab tools, all the while improving your character.
::在这个模块中, 你将使用尺度和抓取工具编辑一个下面的网格,
You'll need the simple person model from the previous module. If you haven't done it, either go back and do it now or else download the pre-made model from Yosun Chang's website at
http://www.nusoy.com/blender
.
::您需要从前一个模块中获得简单的人模型. 如果您还没有做过,请现在就做一次,否则可以从Yosun Chang的网站下载预制模型.
Widening the Torso
::扩大躯干
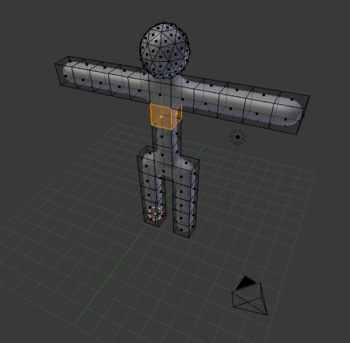
To be realistic, the simple person's torso needs to be three times wider. In order to keep the torso symmetrical, you'll expand it by scaling both sides from a central point.
::为了保持对称, 您将通过从中心点缩放两侧来扩展它.
Select the sides of the torso:
::选择躯干的侧面:
-
Enter edit mode on the simple person.
::进入编辑模式. -
In the 3D View header, set Face select mode.
::在3D视图标题中,设置面部选择模式. -
From the 3D View header, choose
Pivot → Median Point
.
::在3D视图标题中,选择Pivot → 中位点. -
In the 3D View header, make sure Proportional Edit button is off.
::在3D视图标题中, 确保按关闭比例编辑. -
Select the two faces on both the left and right sides of the torso, between the armpits and the waist.
::在下和腰之间选择的左侧和右侧的两个面部.
|
|

When editing in solid mode, the vertices, edges and faces on the back side of the model are, by default, invisible. This feature can be toggled by clicking LMB on the
Limit selection to visible
(called in older versions, "Occlude Background Geometry") button in the 3D View header. Toggle it on and off a few times and observe how the back faces appear and disappear.
|
We will now scale the torso with the scaling tool:
::现在我们将用缩放工具对干进行缩放:
-
Activate the 3D View window and press S , X .
::启动3D视图窗口并按S ,X . -
Adjust the amount of scaling. Either:
-
Move the mouse pointer until the torso is the width you want.
::移动鼠标指针,直到干是你想要的宽度.
- or
-
Press 3
::按3
::调整缩放的数量. 无论: 移动鼠标指针直到干是你想要的宽度. 或按3 -
Move the mouse pointer until the torso is the width you want.
-
Confirm and exit by pressing Enter or clicking LMB .
::通过按键Enter或点击LMB确认并退出 .
|
|
Scaling faces causes adjacent edges and faces to move, due to their shared vertices. You cannot separate a face or edge from its vertices.
|
Continue selecting different parts of the torso and scaling them to get more practice using the above scaling methods.
::继续选择干的不同部位,并使用上述缩放方法进行缩放,以获得更多的实践.
Bending the Arms
::曲手臂
When you've got the basic shape of the torso, make the person hold up his hands. You'll do this by deleting the forearms and then extruding upward from the elbows.
::让人举起双手, 删除前臂, 然后从肘部向上挤出.
Select both forearms:
::选择两只前臂:
-
Enter edit mode on the simple person.
::进入编辑模式. -
In the 3D View header, set Face select mode.
::在3D视图标题中,设置面部选择模式. -
With the 3D View window active, press A until all vertices are deselected.
::在3D视图窗口激活时,按A直到所有顶点被取消选择. -
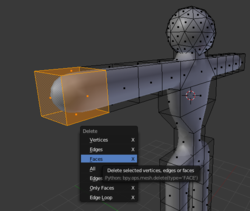
Select the five faces at the end of the forearm.
::选择前臂末端的五个面孔.
Now erase them:
::现在删除它们:
-
Press X to open the Delete menu.
::按一下X打开删除菜单. -
Choose
Faces
.
::选择面孔.
The forearm will disappear, leaving a hole. Don't panic; we'll fix it later. Now to make the arm point upwards:
::臂会消失,留下一个洞. 不要惊慌,我们会稍后修复.
-
Select the top face of the last remaining "arm cube".
::选择最后一个剩余的"手臂立方体"的顶面. -
Extrude the region upward by two Blender units E , 2 and confirm with LMB or Enter .
::通过两个混合器单位E , 2向上挤出区域并用LMB或Enter确认.
|
Note:
|
The hole in the elbow is caused by a missing face. To fill in the missing face:
::肘部的洞是缺少的脸造成的.
-
Deselect all vertices.
::删除所有顶点. -
Select the four vertices surrounding the missing face.
::选择四个环绕缺失面的顶点. -
With the 3D View window active, create the face using either
-
Mesh → Faces → Make Edge/Face
::网格 → 面孔 → 制造边缘/面孔
- or
-
F
::没有
::在3D视图窗口激活时,使用Mesh → Faces → Make Edge/Face或F创建面孔 -
Mesh → Faces → Make Edge/Face
|
|
If a
Make Faces
menu appears when you try to fill the hole, it may be that you have some doubled vertices. You can remove doubles by selecting the whole mesh in edit mode, then pressing W and in the appearing menu "Remove Doubles" and try again.
|
The new face should be smooth. If it isn't, make it so, using
Mesh → Faces → Shade Smooth
.
::新面应该是光滑的.如果不是,那么使用Mesh → Faces → Shade Smooth.
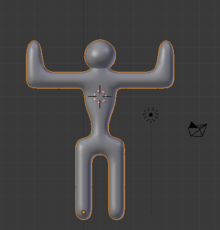
Go through the same steps (erase, extrude, and fill) on the other arm. Be sure to deselect all vertices in the first arm before selecting any in the other arm. If you have difficulty making the arms symmetrical, undo your work and go through the steps simultaneously on both arms.
::在另一臂上执行相同的步骤 (擦除,挤出和填充).在选择另一臂之前,请确保在第一臂中取消所有顶点的选择.如果您难以使臂对称,请撤销您的工作并同时在两臂上执行步骤.
Making Feet
::如何制作脚
To make feet for your simple person, you subdivide the ends of the legs and pull the front edges forward.
::为了为你那个简单的人做脚, 你把腿的两端分成小部分,
-
Edit the simple person in Face select mode.
::在面部选择模式中编辑简单的人. -
Select the two bottom faces of the legs (front of the feet) by clicking RMB on the first and then Shift + RMB on the other.
::选择两条腿的底面 (脚前面) 通过点击第一个的人民币,然后点击另一边的Shift +人民币. -
Subdivide both faces, either with:
-
W
Subdivide
::部分分类
- or
-
Mesh → Edges → Subdivide
::网格 → 边缘 → 分区
::用:W 分区或网 → 边缘 → 分区来分区两面 -
W
Subdivide
Each face gets subdivided into four smaller faces.
::每个面部都被分成四个较小的面部.
Now select the front edges and pull them forward:
::现在选择前边,并把它们向前拉:
-
Switch to Edge select mode.
::切换到边缘选择模式. -
Press A until no edges are selected.
::按A,直到没有边缘被选中. -
Select the four bottom front edges of the soles (two for each feet) (where the toes should be).
::选择四个底部前边的鞋底 (每只脚两根) (脚应该在哪里). -
Press G and limit movement to the Y axis.
::按G,限制运动到Y轴. -
Move the mouse pointer until the feet are the length you want.
::移动鼠标指针,直到脚的长度是你想要的. -
Confirm and exit by pressing Enter or Space or clicking LMB .
::通过按键Enter或空格或点击LMB确认并退出 .
Reshaping the Head
::改变头部的形状
When you're satisfied with the torso and limbs, you should do something about that head. A bit too spherical, isn't it? You can elongate it by scaling along the Z axis.
::当你对躯干和四肢感到满意时,你应该对头部做点什么。有点太圆了,不是吗?你可以通过沿Z轴缩放来延长它。
When scaling the head, you want to make sure that it stays connected to the neck.
::需要确保头部与脖子保持连接.
First, place the 3D Cursor at the base of the head, where it meets the neck. An easy way to do this is as follows:
::首先,将3D指针放在头部底部,与部相连的地方.
-
Go into Vertex select mode.
::进入顶部选择模式. -
Make sure the
Limit selection to visible
option is "off".
::确保限制可见选项的选择是"关闭". -
Select the vertex at the base of the head using RMB .
::使用人民币选择头部底部的顶点. -
Snap the cursor to this vertex using Shift + S
Cursor to Selected
::通过使用Shift+S将光标移到此顶点 光标移到已选
Now select the entire head:
::现在选择整个头部:
-
Hover the mouse over a vertex/edge/face of the head
::滑鼠在顶点/边缘/头部的面部上空 -
Press L to select all parts linked to that part.
::按下L来选择与该部分相关的所有部分.
|
|
This works even when the head and body meshes overlap, so long as they aren't linked together anywhere.
|
Tell Blender that you want to pivot around the 3D Cursor by changing the pivot point to
3D Cursor
on the Pivot menu (the small button located to the left of the 3D Manipulator button).
::告诉Blender您想要在3D标记器周围旋转,通过在Pivot菜单 (位于3D操纵器按左边的小按) 上将旋转点更改为3D标记器.
Now scale the head along the Z-axis, using the scale tool ( S , scaling by 1.5 should be about right).
::现在将头部沿 Z 轴进行缩放,使用缩放工具 (S,缩放 1.5 应该是正确的).

You'll need this simple person later, so remember to save your work!
::现在,你需要一个简单的人,