Blender 3D:零基础到专业级-单元2:基本建模和着色
Preliminaries
::预览
This is a version of "Model a Silver Goblet" but starting from a cylinder rather than a cube.
::这是一个"银杯模型"的版本, 但从一个圆柱体而不是一个立方体开始.
Start Blender or start a new scene ( Ctrl + X ) and delete the default cube.
::启动混合器或启动一个新的场景 (Ctrl + X) 并删除默认立方体.
Change to Top view ( Num7 ), make sure you're in Object mode and add a cylinder ( Shift + A Mesh > Cylinder): in the popup menu, change the number of vertices from 32 to 16, the Radius from 1.000 to 1.800, the Depth from 2.000 to 0.100 and leave "Cap Ends" as it is.
::切换到顶部视图 (Num7),确保您处于对象模式,并添加一个圆柱体 (Shift + A Mesh>圆柱体):在弹出菜单中,将顶点数量从32变为16,半径从1000变为1800,深度从2000变为0.100,并将"盖子末端"保持原样.
Change to Front view ( Num1 ).
::转换为前视图 (第1号).
Description of the modeling steps
::模拟步骤的描述
The steps in this tutorial are almost all made up of "extrude" and "scale": so, to avoid repeating key sequences every time,
::为了避免每次重复关键序列,
- extrude
- means
-
make sure "Limit selection to visible" is off
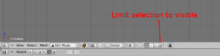
Shows "Limit selection to visible" icon
::确保"限制选择可见"是关闭显示"限制选择可见"图标 -
box select the top vertices of the cylinder: press B , click and drag LMB to make a rectangle around the top vertices
::选择圆柱顶点: 按B , 点击并拖动LMB以在圆柱顶点周围形成矩形 -
press E , press Z and type in the amount of the extrusion and press Enter ; you can move the mouse instead but it is quicker and easier to type it in.
::按E,按Z,输入挤出量,然后按Enter; 您可以移动鼠标,但输入更快,更容易.
For example, the following keystroke sequence extrudes by 1.5:
B , click and drag LMB to make a rectangle around the top vertices; E Z 1 . 5 Enter .
::例如,下列按键按键序列的输出速度为1.5:B,点击和拖动LMB以在顶端的顶点周围制成矩形;E Z 1 . 5 输入.
- scale
- scaling is by default restricted to the X-Y plane; although the numbers in the bottom left corner of the 3Dview show Z changing, in fact only X and Y change, and by equal amounts.
-
press S , type in the value and press enter — you can use the mouse instead but it is quicker and easier to type in the number.
::按S,输入值,然后按Enter, 您可以使用鼠标,
Creating the Goblet
::创造杯子
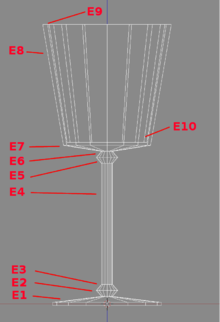
This diagram shows the connection between the E-numbers and the goblet construction.
::这幅图显示了E号码与杯子结构之间的联系.
-
E1:
Deselect all vertices ( A ), Box-select the top vertices (B-key), and extrude by 0.2: you may need to zoom in ( SCROLL ) to do this as it's quite thin. Scale to 0.1.
::E1:取消所有顶点 (A),选择顶点 (B键),并挤出0.2:您可能需要放大 (SCROLL) 来完成此操作,因为它非常薄.缩小到0.1. -
E2:
Extrude by 0.2, scale by 2.
::出一个0.2,缩放一个2. -
E3:
Extrude by 0.2, scale by 0.5 to make the lower knob.
::: 挤出0.2分,缩放0.5分, 制成下面的旋. -
E4:
Extrude by 4 to make the stem.
::E4: 挤出4个,使茎. -
E5:
Extrude by 0.2, scale by 2.
::: 挤出0.2分,缩放2分. -
E6:
Extrude by 0.2, scale by 0.5 to make the upper knob.
::: 挤出0.2分,缩放0.5分, 制成上旋. -
E7:
Extrude by 0.2, scale by 8 to make the base of the cup.
:::用0.2挤出,用8缩小,使杯子的底部. -
E8:
Extrude by 4, if you wish to make a flared cup, you can scale by 1.5.
:::如果想做一个的杯子, 可以缩小1.5个. -
E9:
Extrude by 0.0, scale by 0.9 to make the rim of the cup. (This will create a new ring of vertices and then move them in towards the centre.)
- Now go into Wireframe mode ( Z ) so you can see inside to guide the next few steps.
::E9: 挤出0.0,缩小0.9以制造杯边. (这将创建一个新的顶点环,然后将它们移动到中心.现在进入线框模式 (Z),以便您可以看到内部以指导下一步的几步. -
E10:
Extrude by -3.9, that is, downwards. and scale by 0.69: you can do this last scaling with the mouse, if you like, to get the edges of the inside of the cup and the outside parallel.
::缩小0.69:如果你愿意,你可以用鼠标进行最后的缩小, 得到杯子内边和外边的平行. -
E11:
Extrude by 0.0, scale by 0.0 to make the inside of the cup. Press W Remove Doubles to merge the centre vertexes.
::E11: 挤出0.0分,缩放0.0分,使杯子的内部.按W取出双,以合并中心顶点.
You now have a goblet, the base of the inside of the cup is the face of the last extrusion, is circular and flat as it derives from a cylinder.
::杯子的底部是最后一块挤出面, 圆形而平,
If you haven't already saved your work-in-progress, now would be a good time.
::如果您还没有保存您正在进行的工作,
Subsurfing and smoothing the goblet
::潜水和平滑杯子
The last step is to subsurf and smooth: go into Object mode and enable Solid mode again ( Z ).
::最后一步是进行下面的滑动:进入对象模式并再次启用固态模式 (Z).
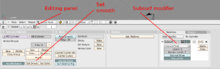
Select the Editing panel from the Buttons window ( F9 ) and, in the "Modifiers" panel, click on "Add Modifier", select "Subdivision Surface" from the popup menu and, in the Subsurf display, increase "View subdivisions" from 1 to 2.
::在"修改器"面板中,单击"添加修改器",从弹出菜单中选择"分区面",并在"分区显示"显示屏中,将"查看分区"从1增加到2.
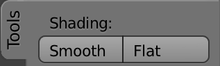
At the bottom right of the "Links and Materials" panel, click on the "Shading: Smooth" button. At the bottom of the cup you will see fluting — this is an artifact caused by smoothing and subsurfing triangles on a curved surface. Here it adds to the appearance, don't you think?
::在"链接和材料"面板的右下方,点击"遮光:光滑"按. 在杯子底部,您将看到流,这是一个由在曲面上平滑和潜水三角形造成的文物. 这里它增加了外观,你不认为吗?
In Blender v2.78, the "Smooth" button is located in the "Tools" menu under the "Edit" tab.
::在Blender v2.78中",Smooth"按位于"工具"菜单中的"编辑"选项卡下.
Flattening the base of the goblet
::杯的底部平坦
The base of the goblet is curved due to the subsurfing, so needs to be flattened.
::由于潜水, 杯子的底部曲, 所以需要平整.
Go into Edit mode, deselect all, box-select the lowest set of vertices, then crease (remove the subsurfing) by pressing Shift + E then 1 enter .
::进入编辑模式,取消所有选项,选择最低的顶点,然后按Shift+E然后1 enter进行折叠 (删除潜水).
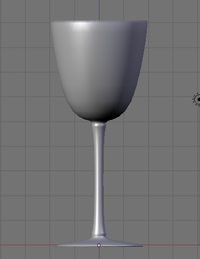
The final result should look something like this:
::最终结果应该是这样的:
Save the scene for use in the lighting tutorial. To jump to the relevant lighting section, go to
Blender 3D: Noob to Pro/Light a Silver Goblet
::保存场景用于照明教程. 跳到相关的照明部分,去混合剂3D:从新手到专业/点亮银杯