Blender 3D:零基础到专业级-单元2:基本建模和着色
Method 1
::方法1
Get the pictures of the model
::得到模型的照片
|
Tip:
|
The images here do not line up. Some need to be rotated and others do not match in size. They will be kept so that you can get the "real feel" for this project. |
|---|

If you have a puppy and a digital camera, take three pictures of the cute little rascal and upload them. If you don't have a puppy, any object or small animal will do. Ideally, the photos will be looking straight down at the top of the puppy, a side view, and a front view. It's important that the puppy be in the same pose in all three photos! Or at least close to the same pose...we all know puppies don't stand still very long.
::如果你有狗狗和数码相机,拍摄三个可爱的小子,并上传它们.如果你没有狗狗,任何物体或小动物都会做.理想情况下,照片将直接向下看狗狗的顶部,侧面和前面的视图.重要的是,狗狗在三个照片中都处于相同的姿势!或者至少接近相同的姿势...我们都知道狗狗不会停留很长时间.
You could use two mirrors. One is placed next to the puppy at 45 degrees to the camera and 45 degrees to the puppy. Another is placed above the puppy, also at 45 degrees to the camera and 45 degrees to the puppy. This produces three images, one of the puppy (
front \ NUM1
), one of its reflection seen 90 degrees to the right (
side \ right \ NUM3)
), and one of its reflection seen from overhead (
top \ NUM7
). Take the photo from a long distance away with a zoom lens to get close to an
orthographic projection
.
::您可以使用两个镜子.一个镜子位于狗狗旁边,相距相机45度,相距狗狗45度.另一个镜子位于狗狗上方,相距相机45度,相距狗狗45度.这产生了三个图像,一张是狗狗 (前面\NUM1),一张是狗狗90度右侧的反射 (侧面\右侧\NUM3)),一张是从头顶看到的反射 (顶部\NUM7).用缩放镜头从远处拍摄照片,以接近正写投影.
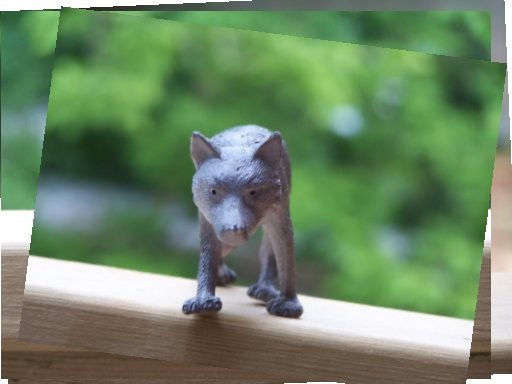
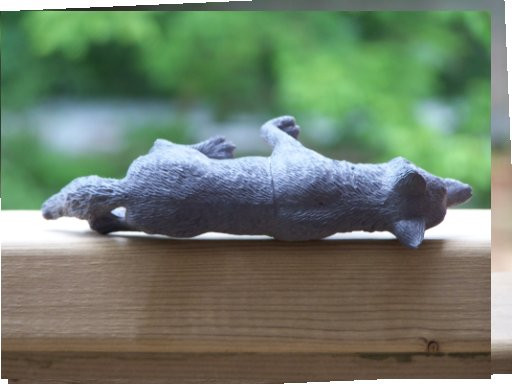
Or how about pictures of a toy wolf taken from 6 view points?:
::或从6个角度拍摄的玩具狼照片呢?
-
Left view
::左侧视图 -
Right view
::视图右侧 -
Front view
::前方的景观 -
Back view
::背后的景观 -
Bottom view
::下方的视图 -
Top view
::上方的视图
Using your favorite image editor, such as PhotoShop or the
GIMP
(see detailed GIMP instructions below:
Detailed steps to align images using GIMP
), down-scale the images need to a reasonable size (I made mine 512x384), and then match them to each other. To match them, draw construction lines (pulled from the rulers above and to the left) on the left view for example to pick out key features. I picked the tail, the front of the back foot, eye level, tip of the ear, and the front of the nose:
::使用您最喜欢的图像编辑器,如PhotoShop或GIMP (见下面详细的GIMP说明:使用GIMP对齐图像的详细步骤),将图像缩小到合理大小 (我做了512x384),然后将它们匹配.为了匹配它们,在左侧视图上绘制构造线 (从上方的统治符拉向左边),以挑选关键特征.我选择了尾部,后脚的前部,眼睛水平,耳尖和鼻子的前部:
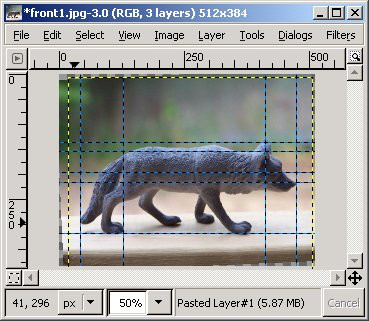
I found when I picked out these features that this first image needed to be rotated slightly. That completed, I proceeded to scale, rotate and shift the other two views (top and front) until they matched fairly well as layers on top:
::我发现当我选择这些特征时,第一个图像需要稍微旋转.完成了,我继续缩放,旋转和移动其他两个视图 (顶部和前部),直到它们与上面的层相匹配:
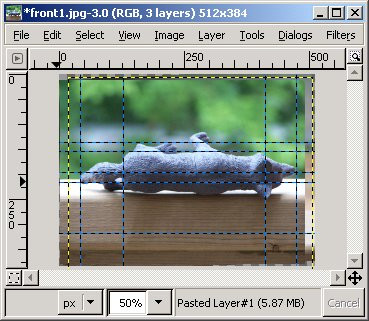
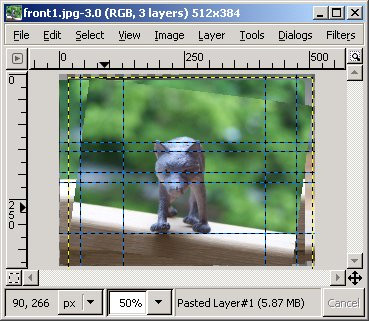
Once I had the proper results I saved the resulting images, and these are the ones we will use in Blender.
::现在我们将在Blender中使用这些图像.
The results are the files you'll need for Step Two:
::结果是您需要的文件, 步骤二:
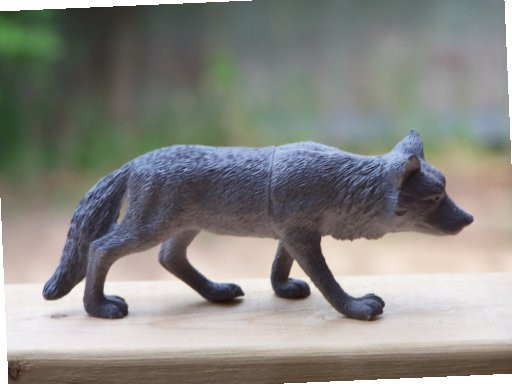
Just right-click and save them some place where you can find them to load them into Blender for Step Two. You may notice the photos aren't perfect, but we'll use them just to show how you should deal with your real photos. When you are creating your own pictures to import, note
parallax
. In this example, parallax is present, and we'll attempt to compensate.
::现在,我们将使用这些图片来展示如何处理您的真实照片. 当您创建自己的图片以导入时,请注意偏差. 在此示例中,偏差存在,我们将尝试补偿.
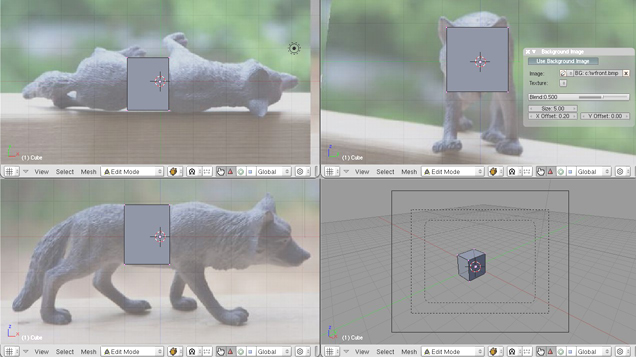
Get the Picture into Blender
::将图片输入混器
Getting the image into blender is the easy part. The more difficult part will be creating the mesh, but first things first. Create a new file (
File → New
) to see the familiar default objects. Don't bother deleting the cube, we'll end up using it in the tutorial. Just as was done in the
"Making A Pyramid"
section, split the 3D Viewer into four views with CTRL-ALT-Q.
::让图像进入混合器是很容易的部分.更困难的部分是创建网格,但首先要先做.创建一个新的文件 (文件 → 新) 来查看熟悉的默认对象.不要费心删除立方体,我们最终会在教程中使用它.就像在"制作金字塔"部分所做的那样,用CTRL-ALT-Q将3D查看器分成四个视图.
Each window will show you different XYZ coordinates.
::每个窗口都会显示不同的XYZ坐标.
Go to View > Properties, or press N . A new toolbar will open to the right of the viewport and by scrolling through you should see
Background Images
. Use the "Add images" bar and options will open up. Then check the box to display your images.
::通过滚动,您应该看到背景图像. 使用"添加图像",选项将打开. 然后勾选框显示您的图像.
Click the
Add Image
button and several more buttons will appear. Now "Open" button. A new full-viewport window will appear. Explore this window a bit and end up selecting the image file of the wolf from the top view. What you should get is the picture of the toy wolf from above with the default cube on top of it.
::按下"添加图像"按,会出现更多的按. 现在"打开"按. 一个全视窗的新窗口会出现. 稍微探索这个窗口,最后从顶部视图中选择狼的图像文件. 你应该得到的是从上面看到的玩具狼的图片,上面是默认立方体.
Now load the top view of the wolf, click on "Open" select the picture and set "Axis:" to "Front". Repeat the procedure and load the picture of the wolf to the other views.
::现在加载狼的顶部视图,点击"打开"选择图片并将"轴:"设置为"前面".重复程序并加载狼的图片到其他视图.
Noob note:
the photo from the top goes into top view, the photo from the front goes into the right view, and the photo from the right goes into front view, if you have front in front, change it now!
::照片从前面进入右边, 右边的照片进入前面, 如果您有前面, 现在就更改它!
The pictures are now loaded into the Blender viewports. If you look at the pictures on the grid, you may notice that the front view of the wolf isn't quite center. That is okay, Blender has a way to fix it.
::现在图片已被加载到Blender的视图中. 如果你看图片的网格,你可能会注意到狼的前景不是很中心.没关系,Blender有办法解决这个问题.
Press
Shift + SpaceBar
, this expands the current viewport to a fullscreen view, then go to "Background Images" and go to the Front view. Notice that there are picture manipulation options available. One of these includes picture offsets. Click on right side of the 'X Offset: 0.00' to increase the offset to 0.20. The picture will be shifted over slightly so now the wolf is more centered. Press
Shift + SpaceBar
again to return to the window-setup you had earlier. Correct the other views also, and scale the cube if needed.
::按下Shift + SpaceBar,将当前视窗扩展到全屏视图,然后进入"背景图像"并进入前景. 注意有图片操作选项. 其中一个包括图片偏移. 点击"X 偏移: 0.00"的右侧以增加偏移到0.20.图片将稍微移动,因此现在狼更集中. 再按下Shift + SpaceBar,返回您之前的窗口设置. 纠正其他视图,并根据需要缩放立方体.
Noob Note:
If you made, and aligned your own photos, you will need to use a different value than '0.20' to center the head in the cube in front view.
::如果您自己拍摄并对齐照片, 您需要使用不同于'0.20'的值来将立方体中的头部置于正面.
The setup work is now done! Let's start on actually making the wolf model.
::现在我们已经完成了设置工作!让我们开始实际制作狼模型.
Create a Rough Model
::创造一个粗略的模型
This is a brute force model creation using techniques discussed previously in this book. This section is meant to help you explore and become more comfortable with them. Do
not
try to follow the example to the tee. Your wolf and my wolf will probably not look the same since you may want to add more or have less detail.
::这是一个使用本书中先前讨论的技术来创建残酷的力量模型. 这个部分旨在帮助您探索并变得更舒服. 不要试图按照模板进行. 你的狼和我的狼可能看起来不一样,因为你可能想要添加更多或更少的细节.
Noob Note:
If you are just getting started with blender, this step may likely take several hours to complete, since you must use your own creativity to position things in 3D space, using 2D views. Just like sculpting, drawing, or oil painting, it will be extremely fustrating at first, but once you get used to the way it works, "modeling" will be much easier.
::对于新手来说:如果你刚刚开始使用混合器,这个步骤可能需要几个小时才能完成,因为你必须使用自己的创造力来将物体放在3D空间中,使用2D视图.就像雕塑,绘画或油画一样,它起初会非常令人丧,但一旦你习惯了它的工作方式",建模"将会更容易.
The rough fit stage requires either some planning or on-the-spot decisions. Think about where the wolf will have parts of its body flex or require parts jutting out.
::想想狼的身体部位在哪些地方有曲或需要突出的部位.
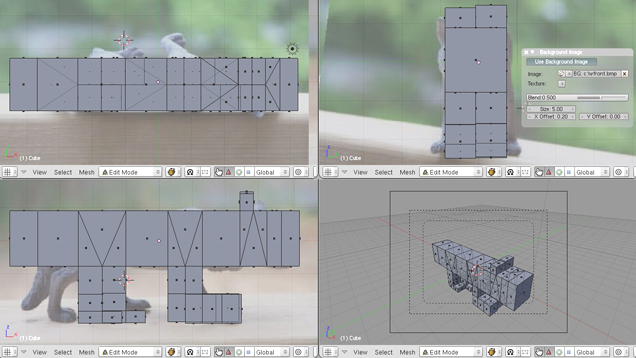
The first step is to create a blocky wolf. Start out with a column of blocks using the extrude face command (select face, E ). Don't worry about snapping the vertices to the grid since we are working with an organic figure.
::第一步是创建一个块狼.使用挤出面命令 (选择面,E) 开始一个块列.不要担心将顶点切入网格,因为我们正在使用一个有机图形.
Noob Note:
It is handy to do this in wireframe view, to see better how the rough model fits out
::对于一个模拟模型, 图像是指一个模拟模型.
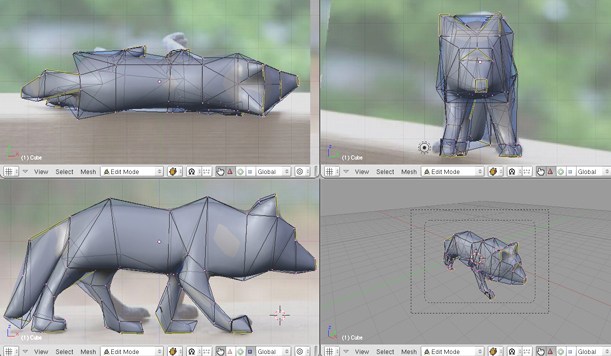
Figure 2.3.1
Body column formation
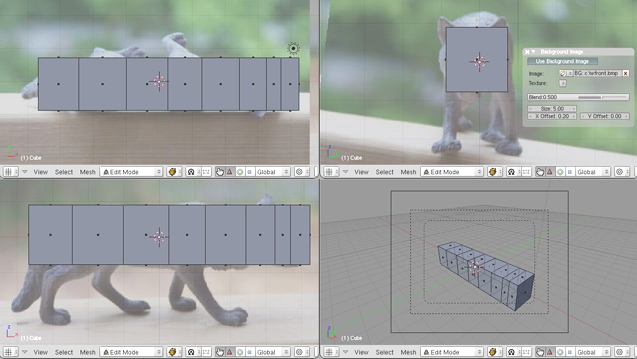
::图2.3.1 车身柱形
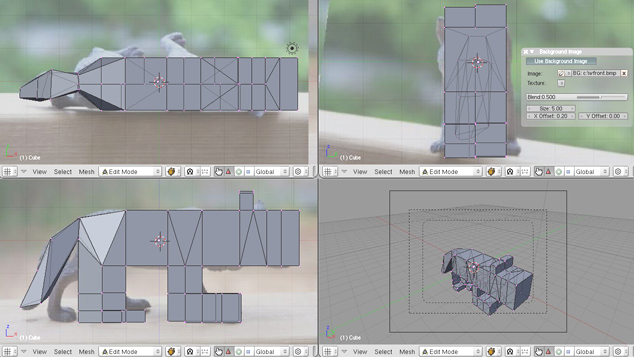
The next step is to split the ears and legs off of the body. Do this by subdividing (With "Quad/Tri Mode" checked) the appropriate faces. Save often, and if you make a mistake, go ahead and use the undo option (
CTRL
Z ). Also, if you find yourself looking at redundant faces, combine them ( F ).
::下一步是将耳朵和腿从身体上分开.通过分别 (选中"四元/三元模式") 适当的面孔来完成此操作.经常保存,如果您犯错误,请继续使用撤回选项 (CTRL Z).如果您发现自己正在查看多余的面孔,请将它们结合起来 (F).
Figure 2.3.2
Appendage formation
 ]
]
::图2.3.2 附属部分形成
If you are having trouble with this, try mousing over the perspective window (the one you designated with NUM0) and using the MMB to rotate the view so that you are looking at the underside of the wolf. Click on the face underneath the wolf that is alongside his front legs (use the side view to check this). We are going to subdivide this face in order to grow legs off the new faces. To subdivide, press the W and choose subdivide. You will see that the face has been divided into four. Take one of these faces and extrude it as many times as is necessary to make the right leg. Then do the same again for his left leg.
::如果您遇到问题,请尝试在视角窗口 (您指定为NUM0的窗口) 上滑鼠并使用MMB旋转视图,以便您看着狼的下面.点击狼的前腿旁边的脸 (使用侧视图来检查此).我们将分别将此脸分为新脸的腿.为了分别,按W并选择分别.您将看到脸已被分为四个.取其中一个脸并挤出必要的数次来制造右腿.然后再为他的左腿做同样的事情.
Noob Note:
To avoid making the extruded faces share common vertices (and be connected to each other), either extrude the legs separately (as stated above) or select
Individual faces
in the Extrude pop-up menu. The same works for the ears.
::笔记:为了避免挤出面共享共同的顶点 (并相互连接),要么单独挤出脚 (如上所述) 或在挤出弹出菜单中选择单独的面.同样适用于耳朵.
Doing the ears is similar, except instead of working underneath you will start with the face on top of the wolf which is directly over the ears. Select this face and subdivide it once. Deselect everything using A , then select one of these four faces and extrude it upwards once to make an ear. Do the same for the face alongside it to make the other ear.
::耳朵的操作类似,除了从下面开始,你将从狼的上面面开始,这正是在耳朵上方.选择这个面部并将其分为一次.使用A,取消所有选择,然后选择这四个面部中的一个并将其向上挤压一次,以制造一个耳朵.为它旁边的面部做同样的事情,以制造另一个耳朵.
Finally, extrude the tail end of the wolf one more time, so that your wolf has as many divisions as the picture above.
::最后, 再一次挤出狼的尾部, 让你的狼有上图的分数.
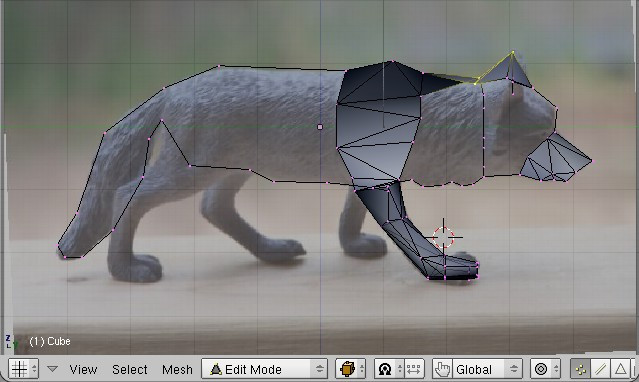
Refine the rough model
::精确粗略模型
Let's start refining the model starting with the tail. Try putting your viewports in wireframe mode by pushing Z , it may make things much easier. Line up the vertices over the wolf in each viewport by lasso selecting multiple vertices (
CTRL LMB, Drag
). then move to the right location with grab ( G ).
::让我们从尾部开始改进模型.试着把视窗设置为线框模式,按Z,这可能会让事情变得更容易.通过拉索选择多个视窗的顶点 (CTRL LMB,Drag) 在每个视窗中的狼上排列顶点.然后用抓取 (G) 移动到正确位置.
Figure 2.3.3
Working on the tail
::图2.3.3 在尾部工作
Continue onto the hind legs of the wolf. It is trickier to manipulate the legs so keep rotating a viewport to look at the model from multiple perspectives. Remember that we are working in three dimensions.
::继续到狼的后腿. 操纵腿更棘手,所以继续旋转视窗以从多个角度看模型. 请记住,我们是在三维工作.
Figure 2.3.4
Working on the hind legs
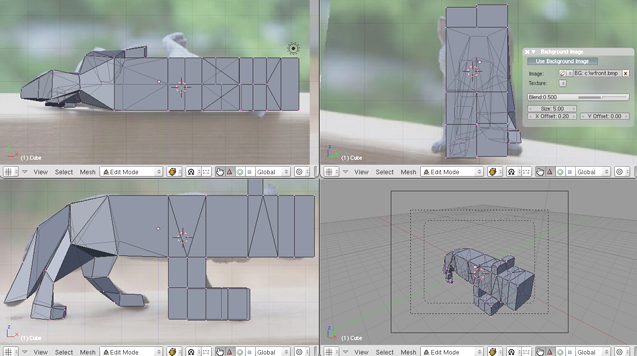
::图2.3.4 在后腿上工作
Continue working up along the wolf fitting the blocks to the pictures. If you have problems seeing the picture because the model is in the way, let's hide the model. In Edit Mode, select the entire model by A or by pressing L when you have the cursor over the model. Simply pressing H will hide the selected items. To unhide the view, use ALT + H . By hiding and unhiding the model, or parts of the model, you should be able to keep using the picture as a guide.
Note: It is much easier to just switch layers by, let's say, pressing 2 (not the Num-Block one) to hide the entire model (thus getting a look at the picture) and 1 to reveal the mesh again.
::继续沿着狼的路上工作,将块与图片相匹配.如果您因为模型在路上出现问题而无法看到图片,那么让我们隐藏模型.在编辑模式中,在模型上按 A 或按 L 时选择整个模型.只需按 H,就会隐藏选定的项目.要打开视图,请使用 ALT + H .通过隐藏和打开模型或模型的部分,您应该能够继续使用图片作为指南. 注意:更容易地通过,比如,按 2 (而不是 Num-Block) 来隐藏整个模型 (从而查看图片),并按 1 再次显示网格来切换层.
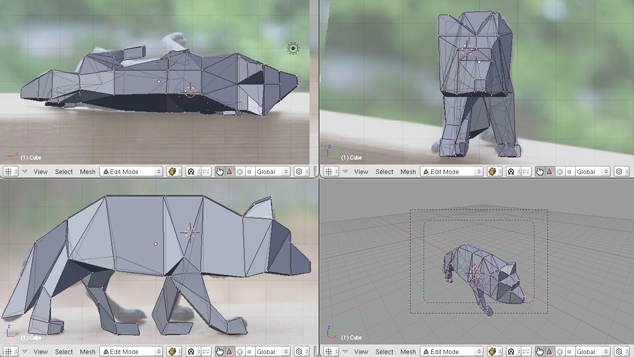
Once you have the first pass done, you'll notice that the model just won't fit all three pictures correctly. This is due to parallax. The most obvious example is the side view. The four feet should be level, as they are all standing on a flat surface. Since they are not, we'll just ignore some of the aspects of each picture and continue with the model. (This is a helpful example to show what you need to consider when taking your own pictures.)
::一旦你完成了第一遍,你会注意到模型不会正确地适合所有三个图片.这是由于偏.最明显的例子是侧面.四个脚应该是平面,因为它们都站在平面上.因为它们不是,我们将忽略每个图片的一些方面并继续使用模型. (这是一个有用的例子来展示你在拍摄自己的照片时需要考虑什么.)
Figure 2.3.5
Completed rough fit
::图2.3.5 完成粗装
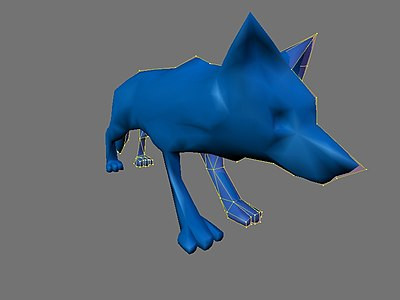
Subsurf the model
::通过模板进行潜水
Now that the rough fit is done, let's smooth out the wolf. Add a Subsurf modifier and set the Levels to 2. The wolf will now be smoothed, but we want to add some of the hard lines back into the model. This may be accomplished with creased edges.
::现在粗的合适完成了,让我们平滑狼. 添加一个Subsurf修饰器并将Levels设置为2. 狼现在将被平滑,但我们希望将一些硬线重新添加到模型中. 这可能通过纹边缘实现.
Select Edges or faces you want to crease and press
SHIFT + EKEY
. Use the mouse and pull away from the center until the Crease value is close to what you want. A value of +1.000 will give you the sharpest look and is useful for places such as the bottoms of the paws. When an edge has been creased, the edge will be highlighted in yellow (positive crease) or black (negative crease). These highlights are shown due to the 'Draw Creases' button being turned on.
::选择要曲的边缘或面部,然后按 SHIFT + EKEY.使用鼠标从中心拉开,直到曲值接近您想要的值.值为 +1.000 将给您最清晰的外观,并且对爪子底部等位置有用.当边缘被曲时,边缘将以黄色 (正曲) 或黑色 (负曲) 亮出.这些亮点是由于'绘制曲'按被打开而显示的.
In this example, I creased edges along the paws, tail, ears, and nose to give them some sharpness.
::在这个例子中, 我在爪子,尾巴,耳朵和鼻子的边缘上了一些,
Figure 2.4.1
Creased edges
::图2.4.1 纹边缘
The last step is to refit the model to the pictures. You may have noticed that when the model was smoothed, the result didn't quite fit to the pictures. Now is a great time to tweak the vertices to fit to the pictures or add to/modify the model.
::最后一步是将模型重新调整到图片上.你可能已经注意到,当模型被光滑时,结果并不完全符合图片.现在是调整顶点以适应图片或添加/修改模型的好时机.
Noob note: if you see a weird edge on the body after smoothing, check the face normals (F9 > Mesh Tools More > Draw Normals; and then W > Flip Normals on the culprit faces).
::如果在平滑后看到身体有奇怪的边缘,请检查面部正常 (F9>网格工具更多>绘制正常;然后W>翻转正常在罪祸首的面部).
And here is my basic wolf based on three pictures!
::这里是我根据三张图片的基本狼!
Figure 2.4.2
Final toy wolf model

::图2.4.2 玩具狼的最终模型
Method 2 (using mirroring)
::方法2 (使用反射)
In this alternative method we will do half a wolf and then mirror it to create a complete wolf. You should start out by creating a silhouette of the wolf body in the side view, and then in front view start to shape the wolf head, tail and legs...
::另一种方法是我们将做半个狼,然后将它镜像化, 创造一个完整的狼. 你应该从侧面的狼体的轮开始,
Noob Note:
If you are attempting this method, it is best to avoid using triangles in rounded areas of a Mesh, because they tend to cause artifacts in your model (artifacts are protruding edges or other things that don't look realistic). Using quads is a much better alternative. Triangles should only be used on flat areas of your mesh if they cannot be avoided.
::笔记:如果你尝试这种方法,最好避免在网格的圆形区域使用三角形,因为它们往往会在模型中造成工件 (工件是突出的边缘或其他看起来不现实的东西).使用四边形是一个更好的替代方案.如果不能避免,则应在网格的平面区域使用三角形.

Here is what you should end up with
::这就是你应该得到的
Using mirroring with method 1
::使用方法1的反射
You can also use mirroring with the first method (the one with cube extrusions).
::您也可以使用第一种方法 (用立方体挤出方法) 进行镜像.
This can speed up your work as you don't have to do the same changes on each side of the fox - just once.
::这样可以加快你的工作速度, 因为你不必在狐的两侧做同样的改变 - - 只要一次.
To start the mirroring:
::开始镜像:
-
Go to Editing (
F9
)
::进入编辑 (F9) -
In the
Modifiers
panel, add a
Mirror
::在修改器面板中,添加镜像 -
Check only the
Y
button
::只有Y按
When modeling:
::在模特时:
-
You may want to adjust the
Merge Limit
value (e.g. 0.14): this means vertices too close to each others (after the mirroring) will be merged, thus avoiding artifacts along the mirror's axis.
::您可能需要调整合并极限值 (例如0.14):这意味着彼此太近的顶点 (镜像后) 将被合并,从而避免沿镜子轴的工件. -
Remove the faces along the mirror's axis, otherwise Subsurf will be confused by the faces
inside
the body of the mirrored fox. Keep all the faces for the legs though.
::删除镜子轴上的面孔,否则Subsurf会被镜子中的狐身体中的面孔所迷惑. -
To move the legs differently on each side: when you're done modeling the rest of the fox, apply the Mirror modifier, and then work on each leg independently.
::为了在每一边不同地移动腿部:当你完成了对狐的模拟后, 应用镜像修改器, 然后独立地对每一条腿部进行工作.
Detailed steps to align images using GIMP
::使用GIMP对齐图像的详细步骤
From this point forward there are multiple ways to do exactly the same thing, however for simplicity's sake and so that I can be more detailed I will be using one method (the one which I use) and be using GIMP.
::现在有很多方法可以做同样的事情,但是为了简单,以便我能更详细,
I found it best to size all the photos to a known width, with an easy way to find center. (Mine happened to be 850x638 pixels, I don’t recommend that but you can choose any size you want really, as long as all of them are the same size). Then drag the construction lines to form a crosshair in the middle of the photo. To do this, click on the top ruler, and drag down to the middle (Exact middle) of the photo, then click on the side ruler and drag across to the middle (Again exact middle) of the photo.
::我发现最好是将所有照片大小调整为已知宽度,以轻松找到中心. (我的是850x638像素,我不建议,但你可以选择任何你想要的尺寸,只要它们都相同大小. 然后拖动构造线在照片的中间形成一个十字线. 要做到这一点,点击顶部线条,并拖向下到照片的中间 (确切的中间),然后点击侧线条并拖向照片的中间 (再次确切的中间).
If you are having trouble finding the exact middle of the photo, move the cursor to the very bottom left of your photo and the height of your photo will be listed at the bottom left of the GIMP interface. The numbers are listed in an (x,y) format so you want the first number to say 0 and the second to be the largest you can make it by dragging your cursor. The second number is the height, and half of that is the middle of your photo. You can do the same with the top ruler to find the vertical middle of your photo. Only this time the co-ordinates at the bottom left of the GIMP interface should list the second number as 0, and the first number should be as large as you can make it by moving your cursor (to the upper right of the photo). Once you have your width again half of that will be the middle of your photo.
::如果您在找出照片的确切中间位置有问题,请将光标移到照片的左下方,照片的高度将在GIMP界面的左下方列出.数字以 (x,y) 格式列出,所以您希望第一个数字表示0和第二个是最大的,您可以通过拖动光标来实现.第二个数字是高度,其中一半是您的照片的中间.您可以使用上方的统治符来找到您的照片的垂直中间.只有这一次,GIMP界面的左下方坐标应该将第二个数字 列为0,并且第一个数字应该尽可能大,您可以通过移动光标 (到照片的右上方).一旦您有了您的宽度的一半,那将是您的照片的中间.
Then using construction lines put one at the top of your object, and the bottom of your object. Find the "height" of your object by the distance between them. Remove the construction lines from the top and the bottom, and place a new construction line above the horizontal center line by the half of the "height"(of your object). Now place a construction line on both sides of your object and find the “width” (distance between the new vertical lines), then remove those construction lines and place a new construction line vertically half of the "width"(of your object) to the right of the vertical center line. Now cut the object out, and drag it so that the point you used as the "top" is on the horizontal construction line that is above the middle. Then Drag the photo left or right until the right edge of the object is on the vertical construction line you put in right of the middle construction line.
::然后使用构造线把一个放在对象的顶部,和对象的底部.通过它们之间的距离找到对象的"高度".从顶部和底部移除构造线,并将一个新的构造线放置在水平中心线上方,以"高度"的一半.现在把一个构造线放在对象的两侧,找到"宽度" (新垂直线之间的距离),然后移除这些构造线,并将一个新的构造线垂直地放置在垂直中心线的右边.现在切出对象,并拖动它,使您作为"顶部"使用的点位于位于位于中间以上的水平构造线上.然后将照片拖向左或右,直到垂直对象的右边在您在中间构造线的右边置于垂直构造线上.
Now the center of your object is at the center of your photo. This is a very important thing because when blender loads in the picture you will need this so that all of your pictures match up with each other 3d. You should repeat these steps with all 3 photos. I also don't recommend doing it in GIMP's "layered mode" as that caused more pandemonium for me. I recommend opening each photo in a new window .
::现在你的对象的中心是你的照片的中心. 这是非常重要的,因为当混合器在图片中加载时,你需要这样做,这样所有的图片都会相互匹配3d. 你应该重复这些步骤与所有3张照片. 我也不建议在GIMP的"层次模式"中这样做,因为这给我带来了更多的混乱. 我建议在新窗口中打开每张照片.
Taking your pictures is the most important part, because if the pictures are not all in the same scale (object size to photo size) then your photos will not line up and you won't be able to place a dot on the same location from front view, side view, and top view.
::拍摄照片是最重要的部分, 因为如果照片不是所有在同一尺度 (对象大小到照片大小), 那么你的照片将不会排列, 你将无法放置一个点在同一位置从前方, 侧面, 和顶部.
As a recommendation I would recommend making your first model from a Lego man. That is what I did and it is very simplistic easy practice. To take my photos I took about 10 minutes to construct a photo platform for my object. It consisted of a cardboard box with two sides cut out. I covered the inside area with computer paper. I then used a 2”x4” and a ruler to make sure that the box stayed the same distance from the camera for all shots, as well as marking where the Lego man’s feet were positioned inside the box with a pencil. This will provide good pictures, providing you keep the camera at the same distance and zoom for all three photos.
::作为一个建议,我建议你从乐高人身上制作你的第一个模型.这就是我做的,这是非常简单的简单实践.为了拍摄我的照片,我花了大约10分钟来为我的对象构建一个照片平台.它由一块两边被切出的纸板盒组成.我用计算机纸覆盖了内部区域.然后我用2x4和一个统治者确保盒子与摄像机保持相同的距离,以及用笔标记乐高人脚在盒子内部的位置.这将提供良好的图片,提供你保持相机在相同的距离和放大三张照片.