Blender 3D:零基础到专业级-单元2:基本建模和着色
Goal
::目标
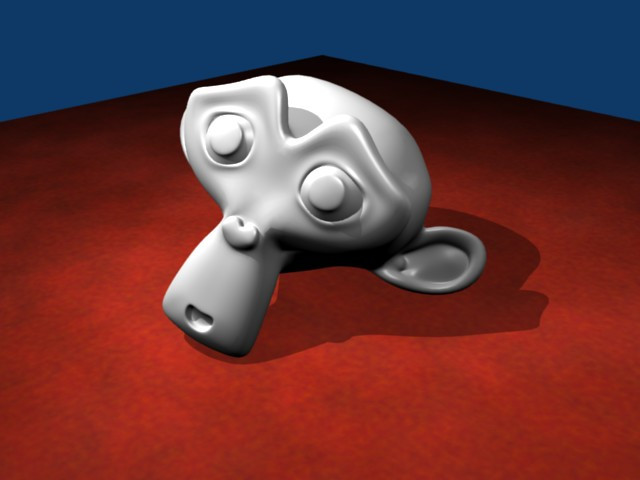
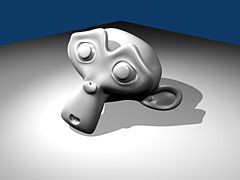
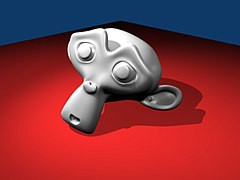
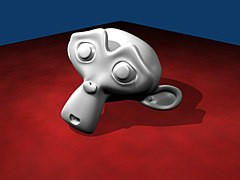
I am using a basic scene that I quickly set up before I started to create the carpet material. It shows a monkey (suzanne), a plane, camera, 3 area lamps and 1 spot lamp.
::我使用了一个基本的场景, 我很快就开始创建地毯材料. 它显示了一个子 (苏珊娜), 一架飞机, 摄像机,3个区域灯和1个点灯.
The purpose of this tutorial, is to highlight the power of blenders built in shaders and procedural textures to create a carpet material to use in your scenes.
::让我们来看看在影子和程序结构中构建的混合器的力量,
NOTE:  For those of you needing help getting a similar scene to the one above, here are some axis positions,etc. to help out:
(Spot-Lamp)-X=1.62,Y=0.86,Z=6.74;rotation-X=37.26,Y=3.16,Z=181.34;
(Area-Lamp-1)X=4,Y=3.27,Z=4.12;rotation-X=54.67,Y=-18.59,Z=-109.47;
(Area-Lamp-2)X=-2.07,Y=-2.08,Z=4.85;rotation-X=29.37,Y=-28.98,Z=355;
(Area-Lamp-3)X=0.315,Y=-2.89,Z=4.29;rotation-X=49.23,Y=-10.63,Z=6.68;
(Monkey)X=0.05,Y=0,Z=0.42;rotation-X=58.61,Y=-16.07,Z=23.245;DIM(dimensions)X=2.734,Y=1.969,Z=1.703;
(Plane)x=0,y=0,z=0;(no rotation);Dimensions: X&Y=14.30,z=0.
Alternatively, you could also download
a pre-made file
in case that you're in a hurry.
::另外,如果你急于下载,
Noob Note:
Try adjusting each of the area lamps Dist(ance) value.
::试着调整每个区域灯的距离值.
Noob Question:
How does the above coordinates help me at all? I haven't found anything that tells me were in 3D space object actually is or the objects dimensions little alone control them. Nothing in the Tutorial up to now even gives a clue to this.
::问:上述坐标有什么帮助? 我没有找到任何告诉我在3D空间物体实际上是或物体的维度单独控制他们. 没有在教程到现在甚至给出一个线索.
Noob Answer:
Hit 'N' to bring up the Transform Properties window and enter the values there.
::打"N"打开"转换属性"窗口,
The Basic Material and Shader Settings
::基本材料和遮光器设置
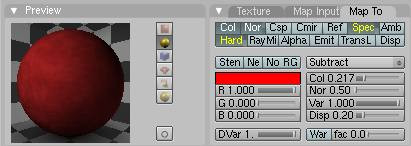
For the basic material for the carpet set the color settings of your material as follows -
Col (R 0.714) (G 0.134) (B 0.134) Dark Red
Spe (R 0.590) (G 0.210) (B 0.084) Reddish Brown
Mir (R 1.000) (G 1.000) (B 1.000) White
::对于地毯的基本材料,请设置您的材料的颜色设置如下: -Col (R 0.714) (G 0.134) (B 0.134) 暗红Spe (R 0.590) (G 0.210) (B 0.084) 红色棕Mir (R 1.000) (G 1.000) (B 1.000) 白色
Noob Note:
Copy paste-able hex values: Dark Red (DC6666), Reddish Brown (CA7E52) and White (FFFFFF)
::编辑器:Noob 注:可复制粘贴的六边形值:深红色 (DC6666),红棕色 (CA7E52) 和白色 (FFFFFF)
Change the specular shader to ('phong') and leave the default lambert diffuse shader as it is. Change the ('spec') to [0.13] and the ('hard') to [12]. Lastly click the ('Full Osa') button to enable it. If you render now you will notice that the plane looks like an ugly pastel color (if not, you have a different lighting setup to mine and the shader will not look the same as the images in this tutorial.) Don't worry about this ugly looking plane it will soon be a beautiful carpet.
::改变镜像影像器为 ('phong') 并将默认的兰伯特扩散影像器保持原样.将 ('spec') 改为 [0.13] 和 ('hard') 改为 [12].最后点击 ('Full Osa') 按以启用它.如果现在进行染,您会注意到飞机看起来像一个丑的色彩 (如果不是,您的照明设置与我的不同,影像器将与本教程中的图像看起来不一样).不要担心这个丑的飞机,它很快就会成为一个美丽的地毯.

Cloud Texture 1
::云质感1
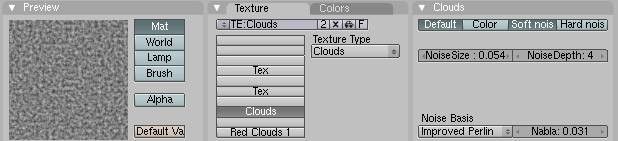
Press 'F6' on the keyboard to bring up the texture panel. Click the bottommost of the long boxes to create a texture in the bottom channel. Create a new texture and rename it something like 'Red Clouds 1'. From the ('Texture Type') pull down select clouds. In the 'Clouds' settings panel change ('NoiseSize') to [0.210] and ('NoiseDepth') to [4].
::按键盘上的"F6"来显示纹理面板.点击最底的长框,在底部的道中创建一个纹理.创建一个新的纹理,并将其更名为"红色云1".从 ("纹理类型") 下拉选取云.在"云"设置面板中,将"噪音大小"更改为[0.210]和"噪音深度"更改为 [4].
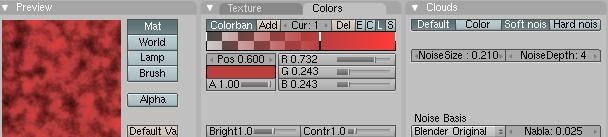
Now select the Colors tab which will bring up the ColorBand for the texture. Press the orange ('Add') button to add a cursor on the colourband. Next make sure the 'Cur : 0' is showing next to the add button and change the colours as follows - (R 0.770, G 0.168, 0.168). Now click on right side of the 'Cur : 0' so it shows 'Cur : 1'. Change 'Pos' to 0.6. Set Alpha to 1 and change the colour to (R 0.732 G 0.243 B 0.243).
::现在选择"颜色"选项卡,将显示纹理的颜色带.按色 ('添加') 按添加光标.接下来确保"颜色: 0"显示在添加按旁边,并如下更改颜色 - (R 0.770,G 0.168,0.168).现在点击"颜色: 0"的右侧,以便显示"颜色: 1".将"位置"设置为0.6.将Alpha设置为1并更改颜色为 (R 0.732 G 0.243 B 0.243).
Now go back into the material settings and change the settings in the Map To tab as follows. Click ('Spec') twice so the text becomes yellow do the same for ('Hard'). Now select 'Subtract' for the texture blending mode. Change ('Col') to [0.188].
::现在回到材料设置,并如下更改"映射到"选项卡中的设置.点击 ("特征") 两次,使文本变为黄色,对 ("硬") 进行相同操作.现在选择"减去"以进行纹理混合模式.将 ("颜色") 更改为[0.188].

At this stage if you render you might find it hard to notice the difference, it is apparent only where there is low light levels on the plane, don't worry about this at the moment. It means if you render with Ambiant Occlusion you get a nice carpet effect of slightly varying colour.
::现在,如果您使用染,您可能很难注意到差异,它只在平面上有低光水平时才会显现出来,目前不要担心.
Cloud Texture 2
::云质感2
Go back to the texture panel and create another texture, call it 'Clouds' and put it in the channel above 'Red Clouds'. Change ('NoiseSize') to [0.054] and ('NoiseDepth') to 4. Select 'Improved Perlin' from the Noise Basis pull down. Finally change ('Nabla') to [0.031]. Do not change any more settings here.
::回到纹理面板,创建另一个纹理,称之为"云"并将其放在"红云"以上的频道中.将"噪声大小"更改为[0.054],并将"噪声深度"更改为4.从噪声基础拉下来选择"改进的Perlin".最后将"Nabla"更改为[0.031].在这里不要更改任何设置.
Now in the material panel, under the Map To tab change the following - Click ('Nor'). Click ('Spec') and ('Hard') twice so as they are yellow.
::现在在材料面板中,在"映射到"选项卡下,改变以下内容 - - 点击"也没有"",特异"和"硬度"两次,使它们呈黄色.
As you can see the material is starting to look a bit better, only 2 more textures to go.
::现在, 材料看起来有点好了, 剩下两种纹理.
The Final Cloud Texture
::最后一个云的纹理
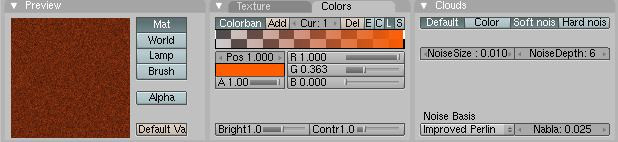
Switch to the texture panel once again and create a new Clouds texture in the next channel up. Change ('NoiseSize') to [0.010] and ('NoiseDepth') to [6]. Now click on the 'Colors' tab and change the colour of the left cursor ('Cur : 0') to (R 0.713 G 0.262 B 0.223) and Alpha to 0. Switch to Cursor 1 ('Cur : 1') and its colour settings (R 1.000 G 0.363 B 0.000) and Alpha to 1.
::再一次切换到纹理面板,并在下一个上方的道创建一个新的Clouds纹理.将"噪声大小"更改为[0.010]和"噪声深度"更改为 [6].现在点击"颜色"选项卡,将左侧光标的颜色 ("光标: 0") 改为 (R 0.713 G 0.262 B 0.223) 和Alpha 改为0.切换到光标1 ("光标: 1") 和其颜色设置 (R 1.000 G 0.363 B 0.000) 和Alpha 改为1.
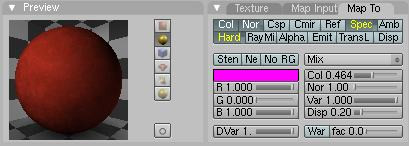
Now in the materials panel under the 'Map To' tab Click ('Nor'). Click ('Spec') and ('Hard') twice so as they are yellow. Leave the blending mode as 'Mix'. Change ('Col') to [0.464] and ('Nor') to [1.00].
::现在在"地图到"选项卡下的材料面板中,单击 ("Nor"). 单击 ("Spec") 和 ("Hard") 两次,使它们变成黄色. 留下混合模式为"Mix". 将"Col"变为[0.464],而"Nor"变为[1.00].

The Last Texture
::最后一个纹理
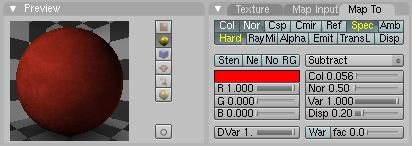
Finally, go to the textures panel one last time. Create a new Stucci texture in the next channel up. Change ('NoiseSize') to [0.006] and ('Turbulence') to [10.94]. Click on the 'Colors' tab. The first cursor 'Cur : 0' should be black with alpha 0. 'Cur : 1' should be red (R 1.000 G 0.000 B 0.000) with alpha 1.
::最后,最后一次进入纹理面板.在下一个上方的频道中创建一个新的Stucci纹理.将 ('NoiseSize') 改为[0.006]和 ('Turbulence') 改为[10.94].点击'Colors'选项卡.第一个光标'Cur: 0'应该是黑色的,字母为0. 'Cur: 1'应该是红色的 (R 1.000 G 0.000 B 0.000),字母为1.

Now go to the materials panel. Under the 'Map To' tab Click ('Nor'). Click ('Spec') and ('Hard') twice. Change the Blending type to 'Subtract'. Change ('Col') to [0.056] and ('Nor') to [0.50]. And that's it. When you render now, you should have a nice-looking carpet material. By tweaking with the colours you can create any colour of carpet.
::现在进入材料面板. 在"Map To"选项卡下,单击 ("Nor"). 单击 ("Spec") 和 ('Hard") 两次. 将混合类型更改为"减去". 将"Col") 更改为[0.056]和"Nor") 改为[0.50]. 完成了. 当你现在染时,你应该有一个漂亮的地毯材料. 通过调整颜色,你可以创建任何地毯颜色.