Blender 3D:零基础到专业级-单元3:拓展视野
UV mapping is a technique used to "wrap" a 2D image texture onto a 3D mesh. "U" and "V" are the names of the axes of a plane, since "X", "Y" and "Z" are used for the coordinates in the 3D space. For example: increasing your "V" on a sphere might move you along a longitude line (north or south), while increasing your "U" might move you along a line of latitude (east or west).
::紫外线映射是一种用于将二维图像纹理"包裹"在三维网格上的技术. "U"和"V"是平面轴的名称,因为"X", "Y"和"Z"用于3D空间中的坐标.例如:增加一个球上的"V"可能会使您沿着一个经线 (北或南),而增加一个"U"可能会使您沿着一个线 (东或西) 移动.
Another explanation can be gleaned from the Blender manual. Imagine a paper 3D model of an object, e.g. a sphere, that is to be laid flat on a table. Each of the 3D coordinates of the sphere can be mapped to the 2D coordinate on the flat piece of paper. Blender provides another view of the vertices (coordinates) in the UV/Image Editor. You can select and edit these 2D vertices just like in the 3D Editor window. The purpose of this unwrapping of the coordinates is just to map these coordinates to images/pictures so that the 3D image can have a realistic looking surface with textures derived from these images.
::另一个解释可以从Blender手册中获取. 想象一下一个物体的纸质3D模型,例如球体,将其平放在桌面上.球体的每个3D坐标都可以映射到平面纸上的2D坐标上. Blender在UV/图像编辑器中提供了顶点 (坐标) 的另一个视图.您可以像在3D编辑器窗口中一样选择和编辑这些2D顶点. 坐标的解封的目的只是将这些坐标映射到图像/图片上,以便3D图像可以具有从这些图像中衍生的真实表面.
The Basics of UV Mapping
::紫外线测绘的基础
Add a sphere
::添加一个球体
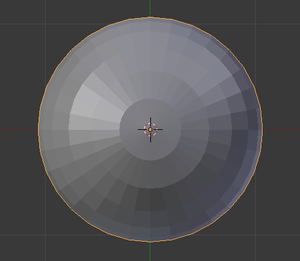
We'll use a sphere for this demonstration. Delete the initial cube ( A + X ). Then, create a new model, a sphere (
Shift + A
→ Add → Mesh → UV Sphere). Leave the settings at default for now.
::我们将使用球体进行示范.删除初始立方体 (A+X).然后,创建一个新的模型,球体 (Shift+A → Add → Mesh → UV Sphere).暂时将设置置为默认.
Mark a UV seam
::标记一个紫外线
In edit mode, select a ring of vertices around the widest part of the sphere (the equator, if you will). This can be done easily by holding down Shift + Alt and left-clicking on the 'equator'.
::在编辑模式下,选择一个环的顶点围绕球的最宽的部分 (赤道,如果你愿意).这可以很容易地通过按住Shift + Alt和左键单击'赤道'.
Press Ctrl + E and select
Mark Seam
, or select
Mesh
→
Edges
→
Mark Seam
. This tells the UV unwrapper to cut the mesh along these edges.
::按Ctrl + E,选择标记接,或选择网格 → 边缘 → 标记接. 这告诉UV拆封器沿着这些边缘切割网格.

Unwrap the mesh
::拆开网格
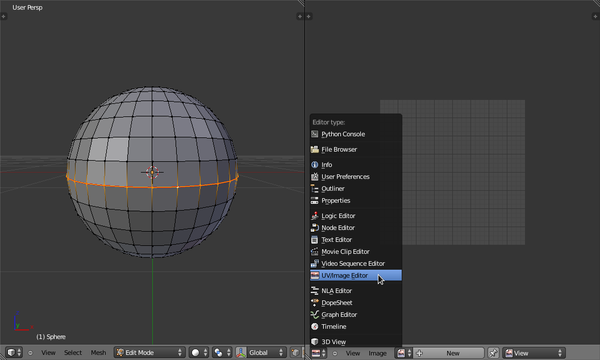
Next, create a window for the UV mapping: click and drag left the small lined area in the top right corner of the 3D window, a new window will be created. Set its window type to "UV/Image Editor" with the drop down box at the bottom left corner of the new window or with Shift + F10 .
::接下来,创建一个窗口为UV映射:点击和拖动左边的小排线区域在3D窗口的右上角,一个新的窗口将被创建.设置其窗口类型为"UV/图像编辑器"下拉框在新窗口的左下角或通过Shift + F10 .
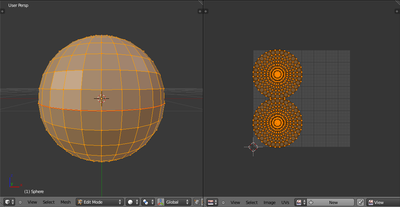
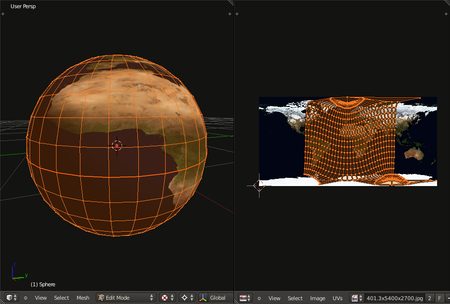
In the 3D View window, select all your vertices by pressing A , and press U →
Unwrap
. In the UV/Image editor you should see all the vertices/faces/edges of the model represented, or 'mapped', in 2D space.
::在3D视图窗口中,按A,选择所有顶点,然后按U → Unwrap.在UV/图像编辑器中,您应该看到模型的所有顶点/面/边缘都在二维空间中表示或"映射".
If you don't see anything, you need to select UV Editing from the Screen Layout dropdown in the UV/Image editor window.
::如果您没有看到任何内容,请在UV/图像编辑器窗口的屏幕布局下拉列表中选择UV编辑.
Apply an image
::应用一个图像
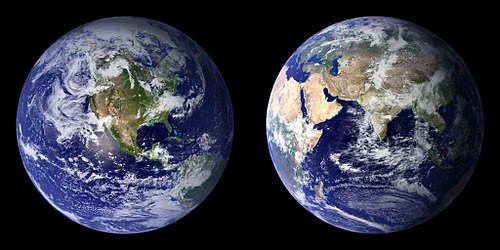
Now we're going to actually use this UV map. Save the following image (click to view in full high resolution (4,096 × 2,048 pixels)):
::现在我们将使用这个UV图. 保存下面的图像 (点击以查看全高分辨率 (4,096 × 2,048像素):
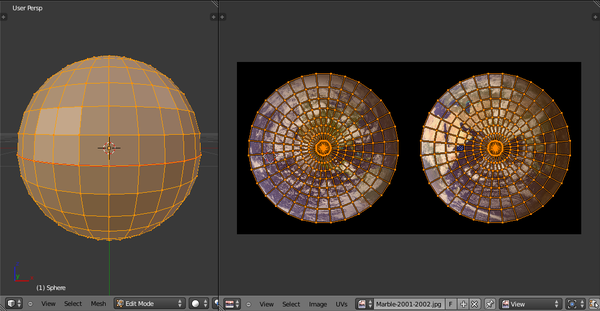
Load it in the UV/Image Editor window by clicking
Image
→
Open Image
or by pressing Alt+O . Then with the grab, rotate and scale tools, adjust the UV islands (the UV groups that aren't connected to each other) so that it fits nicely on top of the image as shown. To select a UV island, hover the mouse over the island and press a vertex and L .
::在UV/图像编辑器窗口中,通过点击图像 → 打开图像或按 Alt+O 进行加载.然后使用抓取,旋转和缩放工具,调整UV岛 (彼此不连接的UV组),使其像图像的顶部一样适合. 为了选择UV岛,请将鼠标移动到岛上,然后按一顶点和L.
Note: Since the aspect ratio of the image will warp the UV's, it may be easier to simply re-unwrap the mesh exactly the same way you did before. You can then adjust the UV's as needed.
::注意:由于图像的尺寸比会扭曲紫外线,所以简单地重新打开网格,就像以前一样.然后根据需要调整紫外线.
If you have issues fitting to the image use X and Y letters after pressing S. This will adjust the shape to fit the image.
::如果您有问题适合图像使用X和Y字母按S后. 这将调整形状适合图像.
[S]cale, [R]otate, [G]rab, [B]order selection, [A] Select/Deselect all
::[S] 尺度, [R] 转动, [G] 抓取, [B] 边界选择, [A] 选择/删除所有
Admire your new creation
::欣赏你的新创造
Back in the 3D View window, go into Object mode. The next drop-down menu to the right of the mode menu is the Viewport Shading (Draw Type) menu; use it to set the Viewport Shading to Texture. Note that parts of the model will be shadowed and other parts illuminated based on the location of the lights in your scene. Try adding more lights and moving them around so you see the model more clearly, and try to use this lighting preview to 'Rough' your lights. (you can add more lights Shift-A-Lamp and right click lamp to move to where light is needed)
::在3D视图窗口中,进入对象模式. 下一个下拉菜单在模式菜单的右边是视图窗口遮 (绘图类型) 菜单;使用它来设置视图窗口遮到纹理. 请注意,模型的部分将会被遮,其他部分根据灯光在您的场景中的位置被照亮. 尝试添加更多的灯光并移动它们,以便您更清楚地看到模型,并尝试使用此照明预览来'粗'您的灯光. (您可以添加更多的灯光,使用Shift-A-Lamp和右键按灯光移动到需要光的地方)
To make the texture visible in renderings, you also need to add the texture to the sphere as a new material. In the Properties window, switch to the Material context by clicking the small shaded-sphere button. Create a new material by pressing the
New
button, leave the settings as they are for now; then switch to the Texture context. Create a new texture and select the type to be 'Image or Movie'. Select the globe texture from the dropdown menu.
::要使纹理在染中可见,您还需要将纹理作为新材料添加到球体中. 在属性窗口中,通过单击小阴影球体按切换到材料上下文. 通过按新按创建新材料,将设置保持如下;然后切换到纹理上下文. 创建一个新的纹理并选择"图像或电影"的类型. 从下拉菜单中选择地球纹理.

Then go to the mapping menu and set the Coordinates to 'UV' and the 'Map' to 'UVMap', leave the projection at 'Flat'. This will make use of the UV's we unwrapped earlier. To make the globe a bit smoother, switch to the Modifier context in the Properties window and add a subsurf modifier; set the number of subdivisions to 2. Then press T , if you had no Tool-shelf, in the 3D viewport and select 'Smooth' under the shading options. This will make the globe far smoother and more realistic.
::然后进入映射菜单,将坐标设置为"UV",将"地图"设置为"UVMap",将投影置于"平面".这将使我们之前解封的UV得到利用.为了使地球更平滑,请切换到属性窗口中的修改器上下文并添加一个下面修改器;将子划分数设置为2.然后按T,如果您没有工具架,在3D视图窗口中,并在遮阳选项下选择"平滑".这将使地球更平滑和更真实.
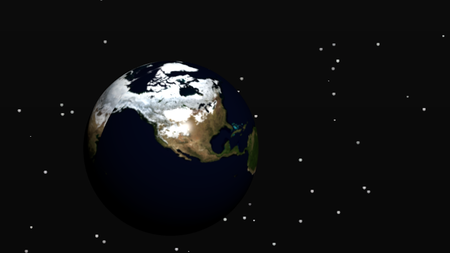
Now, simply press F12 to render your scene!
::现在,只需按F12即可染您的场景!
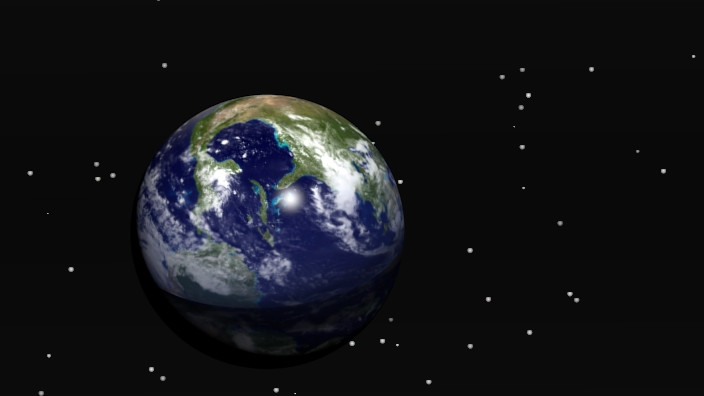
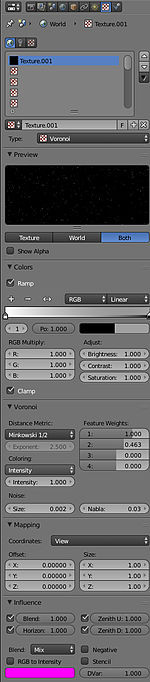
Note that in the above render I've changed the lighting and the camera position to make the image more interesting. I also added a star background, you can find the settings for this in the World context (a pretty relevant coincidence) in the Properties window and the texture settings for the World.
::为了让图像更有趣, 我更改了照明和摄像头位置. 我还添加了星背景, 你可以在属性窗口和世界纹理设置中找到这个设置.
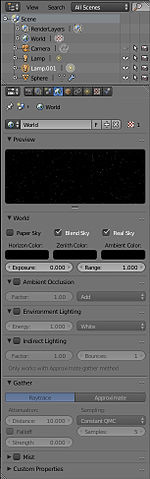
Go to the
World
properties and check both
Blend Sky
and
Real Sky
, set all 3 colours (Horizon, Zenith, Ambient) to
black
. Go to
Texture
settings and if you weren't already there, click on the
World
texture settings (upper left globe icon) and set the type to
Voronoi
. Scroll down to
Colors
panel and check
Ramp
and give Color Stop 0 a white color and an alpha of 1 and Color Stop 1 a black color and alpha of 0. Now some will happen magic: set
Distance Metric
to
Minkowski 1/2
, in
Noise
section set size to
.002
and set 2 of Feature Weights at around .5. Finally, in
Influence
panel, check
Horizon
,
Zenith Up
and
Zenith Down
. That will do the trick. In some older versions there was a standard option for this but it has "disappeared".
::进入世界属性,并检查Blend Sky和Real Sky,将所有3种颜色 (地平线,天际,环境) 设置为黑色.进入纹理设置,如果您还没有在那里,请单击世界纹理设置 (左上球形图标) 并将类型设置为Voronoi.向下滚动到颜色面板,并检查Ramp,并给颜色停止0白色和1的α,颜色停止1黑色和0的α.现在将发生一些神奇的事情:将距离度量设置为Minkowski1/2,在噪音部分设置大小为0.002和设置2个特征重量约为 .5.最后,在影响面板中,检查地平线,天际和天际.这将会有所作为.在一些旧版本中
Alternative method
::其他方法
If you looked around the textured globe we just made, you would have noticed that around the 'equator' there were lines, or 'seams', where the two UV islands met. This is a common problem with UV mapping and there are a couple of ways to avoid it. In our case, since we're using a sphere, the best way to remove the seams is to use spherical mapping.
::假如你看看我们刚刚制作的纹理球,你会注意到在'赤道'周围有线条,或者''在两个紫外线岛交集的地方. 这是一个常见的紫外线映射问题,有几种方法可以避免它. 在我们的情况下,因为我们使用的是球体,最好的方法是使用球形映射来去除.
First download one of the textures from this link:
http://earthobservatory.nasa.gov/Features/BlueMarble/BlueMarble_2002.php
. Then use this texture for your globe instead of the one we first downloaded.
::首先从这个链接下载其中一个纹理: http://earthobservatory.nasa.gov/Features/BlueMarble/BlueMarble_2002.php 然后使用这个纹理为您的地球,而不是我们最初下载的.
Go into edit mode, and select all the vertices of sphere. Press U →
Sphere Projection
. If you've got the UV/Image editor open you should see a very different UV map, as shown below. Note that only the 'Unwrap' option will use the seams we just made, all of the other options completely ignore it.
::进入编辑模式,选择球的顶点.按U →球投影.如果您打开了UV/图像编辑器,您应该看到一个非常不同的UV地图,如下所示.请注意,只有'解封'选项将使用我们刚才做的,所有其他选项完全忽略它.
You can also try, especially handy when you use a more detailed map in the place of the seam: First unwrap with cube projection and then with sphere projection. It's now a square like UV.
::您也可以尝试,尤其是在使用更详细的地图来代替接时, 首先用立方体投影解开,然后用球体投影. 它现在是正方形的,就像紫外线一样.
Now lets make the UVs fit more evenly over the texture. In the UV/Image editor, press
UVs
→
Constrain to Image Bounds
. This will make sure that during editing none of the UVs will go over the bounds of the texture; if they did, it would cause the texture to repeat itself in the area of the UVs outside the bounds.
::现在让UV光线在纹理上更均地适应. 在UV/图像编辑器中,按下UVs → Constrain to Image Bounds. 这将确保在编辑过程中没有UV光线会超出纹理的边界;如果他们这样做,它会导致纹理在边界之外的UV光线区域重复.
Now select all the UVs with A and scale them up till it is stopped by the image bounds. In my case, there is one vertex in the top-right corner, and a few in the bottom-right corner that are quite distant from the rest of the UVs; to fix this, I simply selected those vertices and moved them closer to the rest of the UVs.
::现在选择所有带有A的紫外线,并将它们缩放到图像边界中停止. 在我的情况下,右上角有一个顶点,右下角有几个与其他紫外线相距很远; 为了解决这个问题,我只选择了这些顶点,并将它们移动到其他紫外线的更近处.
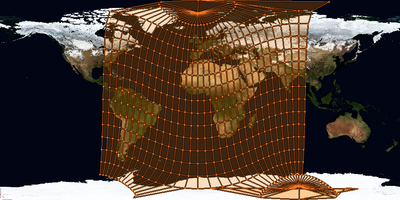
Now simply scale all the UVs by the X axis until the UVs stretch over all of the image. Doing this is exactly the same as scaling in the 3D viewport, press S and X , then drag the mouse.
::现在简单地将所有紫外线按X轴缩放,直到紫外线在整个图像上伸展. 这与在3D视窗中缩放完全相同,按S和X,然后拖动鼠标.
Now rerender your model, and you will see that there are no seams! You can also use an image with clouds. if you render this you will see seams. you can fake this away a bit by making the diffuse at material sea-blue by using the color picker after rendering the first render (If it looks good it is good).
::现在重新染你的模型,你会看到没有接!你也可以使用云的图像.如果你染这个你会看到接.你可以假装这有点通过使扩散在材料海蓝色使用颜色选择器后染的第一 (如果它看起来很好,它是好的.